Title: Tucano toon.
Post by: buccfan on August 25, 2012, 09:11:37 PM
Post by: buccfan on August 25, 2012, 09:11:37 PM
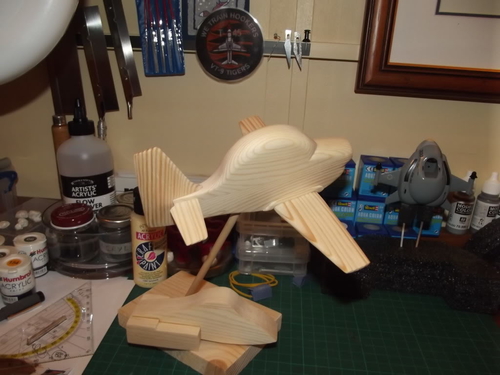
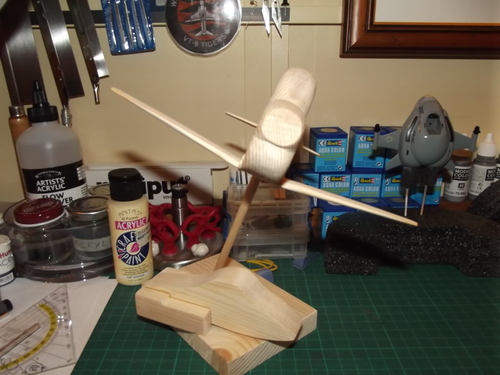
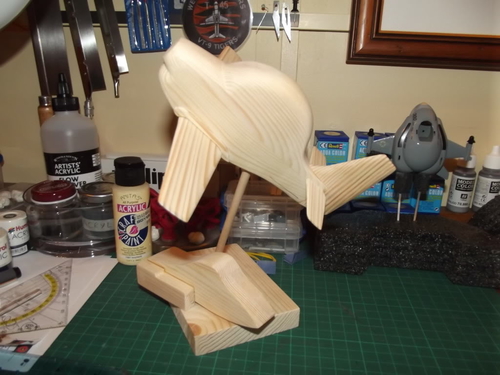
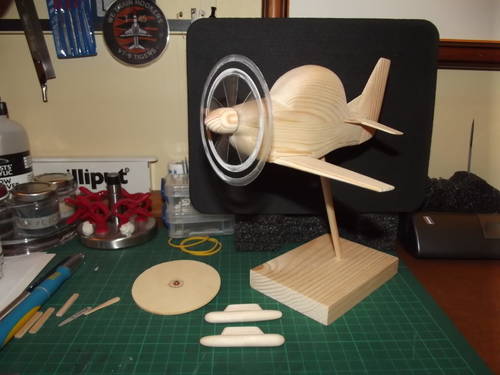
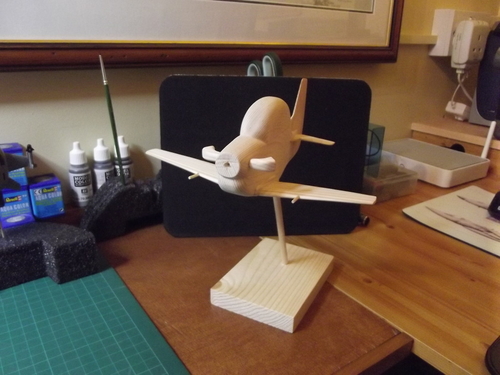
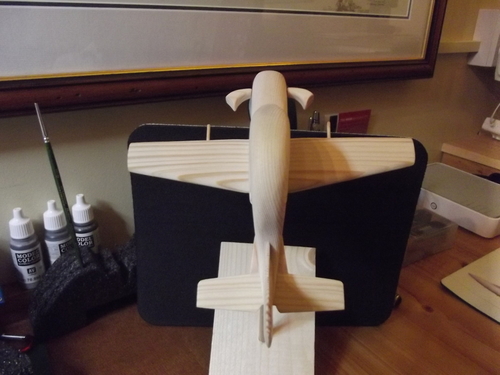
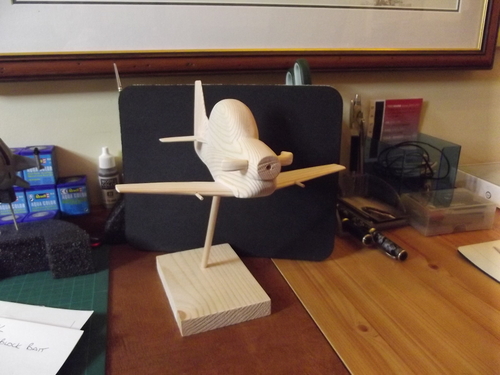
Following on from my last post in the cookup section, all the major parts glued together ready for some filling and sanding. I shall continue with templates for strakes and weapon pylons etc, and a spinning prop circle. Regards Paul J.
Title: Re: Tucano toon.
Post by: lastvautour on August 25, 2012, 10:57:07 PM
Post by: lastvautour on August 25, 2012, 10:57:07 PM
As mentioned before, great going. Just include a finished photo in the Group Build.
Lou
Lou
Title: Re: Tucano toon.
Post by: buccfan on September 16, 2012, 09:42:22 PM
Post by: buccfan on September 16, 2012, 09:42:22 PM
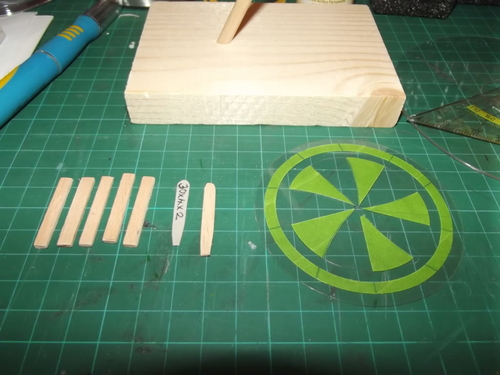
Prop disc or prop blades?. I suspect it will be blades. The disc I need to make is five bladed with a double warning ring. But as I only have inch tape available, when I have cut out the required areas the tape remaining is in small pieces so I fear the worst when sanding. If successful, I will have to remask the lower line of the inner warning ring before colouring. But I have cut out a set of blades just in case. Regards Paul J.
Title: Re: Tucano toon.
Post by: lastvautour on September 16, 2012, 10:25:23 PM
Post by: lastvautour on September 16, 2012, 10:25:23 PM
Looks promising.
Lou
Lou
Title: Re: Tucano toon.
Post by: buccfan on September 21, 2012, 08:32:26 PM
Post by: buccfan on September 21, 2012, 08:32:26 PM
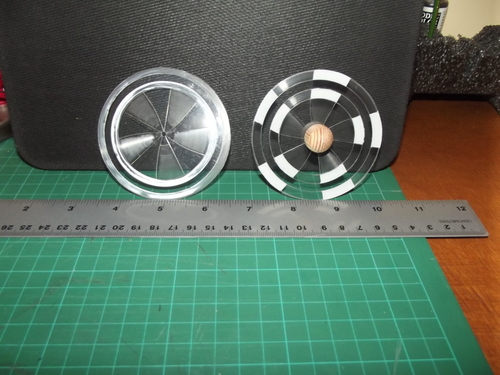
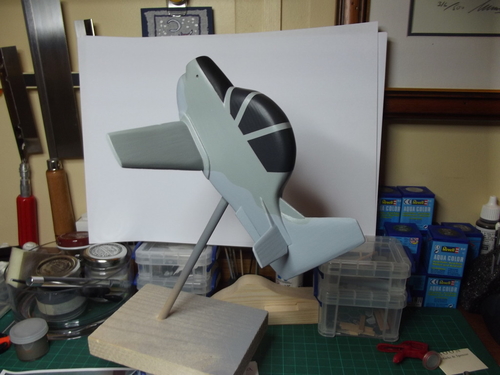
I think I will have another try at the spinning prop, the first attempt worked ok with the sanding process, but failed miserably at the warning circle painting stage. The paint would not spread evenly when spinning, it turned out blotchy. The resut in the picture is after I tried to sand it back, but that didn't work very well either. I was going to go with the prop blades, but since making the spinner I feel happier with the spinning prop. I will probably make both to see which I like best. Regards Paul J.
Title: Re: Tucano toon.
Post by: lastvautour on September 22, 2012, 05:15:01 PM
Post by: lastvautour on September 22, 2012, 05:15:01 PM
Your spinning prop looks great Paul. Are you up to making decals for the warning stripe? Check out my Yukon project.
Lou
Lou
Title: Re: Tucano toon.
Post by: buccfan on September 22, 2012, 08:05:37 PM
Post by: buccfan on September 22, 2012, 08:05:37 PM
Yes I saw that Lou, looks very effective. I might have a try.Regards Paul J.
Title: Re: Tucano toon.
Post by: buccfan on October 01, 2012, 07:24:42 PM
Post by: buccfan on October 01, 2012, 07:24:42 PM
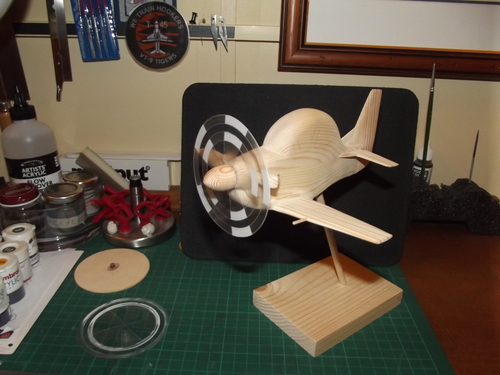
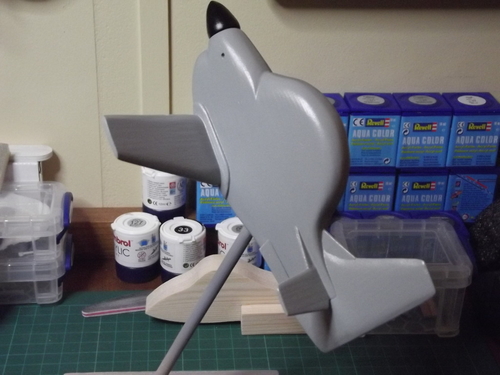
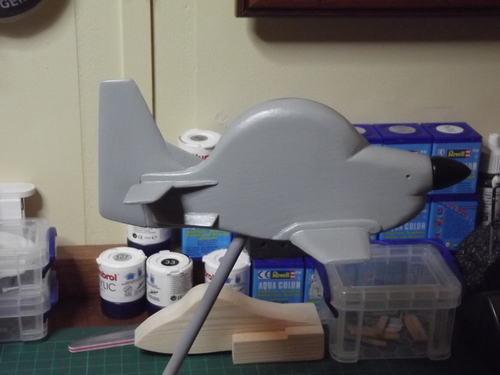
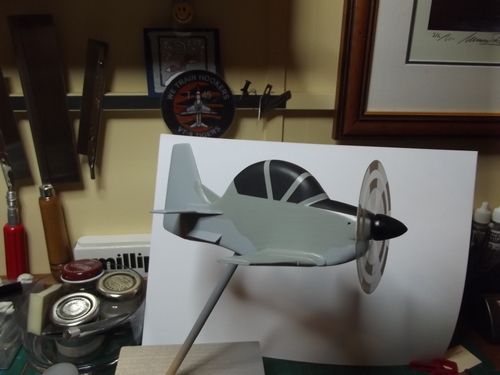
Made some progress today, gaps filled and sanded, exhausts made and drilled in place to be fitted final after painting, guns drilled in leading edge and temp fit till after paint. I decided to have another go with the spinning prop and I'm happier with this one. I mixed a drop of white with some satin acrylic varnish for the warning stripes, the light makes them look bright white in the pics but they aren't . I will try to get the first coat of primer on this week. A couple of pics of the progress. Regards Paul J.
Title: Re: Tucano toon.
Post by: lastvautour on October 01, 2012, 07:28:03 PM
Post by: lastvautour on October 01, 2012, 07:28:03 PM
The spinner and model look great Paul.
Lou
Lou
Title: Re: Tucano toon.
Post by: buccfan on October 02, 2012, 08:22:56 AM
Post by: buccfan on October 02, 2012, 08:22:56 AM
Thanks Lou, how did your gloss poly trials go?. Regards Paul J.
Title: Re: Tucano toon.
Post by: buccfan on October 02, 2012, 07:49:21 PM
Post by: buccfan on October 02, 2012, 07:49:21 PM
In the paintshop for primer coat 1. Regards Paul J. 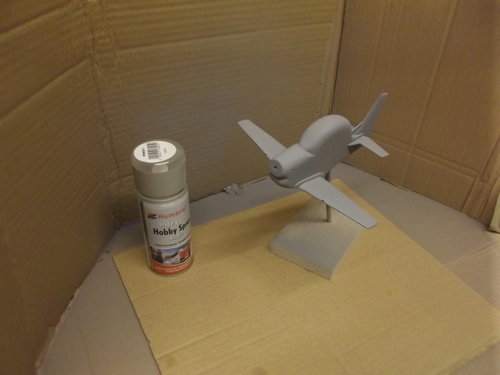
Title: Re: Tucano toon.
Post by: lastvautour on October 03, 2012, 01:00:29 AM
Post by: lastvautour on October 03, 2012, 01:00:29 AM
Things that dreams are made of. You have to love this hobby when things work out so well.
Lou
Lou
Title: Re: Tucano toon.
Post by: buccfan on October 03, 2012, 09:21:56 AM
Post by: buccfan on October 03, 2012, 09:21:56 AM
I couldn't agree more, unfortunately real life interferes and I have to do other jobs. >:( Happily the site is secured for another 3 years. ;D ;D ;D Regards Paul J.
Title: Re: Tucano toon.
Post by: buccfan on October 11, 2012, 08:35:23 PM
Post by: buccfan on October 11, 2012, 08:35:23 PM
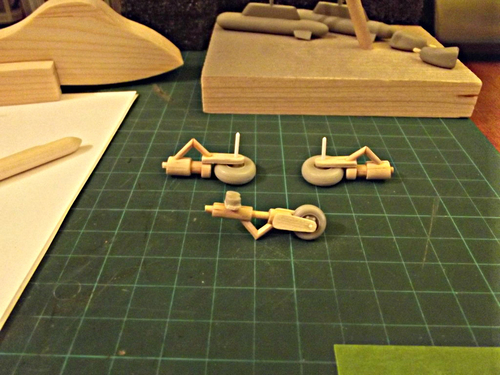
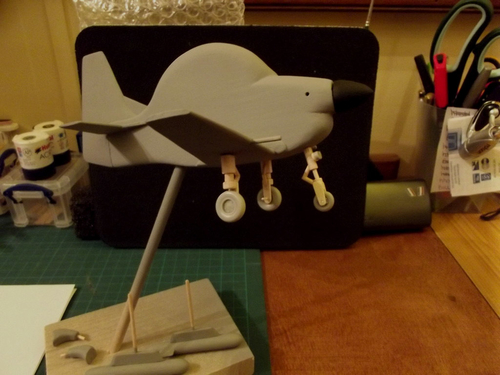
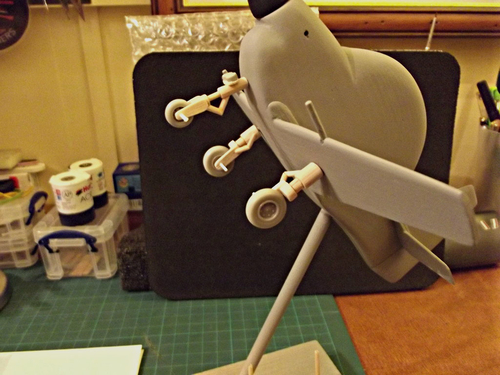
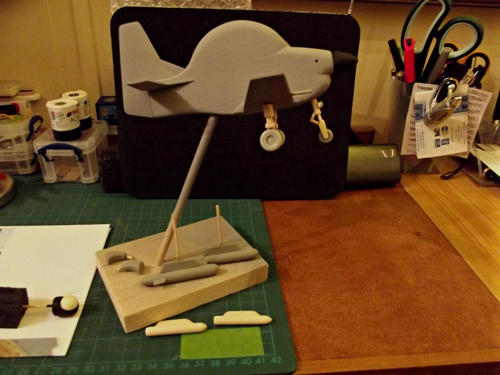
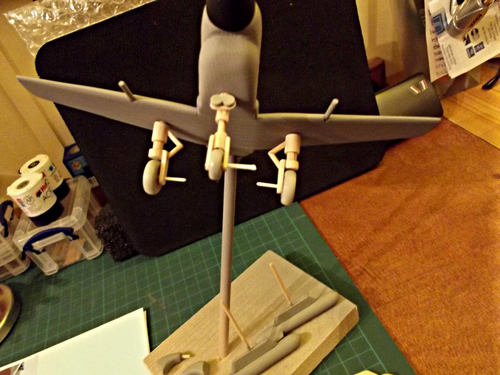
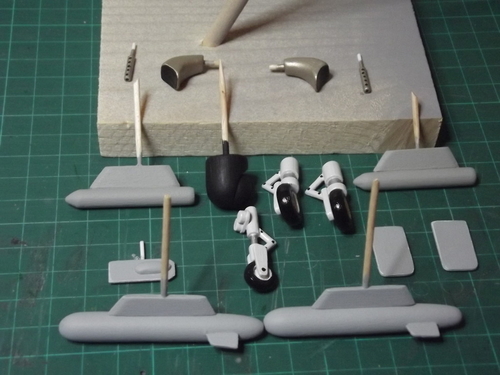
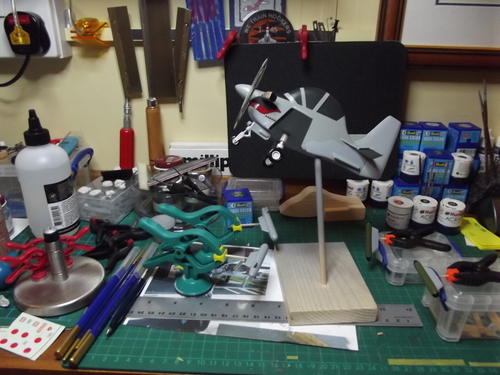
A bit more progress to report. Two coats of primer now done, I've been working on landing gear and extras. undercarriage made from mainly dowel and cocktail stick, but the wheels are from the spares box. Two rocket pods made along with a FLIR unit for the underside. U/C doors still to make then paint them all.Regards Paul J. ps images are a little dark, but the flash was too bright and washed them out.
Title: Re: Tucano toon.
Post by: Peter on October 11, 2012, 08:46:07 PM
Post by: Peter on October 11, 2012, 08:46:07 PM
Very impressive and detailed landing gear Paul!
Peter
Peter
Title: Re: Tucano toon.
Post by: lastvautour on October 12, 2012, 12:55:55 AM
Post by: lastvautour on October 12, 2012, 12:55:55 AM
Great looking undercarriage. Please send me your Photobucket adress so I can see a larger image.
Lou
Lou
Title: Re: Tucano toon.
Post by: buccfan on October 12, 2012, 09:24:52 AM
Post by: buccfan on October 12, 2012, 09:24:52 AM
Thanks for the comments Peter/Lou, I'll sort that address for you. Regards Paul.
Title: Re: Tucano toon.
Post by: buccfan on October 21, 2012, 08:18:17 PM
Post by: buccfan on October 21, 2012, 08:18:17 PM
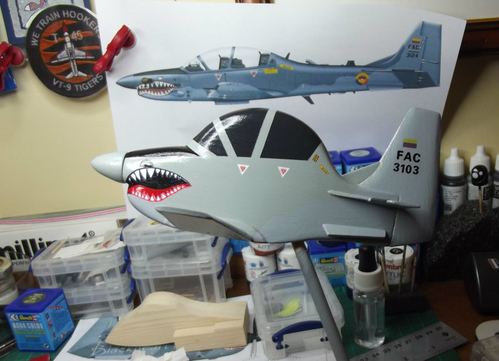
A bit more progress on details and painting. Strakes fitted to fuse under the tailplane, and two coats of the first top colour done ready for the underside colour, which actually starts on the whole of the fin. Painting of the u/c, u/c doors internal colour,exhausts and gun barrels done, tanks, rocket pods and IR housing to complete. then the canopy needs to be masked up, and the sharkmouth needs painting. Regards Paul J.
Title: Re: Tucano toon.
Post by: lastvautour on October 22, 2012, 03:08:39 PM
Post by: lastvautour on October 22, 2012, 03:08:39 PM
Fantastic work(or in this case pleasure). Waiting eagerly for the finished paint job.
Lou
Lou
Title: Re: Tucano toon.
Post by: buccfan on October 22, 2012, 08:03:55 PM
Post by: buccfan on October 22, 2012, 08:03:55 PM
Thanks Lou, more pleasure today but I will post tomorrow night as I am going to have some more pleasure tomorrow as well, and will have a bit more to report. Regards Paul J.
Title: Re: Tucano toon.
Post by: buccfan on October 23, 2012, 07:06:21 PM
Post by: buccfan on October 23, 2012, 07:06:21 PM
Managed to get all the main colour coats finished now, just a couple of black areas around the exhausts and the sharkmouth to do, the u/c doors require the underside colour and rocket pods the same on the pylons. I will do some better pics in daylight later on.Regards Paul J.
Title: Re: Tucano toon.
Post by: Peter on October 23, 2012, 07:27:32 PM
Post by: Peter on October 23, 2012, 07:27:32 PM
Looking good Paul!!!
Peter
Peter
Title: Re: Tucano toon.
Post by: buccfan on October 24, 2012, 08:30:45 PM
Post by: buccfan on October 24, 2012, 08:30:45 PM
Thanks Peter, I just thought I would dry run a few bits while waiting for paint and varnish to dry. For a larger view in Firefox, righ click the image and select view image. Regards Paul J.
Title: Re: Tucano toon.
Post by: lastvautour on October 25, 2012, 06:11:20 PM
Post by: lastvautour on October 25, 2012, 06:11:20 PM
Looking great even without the close up.
Lou
Lou
Title: Re: Tucano toon.
Post by: lastvautour on October 25, 2012, 06:13:58 PM
Post by: lastvautour on October 25, 2012, 06:13:58 PM
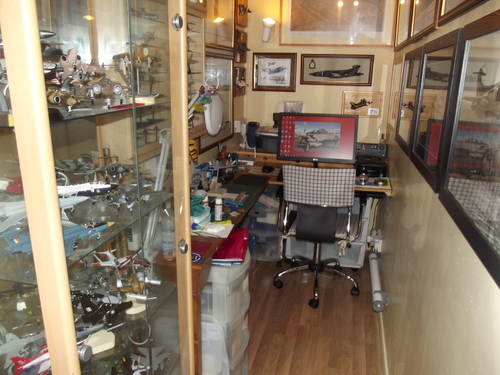
I remembered the link you gave me and I went in. It looks even better in close up. Neat work space. Nothing like mine.
Lou
Lou
Title: Re: Tucano toon.
Post by: buccfan on October 25, 2012, 07:49:10 PM
Post by: buccfan on October 25, 2012, 07:49:10 PM
Thanks for the comments Lou, anything I post on here goes in that folder so you can see the original files. My work space has to be kept resonably tidy and sawdust free, as my office is snug to say the least. I do the odd bit of razor sawing and sanding, but I have a usb vaccuum cleaner to hoover up afterwards, as I do all the painting in there and can't afford for it to be dusty. Best regards Paul J.

Title: Re: Tucano toon.
Post by: buccfan on November 16, 2012, 09:07:44 PM
Post by: buccfan on November 16, 2012, 09:07:44 PM
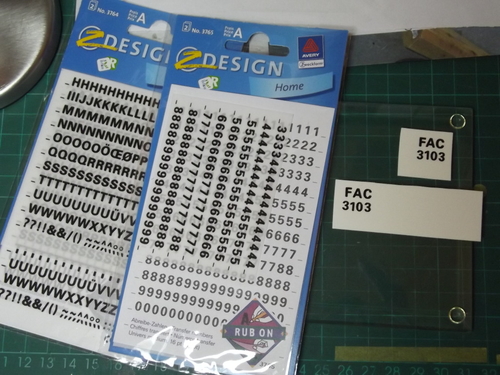
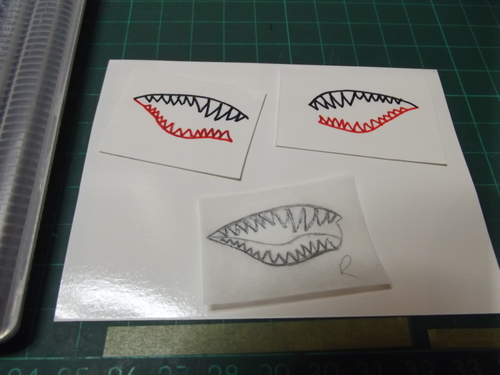
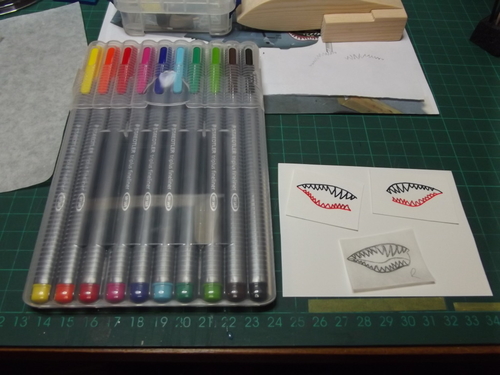
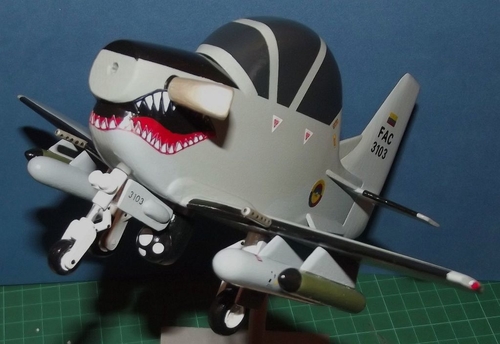
A bit of an update on decaling. I made the lettering for the tailplane by using rub off letters on to a clear decal paper and sealing with acrylic varnish, which worked out quite well. The national insignia was printed on to clear decal paper and also sealed with clear acrylic varnish. I was originally going to attempt to handpaint the sharkmouth teeth, but after the painting of the actual mouth I changed my mind. So I drew the teeth on to some white decal paper using Staedtler triplus fineliner pens and yes you guessed it sealed with acrylic varnish, I left them a couple of days to dry so they wouldn't run when varnished.
I then cut them out with a craft knife and applied them as a decal, I think they turned out pretty good. All the other decals such as the warning triangles are from my stock. Here are a few pictures to show the progress so far. Regards Paul J.
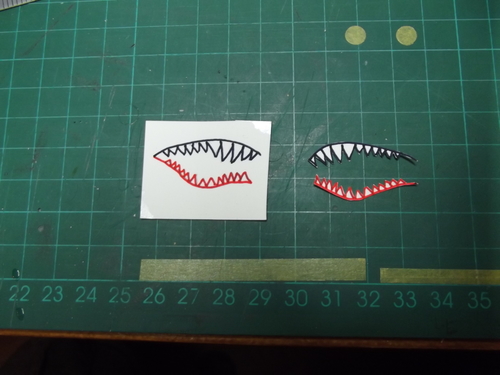
I then cut them out with a craft knife and applied them as a decal, I think they turned out pretty good. All the other decals such as the warning triangles are from my stock. Here are a few pictures to show the progress so far. Regards Paul J.
Title: Re: Tucano toon.
Post by: lastvautour on November 17, 2012, 02:02:54 PM
Post by: lastvautour on November 17, 2012, 02:02:54 PM
Wonderful project Paul. Your decals reaslly turned out well. The best I can do is duplicate images I find on line.
Lou
Lou
Title: Re: Tucano toon.
Post by: buccfan on November 17, 2012, 04:36:22 PM
Post by: buccfan on November 17, 2012, 04:36:22 PM
Thanks Lou, I get a bit nervous when doing my own decals as they can cause a lot of stress if they go wrong. I used your water on glass method to avoid overwetting them just in case they run. I don't have word on my computer to do as you do with the lettering. Regards Paul J.
Title: Re: Tucano toon.
Post by: lastvautour on November 17, 2012, 08:32:14 PM
Post by: lastvautour on November 17, 2012, 08:32:14 PM
Any word processing program will work. What program do you have? I have worked a bit with Lotus some time ago.
Lou
Lou
Title: Re: Tucano toon.
Post by: cliff strachan on November 17, 2012, 09:42:25 PM
Post by: cliff strachan on November 17, 2012, 09:42:25 PM
Very nice lettering, Paul. Another way to make decals. I've just got a laptop and am really really struggling so far.It still is a tossup whether it ends up in the garbage.
Cliff.
Cliff.
Title: Re: Tucano toon.
Post by: buccfan on November 18, 2012, 10:13:43 AM
Post by: buccfan on November 18, 2012, 10:13:43 AM
Thanks Cliff, I was originally going to try and use the letters individually on the toon,but remembered I had some clear film. It is probably better on the film as the rub offs don't always stick very well on first attempt to rub them down. I also struggle when trying to print letters on my computer, mainly with the sizing of them, but have better success with roundels etc. Keep trying you will get there in the end.Regards Paul J.
Title: Re: Tucano toon.
Post by: buccfan on November 21, 2012, 04:18:47 PM
Post by: buccfan on November 21, 2012, 04:18:47 PM
Just the one pic for now before fitting the prop circle and the stand which is drying in the paintshop. I will take some pics of the finished toon hopefully tomorrow if it stops raining and we get some daylight. Regards Paul J.
Title: Re: Tucano toon.
Post by: lastvautour on November 21, 2012, 05:50:27 PM
Post by: lastvautour on November 21, 2012, 05:50:27 PM
She is a beauty Paul. I await more photos.
Lou
Lou
Title: Re: Tucano toon.
Post by: buccfan on November 22, 2012, 03:03:10 PM
Post by: buccfan on November 22, 2012, 03:03:10 PM
Thanks Lou, I didn't get any photo's done today but I'll get some done as soon as I can.Regards Paul J.
Title: Re: Tucano toon.
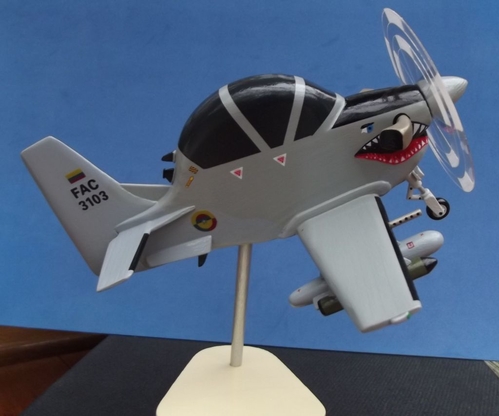
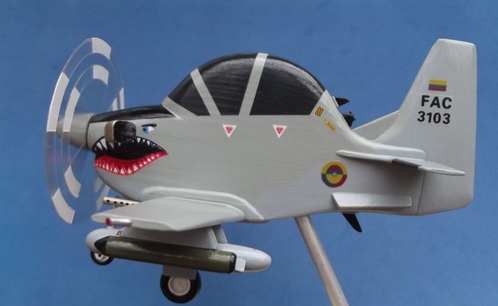
Post by: buccfan on November 26, 2012, 11:46:59 AM
Post by: buccfan on November 26, 2012, 11:46:59 AM
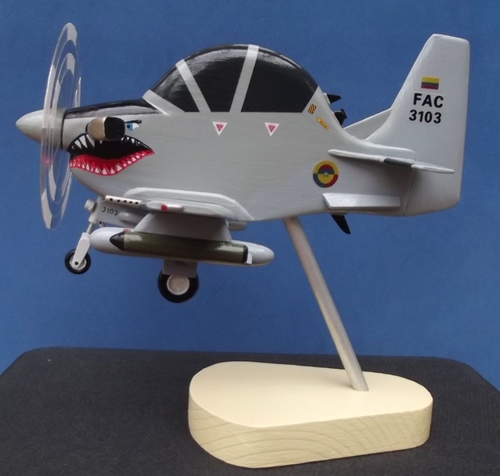
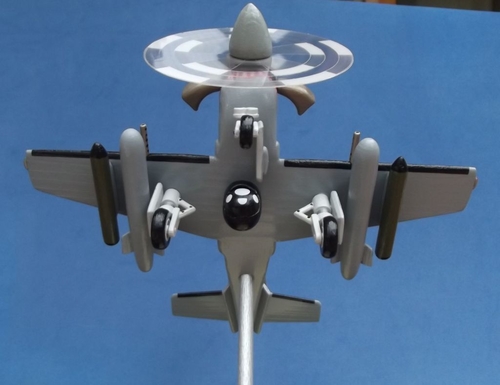
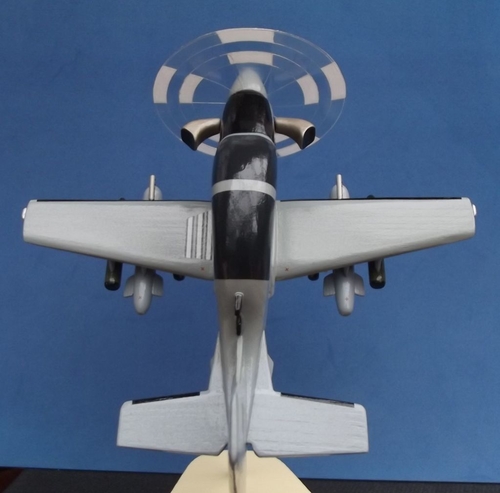
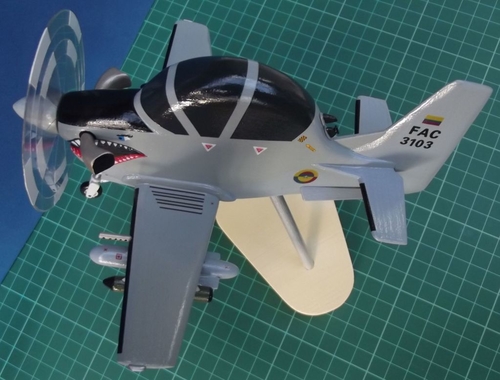
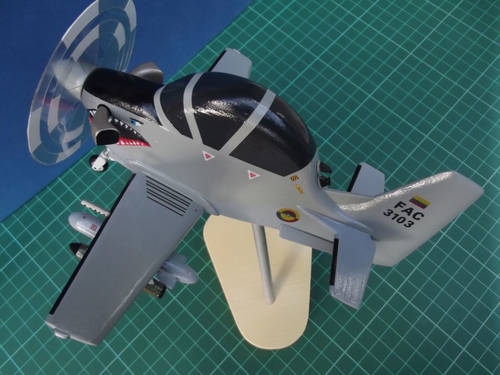
Finally got to finish the stand and take some pics of the finished model. I am pleased with the result,and with the inspiration and help and tips from members on this site I shall continue to improve.( I hope!!!!). The small numbers on the nose wheel door are the numbers used for identifying the different decals on the model decal sheets, which are also decals and can come in handy. There are usually lines and words which can also be cut up and used for crew names etc. Some more pics.Regards Paul J.
Title: Re: Tucano toon.
Post by: lastvautour on November 26, 2012, 05:39:44 PM
Post by: lastvautour on November 26, 2012, 05:39:44 PM
Fantastic model Paul. You are to be congratulated on your masterpiece. The details are excellent as well as your decals.
Lou
Lou
Title: Re: Tucano toon.
Post by: lastvautour on November 26, 2012, 06:06:25 PM
Post by: lastvautour on November 26, 2012, 06:06:25 PM
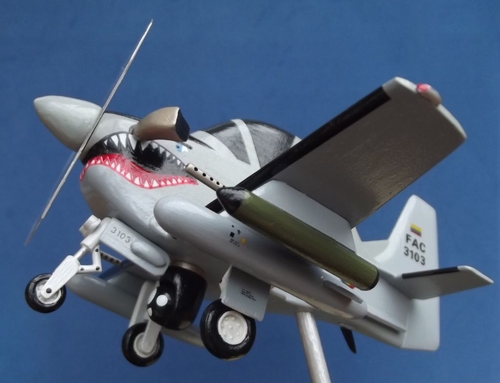
Paul, can you post a front quarter shot from about 45 degrees up. I popst two photos to your collection on flickr at http://www.flickr.com/photos/8416077@N08/8221696410/in/photostream
I also made a reference to your excellent built on SMM.
Lou
I also made a reference to your excellent built on SMM.
Lou
Title: Re: Tucano toon.
Post by: buccfan on November 26, 2012, 08:14:48 PM
Post by: buccfan on November 26, 2012, 08:14:48 PM
Thanks for you comments Lou,much appreciated, and posting on your flickr page. Only the wheels are from the spares box on the u/c and armaments everything else has been made including the guns. I wil take another photo for you probably tomorrow. Best regards Paul J.
Title: Re: Tucano toon.
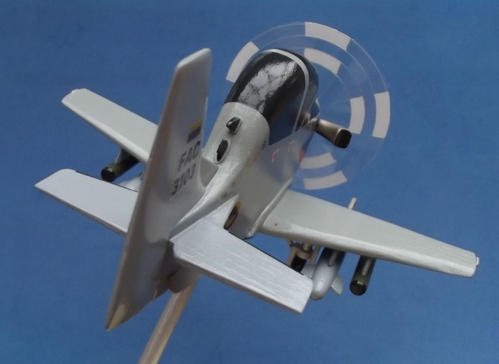
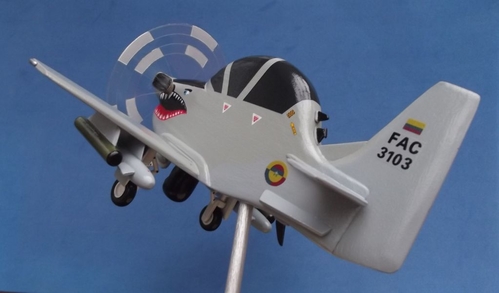
Post by: buccfan on November 27, 2012, 11:43:08 AM
Post by: buccfan on November 27, 2012, 11:43:08 AM
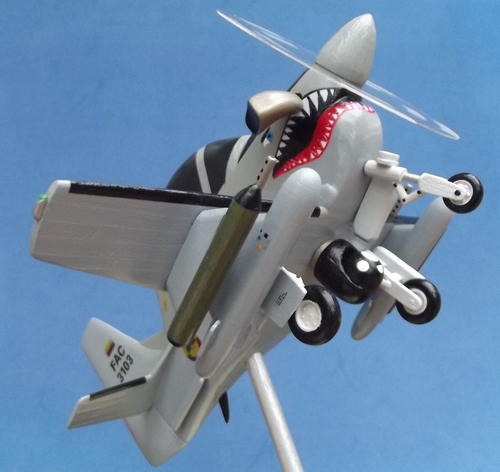
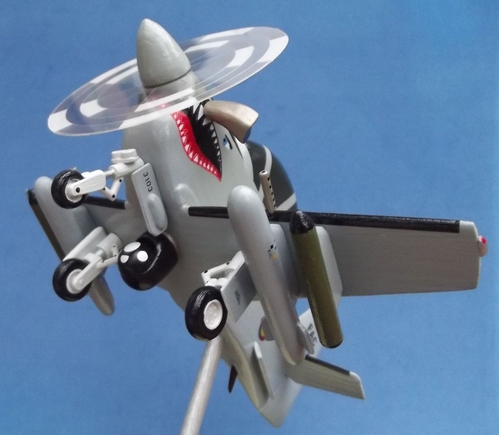
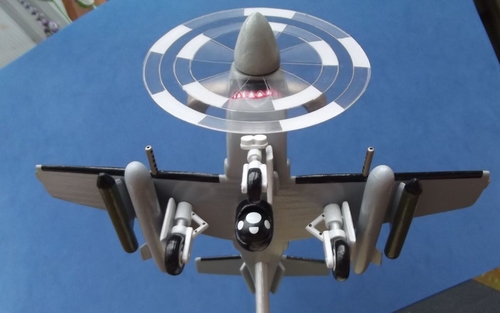
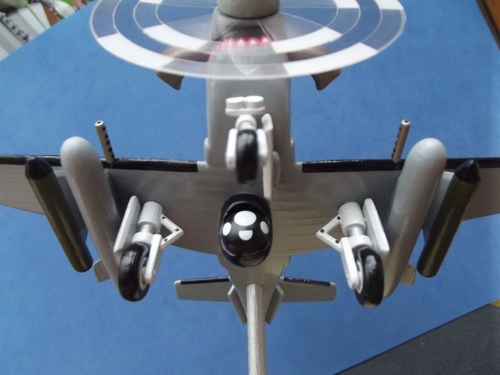
Is this what you were looking for Lou?, two more views. Did you say I had to post in the gallery as well?. I tried to log in but my password details won't work. I will send you the plans when I get them finished. Regards Paul J.
Title: Re: Tucano toon.
Post by: lastvautour on November 27, 2012, 01:07:43 PM
Post by: lastvautour on November 27, 2012, 01:07:43 PM
I want photos from the top front quarter.
Lou
Lou