Title: Grumman Bearcat
Post by: lastvautour on August 11, 2017, 05:58:40 PM
Post by: lastvautour on August 11, 2017, 05:58:40 PM
As written by Harvey aka FlyingS
Starting my next model, a F8F Grumman Bearcat. This was my Dad's favorite aircraft during his 22 year carrier in the Navy. I have printed the patterns and will start making templates to rough out the blocks. Using Bass wood and will be my first fully painted aircraft. It will have a 10" wing span.

Starting my next model, a F8F Grumman Bearcat. This was my Dad's favorite aircraft during his 22 year carrier in the Navy. I have printed the patterns and will start making templates to rough out the blocks. Using Bass wood and will be my first fully painted aircraft. It will have a 10" wing span.
Title: Re: Grumman Bearcat
Post by: lastvautour on August 11, 2017, 05:59:19 PM
Post by: lastvautour on August 11, 2017, 05:59:19 PM
As written by Harvey aka FlyingS
This is my first attempt at doing the wings in one piece. This model I'm going to paint in Navy blue and tryout the printable decal paper. Any suggestions on that is appreciated.

This is my first attempt at doing the wings in one piece. This model I'm going to paint in Navy blue and tryout the printable decal paper. Any suggestions on that is appreciated.
Title: Re: Grumman Bearcat
Post by: lastvautour on August 11, 2017, 06:00:52 PM
Post by: lastvautour on August 11, 2017, 06:00:52 PM
Looks good to me. Check out the group build board. Some have directions on carving one piece wings with the dihedral built in.
Lou
Lou
Title: Re: Grumman Bearcat
Post by: Model Maker on August 11, 2017, 09:55:30 PM
Post by: Model Maker on August 11, 2017, 09:55:30 PM
You can take a look at the Halifax listed on my Building Board. The wing also has a dihedral construction. When cutting out the wing, I used the bandsaw to rough cut the dihedral in the wing. Then used a block plane, sharp chisel and files to shape the various aspects of the wing profile. But based upon this plane and the scale I believe the wing span of the model is approximately 7.5" / 19 cm. For this size of wingspan, I'd opt for the sharp chisel and file.
I find a higher than normal back stop on a bench hook is a great aid in chiselling the wing profile as I tend to chisel across the wood grain (ie across the wing) to remove the material rather than along the wood grain (ie along the wing axis) of the wing when shaping the various sections of the wing.
-ken
Title: Re: Grumman Bearcat
Post by: FlyingS on August 17, 2017, 04:25:07 PM
Post by: FlyingS on August 17, 2017, 04:25:07 PM
Have the rear stabilizer (at least that what it is on a helicopter :) fitted to the fuselage. Need to trim the wing down on the band saw. I saved the one profile scrap to act as a cradle for sawing. I may have over done it on square section to match up with the notch in the fuselage, but I'm still figuring the thing out.


Title: Re: Grumman Bearcat
Post by: lastvautour on August 17, 2017, 07:11:10 PM
Post by: lastvautour on August 17, 2017, 07:11:10 PM
It takes time. My first effort back around 1954 did not look like any airplane flying at the time, but my imagination made up for it. Just remember Harvey, the only person you need to satisfy is yourself. You seem to be doing that so far.
Lou
PS Send me those photos and I will place them in this post.
Lou
PS Send me those photos and I will place them in this post.
Title: Re: Grumman Bearcat
Post by: FlyingS on August 18, 2017, 05:16:25 PM
Post by: FlyingS on August 18, 2017, 05:16:25 PM
Thanks for the advise! I messed up on my measurements for the wing construction. (which bugs me since that is sort of what I did for a living) the good news is it is savable. I like you method of small notch to mach the piece tying the two wings to one piece. I learn something new every time I login!
Title: Re: Grumman Bearcat
Post by: lastvautour on August 18, 2017, 10:57:54 PM
Post by: lastvautour on August 18, 2017, 10:57:54 PM
I have forgotten the measure twice cut once many a time.
Lou
Lou
Title: Re: Grumman Bearcat
Post by: lastvautour on August 20, 2017, 12:56:01 AM
Post by: lastvautour on August 20, 2017, 12:56:01 AM
Harvey, please send me the drawings you are using or the link if you found them on line.
Lou
Lou
Title: Re: Grumman Bearcat
Post by: FlyingS on August 20, 2017, 09:34:09 PM
Post by: FlyingS on August 20, 2017, 09:34:09 PM
Work for today. As it turns out due to my miscalculation I will be putting an insert in the bottom under the wing.


Title: Re: Grumman Bearcat
Post by: lastvautour on August 20, 2017, 11:07:40 PM
Post by: lastvautour on August 20, 2017, 11:07:40 PM
It is easier to get the wing even on both sides. I will be staring a Bearcat after my Spitfires and Mustangs are done.
Lou
Lou
Title: Re: Grumman Bearcat
Post by: lastvautour on August 23, 2017, 09:09:23 AM
Post by: lastvautour on August 23, 2017, 09:09:23 AM
Harvey, s your engine nacelle turned on a lathe? I just noticed it is a separate part.
Lou
Lou
Title: Re: Grumman Bearcat
Post by: FlyingS on August 27, 2017, 11:08:28 PM
Post by: FlyingS on August 27, 2017, 11:08:28 PM
I didn't use a lathe (had one sold it) I sliced a square piece the right thickness, I laid out the diameter of the cowl and used a spade drill to drill out the center. On my band saw with a fine blade I cut out the diameter (over sized) I sanded to the line by eye with a little extra. Then I glued it to the fuselage and started shaping it to the profile.

Title: Re: Grumman Bearcat
Post by: lastvautour on August 28, 2017, 01:41:36 PM
Post by: lastvautour on August 28, 2017, 01:41:36 PM
Shaping up nicely. Will you being using a hand made engine? I will be doing twp Jacobs L6 radials in the next few months.
Lou
P.S. Nice clamps.
Lou
P.S. Nice clamps.
Title: Re: Grumman Bearcat
Post by: FlyingS on August 29, 2017, 11:03:12 AM
Post by: FlyingS on August 29, 2017, 11:03:12 AM
Thanks! Thats the plan. I've never done propeller blades so that will be interesting. The shaping is taking some time but the front portion of the engine cowl is round and it will set the scale for the rest of the airframe.
Every model is a lesson for me. After trying a couple different methods, for me, I like scaling the prints and making all my templates off the prints using a home made light box. I find I need to go back and make small templates for different details of the plane which if find helpful. No right way, just more than one way to skin a cat.haha
Every model is a lesson for me. After trying a couple different methods, for me, I like scaling the prints and making all my templates off the prints using a home made light box. I find I need to go back and make small templates for different details of the plane which if find helpful. No right way, just more than one way to skin a cat.haha
Title: Re: Grumman Bearcat
Post by: lastvautour on August 29, 2017, 02:16:59 PM
Post by: lastvautour on August 29, 2017, 02:16:59 PM
My biggest allies are my Mk i eyeballs. I rough shape the blocks and after that is take away a bit at a time until it looks like what I want. I was never any good at using contour templates. I think of my Bearcat every day but still have no time to devote to it. I made four benches over the week and have them up. Now the job is to organize. I also took out my scroll saw but now need a method to better control dust. My approach to hook up our unused central vac did not go well, so back to the drawing board.
Lou
Looking forward to you progress shots.
Lou
Looking forward to you progress shots.
Title: Re: Grumman Bearcat
Post by: FlyingS on August 31, 2017, 12:59:23 AM
Post by: FlyingS on August 31, 2017, 12:59:23 AM
This was my first one I used templates. 20 years ago thats how they developed the air frames (at least on helicopters) My first two models were by eye. I do have a good eye for symmetry also. The bear cat has some interesting shapes. As usual life gets in the way of my hobby, but I try to get a little in each day. I will post some pictures when I get more detail finished.
Title: Re: Grumman Bearcat
Post by: Model Maker on September 03, 2017, 04:07:13 PM
Post by: Model Maker on September 03, 2017, 04:07:13 PM
I too use templates as I don't have an eagle eye. Normally I'll import and size a plan into Turbocad which is a mid level CAD program. After than I'll create a layer for the elevations and sections in order to create the various templates. It's a little time consuming, but it also allows me to check some of the plan cross sections which are occasionally off scale potentially due to previous scanning and photo copying.
Title: Re: Grumman Bearcat
Post by: lastvautour on September 03, 2017, 06:17:24 PM
Post by: lastvautour on September 03, 2017, 06:17:24 PM
So true. What ever works!
Lou
Lou
Title: Re: Grumman Bearcat
Post by: FlyingS on September 10, 2017, 11:01:32 AM
Post by: FlyingS on September 10, 2017, 11:01:32 AM
Here is the progress so far on my Bearcat.
Lessons learned:
When I did chip carving I started at one end and worked my way to the end...finished. But I tried that with the bearcat and soon learned I was running into a speed bump with the rest of the fuselage. I took Lou's advice and roughed out the whole fuselage first.
I made templates but mainly use then to check the radiuses. The profile of this airframe transitions from a circle at the nose and transitions into an egg shape at he canopy and tappers down to the tail. I found I was getting too focused on fitting the templates instead of eyeballing the whole fuselage as I went along. For me I find using the templates more as a "radius gage" because most photos don't seem to show the transitions in the shape of the airframe.
After I bandsaws the top and side profile I finished then to kind of give me a gage for the finished size. Not sure if that was a good idea? next time I'm going to leave a little extra so I can finish sanding the whole fuselage together.
Next thing to tackle is shaping the canopy bubble. ( First one like this one for me)
Title: Re: Grumman Bearcat
Post by: lastvautour on September 10, 2017, 06:19:50 PM
Post by: lastvautour on September 10, 2017, 06:19:50 PM
Nice progress to date. Check out these articles on canopy shaping.
http://smm.solidmodelmemories.net/SMF/index.php?topic=234.0
http://smm.solidmodelmemories.net/SMF/index.php?topic=1555.0
Lou
http://smm.solidmodelmemories.net/SMF/index.php?topic=234.0
http://smm.solidmodelmemories.net/SMF/index.php?topic=1555.0
Lou
Title: Re: Grumman Bearcat
Post by: FlyingS on September 18, 2017, 04:09:57 PM
Post by: FlyingS on September 18, 2017, 04:09:57 PM
Hope to have some new pictures of progress soon.
I have a question...the Bearcat has a 4 blade prop and I am trying to decide between the plastic disk or carve the blades from wood. If I go with the wood would you carve the blades from one piece or individual blades and glue them to the hub? It seems to me the blades wouldn't have much of a cross section for the glue to hold the blade very well?
This model has been a challenge for me therefore taking me more time than I thought, But I have been picking up got pointers for my next model.
Harv
Title: Re: Grumman Bearcat
Post by: johnnytodd on September 18, 2017, 07:40:42 PM
Post by: johnnytodd on September 18, 2017, 07:40:42 PM
Harv,
I carve my propellor blades individually and then glue to the hub (I file small notches into the hub at about a 45 degree angle). When the glue dries the prop is plenty strong.
John
I carve my propellor blades individually and then glue to the hub (I file small notches into the hub at about a 45 degree angle). When the glue dries the prop is plenty strong.
John
Title: Re: Grumman Bearcat
Post by: FlyingS on September 18, 2017, 08:18:43 PM
Post by: FlyingS on September 18, 2017, 08:18:43 PM
Brilliant, I should have thought of that. haha.
Thanks
Harv ::)
Thanks
Harv ::)
Title: Re: Grumman Bearcat
Post by: johnnytodd on September 18, 2017, 11:09:28 PM
Post by: johnnytodd on September 18, 2017, 11:09:28 PM
In the past I cut 1/32nd flat basswood or plywood as simple prop blades.... but lately I use something thicker, then file/sand/shape blade into more accurate screw shape
Title: Re: Grumman Bearcat
Post by: Model Maker on September 19, 2017, 04:02:49 AM
Post by: Model Maker on September 19, 2017, 04:02:49 AM
Hi Harv;
I also carve the blades individually and attach them to the hub. But I leave a round plug at the hub end of the blade which is inserted into a hole drilled in the hub. I put together a short document on this approach on the link below. It's listed under the "Tips & Techniques" section of the main board. Select Construction Techniques/Propeller Hubs and Blades. Or you can click on the link below. There's a PDF document under the start of the thread which outlines the approach.
http://smm.solidmodelmemories.net/SMF/index.php?topic=1372.0
This method is very strong for 1/32 scale. I cannot comment on any other scales at this time.
-ken
Title: Re: Grumman Bearcat
Post by: lastvautour on September 19, 2017, 03:35:08 PM
Post by: lastvautour on September 19, 2017, 03:35:08 PM
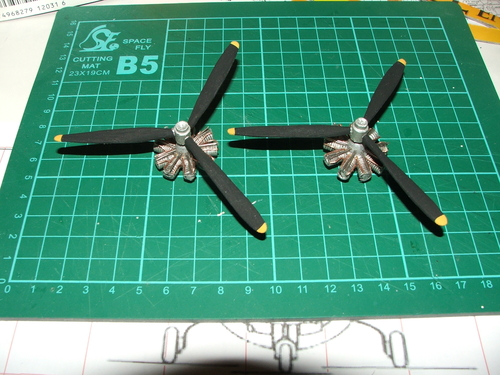
Examples of my propellers. I can't believe I never did a tutorial on this nor did I describe it in other posts.
Bollingbrook
WACO Cabin Biplane

Hudson
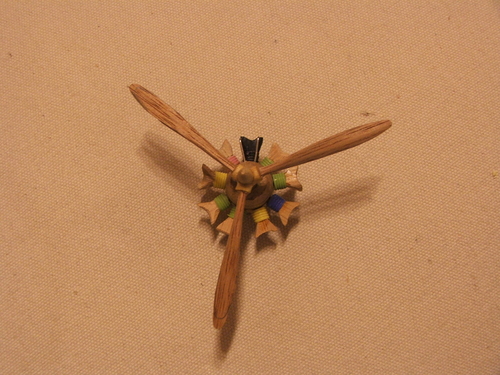
I make my propeller with a hub, drilled to accept a stub to which I will accept a hollow blade shaft. It does not mater how many blades. I will search some more, I am sure I must have shown my method. Now to find it.
Lou
Bollingbrook
WACO Cabin Biplane
Hudson
I make my propeller with a hub, drilled to accept a stub to which I will accept a hollow blade shaft. It does not mater how many blades. I will search some more, I am sure I must have shown my method. Now to find it.
Lou
Title: Re: Grumman Bearcat
Post by: lastvautour on September 19, 2017, 03:39:29 PM
Post by: lastvautour on September 19, 2017, 03:39:29 PM
Found this but it does not show the construction of the hub.
http://smm.solidmodelmemories.net/SMF/index.php?topic=1013.0
Lou
http://smm.solidmodelmemories.net/SMF/index.php?topic=1013.0
Lou
Title: Re: Grumman Bearcat
Post by: FlyingS on September 20, 2017, 12:52:49 PM
Post by: FlyingS on September 20, 2017, 12:52:49 PM
Thanks for the great information. I have learned so much from you guys and has helped me improve my carving methods. Lou, I forgot to mention that I have had those wooden clamps for years and never used them now I find they make a great vise/holding clamps.
Here is the latest on my Bearcat:
Need to finish sanding profile of nose and cockpit.
Finish shaping thickness of wing and finish sanding. (Wing air inlets are giving me a challenge :P)
Finish carving the tail section.


Here is the latest on my Bearcat:
Need to finish sanding profile of nose and cockpit.
Finish shaping thickness of wing and finish sanding. (Wing air inlets are giving me a challenge :P)
Finish carving the tail section.
Title: Re: Grumman Bearcat
Post by: lastvautour on September 20, 2017, 04:15:57 PM
Post by: lastvautour on September 20, 2017, 04:15:57 PM
You are doing exceedingly well for a novice builder.
Lou
Lou
Title: Re: Grumman Bearcat
Post by: Boomerang on September 20, 2017, 08:30:16 PM
Post by: Boomerang on September 20, 2017, 08:30:16 PM
Coming along very nicely.
Gordon
Title: Re: Grumman Bearcat
Post by: johnnytodd on September 20, 2017, 09:37:42 PM
Post by: johnnytodd on September 20, 2017, 09:37:42 PM
Looking Good! 8)
Title: Re: Grumman Bearcat
Post by: FlyingS on September 21, 2017, 01:19:42 AM
Post by: FlyingS on September 21, 2017, 01:19:42 AM
Thanks guys for the nice comments! They are very encouraging words. Your postings have helped me greatly. Its nice when you can learn from so many collective years of experience.
Harv
Harv
Title: Re: Grumman Bearcat
Post by: FlyingS on October 02, 2017, 11:17:38 PM
Post by: FlyingS on October 02, 2017, 11:17:38 PM
I have the fuselage and wings pretty much to shape. Have to finish the profile of the vertical and horizontal stabilizer and cut out the rudder. The wing air inlets were a bit of a challenge. To get to this point it took a lot of filing and sanding. My wife asks me if I'm going to go "scratch" on my plain haha.


Title: Re: Grumman Bearcat
Post by: lastvautour on October 03, 2017, 09:21:34 AM
Post by: lastvautour on October 03, 2017, 09:21:34 AM
Great workmanship on that Bearcat. One would think you have been building for decades.
Lou
Lou
Title: Re: Grumman Bearcat
Post by: FlyingS on October 03, 2017, 10:57:29 AM
Post by: FlyingS on October 03, 2017, 10:57:29 AM
Thanks Lou! I This model has taught me a lot on what to do and not do. One thing I've learned is some details just don't translate well due to the small scale.
I have rattle can paint for primer and color. I could only find gloss navy blue paint so I'm going to try an experiment and see if I spray it with satin acrylic clear spray if it will flatten the gloss a little.
For the emblems do you think that the dark back ground will show through the printable transfer paper?
I did an experiment with a paper decal where I glued it to sample wood piece with rubber cement and then coated it with 3 coats of water base polyurethane. It has stuck pretty well but the white portion has turned a little yellow. I'm wondering if there is some kind of stabilizer to preserve the colors? I will need to try the same thing with the spray on acrylic to see how it works with the paper emblems. The thing I like about printing the emblems on regular printer paper if I screw up on the scale I don't mind throwing it away as posed to the transfer paper. Thoughts??
Title: Re: Grumman Bearcat
Post by: FlyingS on October 04, 2017, 08:55:58 PM
Post by: FlyingS on October 04, 2017, 08:55:58 PM
Maybe everyone has tried all these approaches but I figured I would post my experiments anyway.
My first experiment was to see if I could get a matt finish for the military paint look ( could only find gloss in the navy blue) I sprayed the sample with satin acrylic clear spray over the gloss blue which is the right side. Seemed to work out pretty good. But the spray doesn't work on the paper decal as far as smoothing the edges.
The second picture is different approaches with applying the paper decals. I tried different methods of gluing them on and the rubber cement seems to work the best (maybe there is a better adhesive I didn't use).
Then I covered them with water base acrylic clear polyurethane (only had gloss in that) I find the several coats of the W.B. polyurethane coats the paper decals nicely.
Now I'm trying to find what will coat the paper print so the white part doesn't become translucent therefore allowing the under color showing through. Will post my final results.
Title: Re: Grumman Bearcat
Post by: lastvautour on October 04, 2017, 09:08:13 PM
Post by: lastvautour on October 04, 2017, 09:08:13 PM
I have not had much luck with paper decals. I had trouble getting them to stay down and even super glue fail to resolve the problems. As to coatings, clear gloss wrinkled the paper. I have since moved to decal film but that is not a perfect solution either. If one was rich, one could order decals specific to an aircraft.
Lou
PS. I have selected the wood for the prop blades. I should have additional data shortly.
Lou
PS. I have selected the wood for the prop blades. I should have additional data shortly.
Title: Re: Grumman Bearcat
Post by: FlyingS on October 31, 2017, 11:28:52 AM
Post by: FlyingS on October 31, 2017, 11:28:52 AM
Almost done. need to paint canopy, make hub for propeller, glue on emblems. finish stand.
Glad the site is back up!


Glad the site is back up!
Title: Re: Grumman Bearcat
Post by: lastvautour on November 01, 2017, 12:17:30 AM
Post by: lastvautour on November 01, 2017, 12:17:30 AM
Well done. Looking forward to the finished Bearcat.
Lou
Lou
Title: Re: Grumman Bearcat
Post by: Boomerang on November 01, 2017, 07:55:45 PM
Post by: Boomerang on November 01, 2017, 07:55:45 PM
Excellent work!
Gordon
Title: Re: Grumman Bearcat
Post by: FlyingS on November 04, 2017, 05:10:28 PM
Post by: FlyingS on November 04, 2017, 05:10:28 PM
Waiting for the paint on the bearcat to cure...didn't realize I had to wait a week for it to cure before I could clear coat it (won't do that again). So Im finishing the stand. It has the squadron emblem (VC-3) my dad was in during and after WW2. The base is cedar.

Title: Re: Grumman Bearcat
Post by: lastvautour on November 05, 2017, 12:50:03 AM
Post by: lastvautour on November 05, 2017, 12:50:03 AM
Looks great.
lou
lou
Title: Re: Grumman Bearcat
Post by: FlyingS on November 12, 2017, 11:24:44 PM
Post by: FlyingS on November 12, 2017, 11:24:44 PM
Just sprayed the Bearcat with spray satin polyurethane. The only Navy blue paint I could find was high gloss so I scuffed it up with fine gray scotch bright. The satin poly gave it more of the military look. The cockpit didn't come out as good as expected but it's my first attempt so it was a learning experience. I'll post pictures of the final assembly.

Title: Re: Grumman Bearcat
Post by: FlyingS on November 13, 2017, 07:13:36 PM
Post by: FlyingS on November 13, 2017, 07:13:36 PM
Finally finished...I have a lot of time into this one but it's been a good learning experience.


Title: Re: Grumman Bearcat
Post by: FlyingS on November 13, 2017, 07:15:09 PM
Post by: FlyingS on November 13, 2017, 07:15:09 PM
More pics.


Title: Re: Grumman Bearcat
Post by: Boomerang on November 13, 2017, 08:10:47 PM
Post by: Boomerang on November 13, 2017, 08:10:47 PM
Well Done Harvey! Looks great!
Gordon
Title: Re: Grumman Bearcat
Post by: lastvautour on November 13, 2017, 09:06:49 PM
Post by: lastvautour on November 13, 2017, 09:06:49 PM
Fantastic Bearcat. Congratulation on a very fine build.
Lou
Lou
Title: Re: Grumman Bearcat
Post by: FlyingS on November 13, 2017, 10:34:20 PM
Post by: FlyingS on November 13, 2017, 10:34:20 PM
Thanks guys I appreciate that very much!! :)
Title: Re: Grumman Bearcat
Post by: Biggles on November 13, 2017, 10:50:16 PM
Post by: Biggles on November 13, 2017, 10:50:16 PM
That's a fine looking model. Good job!
The full size must have had some pretty tall landing gear to accommodate that large prop.
Abe
The full size must have had some pretty tall landing gear to accommodate that large prop.
Abe
Title: Re: Grumman Bearcat
Post by: lastvautour on November 14, 2017, 09:56:42 AM
Post by: lastvautour on November 14, 2017, 09:56:42 AM
It did have very long legs. I often wondered how the survived those carrier landings.
Lou
Lou
Title: Re: Grumman Bearcat
Post by: FlyingS on November 14, 2017, 12:51:11 PM
Post by: FlyingS on November 14, 2017, 12:51:11 PM
Thats why I didn't do landing gear. They are so long I thought it looked ugly.

Title: Re: Grumman Bearcat
Post by: Biggles on November 15, 2017, 12:52:23 AM
Post by: Biggles on November 15, 2017, 12:52:23 AM
Yep there are a few planes like that-very ugly on the ground!