Title: Tutorial Novice - Curtiss P-40E/Tomahawk Mk I
Post by: lastvautour on January 10, 2021, 02:19:53 AM
Post by: lastvautour on January 10, 2021, 02:19:53 AM
This will be a separate cook-up of a P-40 for Michael, a soon to be new member. Once completed, I will join it to the exiting P-40 cook-up.
Anyone else wanting to join in is welcomed.
Lou
Anyone else wanting to join in is welcomed.
Lou
Title: Re: P-40 Cook-up 2021
Post by: lastvautour on January 10, 2021, 03:36:31 AM
Post by: lastvautour on January 10, 2021, 03:36:31 AM
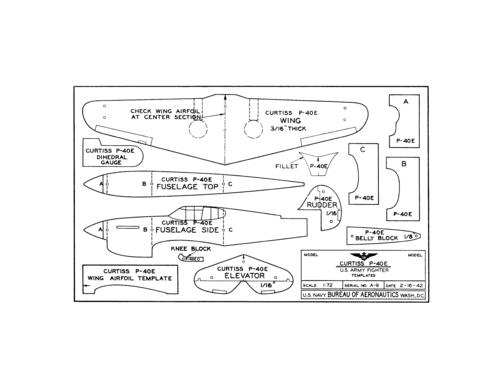
These drawings are scaled to 1/48 and placed in MS Word ready for printing. Assembly will be as per those found in the gallery. As with any project, once printed measure again to see if your printer may have skewed your drawings. Adjust accordingly.

Lou
Lou
Title: Re: P-40 Cook-up 2021
Post by: lastvautour on January 10, 2021, 06:53:51 PM
Post by: lastvautour on January 10, 2021, 06:53:51 PM
The SMM gallery drawings have also been scaled to 1/48 in the attached MS Word.
Lou
Lou
Title: Re: P-40 Cook-up 2021
Post by: lastvautour on January 10, 2021, 07:02:21 PM
Post by: lastvautour on January 10, 2021, 07:02:21 PM
Here are the 1/72 version. My excel scale calculator is available for the asking. I will email it as SMM does not support excel docs. Note, input data is in the green cells. Once done I save it as the project name file.
Lou

Lou
Title: Re: P-40 Cook-up 2021
Post by: lastvautour on January 11, 2021, 12:00:33 AM
Post by: lastvautour on January 11, 2021, 12:00:33 AM
Additional 1/48 of the earlier P-40B.
Lou
Lou
Title: Re: P-40 Cook-up 2021
Post by: Boomerang on January 12, 2021, 12:17:27 AM
Post by: Boomerang on January 12, 2021, 12:17:27 AM
Looking forward to progress shots. Have looked at my drawings and the internet. Have a few ideas but they will have to wait awhile.
Cheers
Gordon
Title: Re: P-40 Cook-up 2021
Post by: lastvautour on January 14, 2021, 06:38:23 PM
Post by: lastvautour on January 14, 2021, 06:38:23 PM
And so the projects begin with Michael on Facebook and simultaneously on SMM while he awaits his membership approval.
FB Post
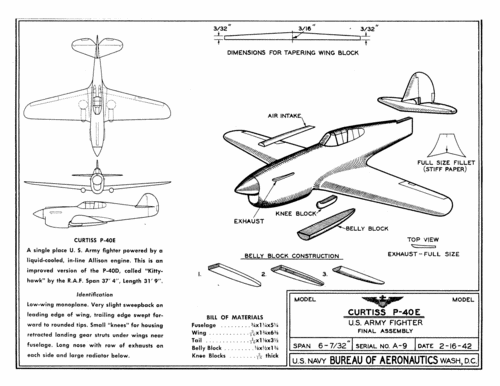
I/48 will do fine. I purchased a 1" X 6" X 36" for just over $6.00 CDN. I only assume you can get it cheaper in the States. I would have prefered a bit whiter, but that is all they had in short pieces..
Lou

FB Post
I/48 will do fine. I purchased a 1" X 6" X 36" for just over $6.00 CDN. I only assume you can get it cheaper in the States. I would have prefered a bit whiter, but that is all they had in short pieces..
Lou
Title: Re: P-40 Cook-up 2021
Post by: lastvautour on January 14, 2021, 06:44:29 PM
Post by: lastvautour on January 14, 2021, 06:44:29 PM
I have made both 1/72 and 1/48 versions. I will also be doing a P-40B on the side in a seperate post.
The first thing after printing the parts is making templates. You may print multiple drawings and paste them directly to the blank pieces of wood when we cut them. It is good to make template. I used cereal box and sandpaper envelops for cardboard.
Lou

The first thing after printing the parts is making templates. You may print multiple drawings and paste them directly to the blank pieces of wood when we cut them. It is good to make template. I used cereal box and sandpaper envelops for cardboard.
Lou
Title: Re: P-40 Cook-up 2021
Post by: lastvautour on January 14, 2021, 10:21:33 PM
Post by: lastvautour on January 14, 2021, 10:21:33 PM
Templates cut and ready for use. For those who don't have a power tool, a hand saw will do the trick. You can cut a larger piece of wood in the normal manner, however the smaller pieces are better cut by placing the saw between your knees and moving the wood back and forth. To create slimmer parts, you can do the same with the saw between your legs. The cut is not as clean as a bandsaw or scroll saw so leave lots of wood. The excess wood will be removed with a blade.
Lou
PS The templates are 1/72 with the 1/48 is on the right. I have a box/cover for each model.


Lou
PS The templates are 1/72 with the 1/48 is on the right. I have a box/cover for each model.
Title: Re: P-40 Cook-up 2021
Post by: lastvautour on January 14, 2021, 11:42:50 PM
Post by: lastvautour on January 14, 2021, 11:42:50 PM
I should have mentioned to trace the fuselage outline on the board and cut out two blocks leaving 1/8" on all sides.
Pictures to follow shortly.
Lou
Pictures to follow shortly.
Lou
Title: Re: P-40 Cook-up 2021
Post by: Gearup on January 15, 2021, 02:16:31 AM
Post by: Gearup on January 15, 2021, 02:16:31 AM
Great saw technique for small parts!
Fraser
Fraser
Title: Re: P-40 Cook-up 2021
Post by: lastvautour on January 15, 2021, 03:50:24 AM
Post by: lastvautour on January 15, 2021, 03:50:24 AM
I was a poor man in my early years so innovative approaches were needed if I was to continue in the hobby. I was 50ish before getting my first bandsaw. Are you going to do a P-40. The P-40 was the first model ever displayed on SMM but that was the old site. Canadian pilots flew it also.
Lou
Lou
Title: Re: P-40 Cook-up 2021
Post by: Gearup on January 15, 2021, 04:50:11 AM
Post by: Gearup on January 15, 2021, 04:50:11 AM
It was good to explore the capabilities of hand tools early on, Im sure.
Funny you should ask about a P-40. I'm going to concentrate on the Banshee for the near term, but here is a P-40 I built for my son back 23 or so years ago. It was from the book The Great American Wooden Toy Book by Norm Marshall pub 1986.

Funny you should ask about a P-40. I'm going to concentrate on the Banshee for the near term, but here is a P-40 I built for my son back 23 or so years ago. It was from the book The Great American Wooden Toy Book by Norm Marshall pub 1986.
Title: Re: P-40 Cook-up 2021
Post by: buccfan on January 15, 2021, 10:51:27 AM
Post by: buccfan on January 15, 2021, 10:51:27 AM
The start of another great tutorial Lou, regards Paul J.
Title: Re: P-40 Cook-up 2021
Post by: lastvautour on January 15, 2021, 08:31:26 PM
Post by: lastvautour on January 15, 2021, 08:31:26 PM
That is an awesome P-40 toy. I will add it to the P-40 photo post.
Lou
http://smm.solidmodelmemories.net/SMF/index.php?topic=1413.msg15337#msg15337
Lou
http://smm.solidmodelmemories.net/SMF/index.php?topic=1413.msg15337#msg15337
Title: Re: P-40 Cook-up 2021
Post by: lastvautour on January 15, 2021, 09:41:37 PM
Post by: lastvautour on January 15, 2021, 09:41:37 PM
The first blocks are for the fuselage and should measure 5cm X 19cm X 1.2cm. You will need two.
Lou

Lou
Title: Re: P-40 Cook-up 2021
Post by: lastvautour on January 15, 2021, 09:42:57 PM
Post by: lastvautour on January 15, 2021, 09:42:57 PM
I decided to redo my templates as the WWII ID drawings are acceptable however the others are better. I used the top fuselage and bottom wing drawings from the P-40B The side is the P-40E that we are making. The parts breakdown are the same as the WWII ID drawing. I will show in great details how to transfer the wing cutout section on the B-40E drawing.
Lou

Lou
Title: Re: P-40 Cook-up 2021
Post by: lastvautour on January 16, 2021, 04:55:12 PM
Post by: lastvautour on January 16, 2021, 04:55:12 PM
Once the block is reduced to 22mm, the fuselage template can be used or a copy of the drawing. Whichever you favour. I usually place the drawing or make the template outline on both sides. Ensure the templates/drawings are aligned properly. Second photo is the template method
Lou


Lou
Title: Re: P-40 Cook-up 2021
Post by: lastvautour on January 16, 2021, 06:40:11 PM
Post by: lastvautour on January 16, 2021, 06:40:11 PM
Mark off 11mm on either side of center. Trace the template outline. Note the upper nose scoop and lower body pan have been removed and will be done as parts. Once one side is traced, draw a line from the tip of the spinner to the upper edge area of the stab. Draw perpendicular lines on the edge of the block and transfer the line to the other side. When you trace the back side, take care to align the template for and aft.
Lou


Lou
Title: Re: P-40 Cook-up 2021
Post by: lastvautour on January 16, 2021, 06:45:14 PM
Post by: lastvautour on January 16, 2021, 06:45:14 PM
Remove the excess wood with a saw or blade. The windscreen area requires care in removing the excess. I illustrate several blades for your consideration. The blade edge should be rock side to side with very little wood removed at a time. Large cut will very often remove too much wood.
Lou


Lou
Title: Re: P-40 Cook-up 2021
Post by: lastvautour on January 16, 2021, 06:54:02 PM
Post by: lastvautour on January 16, 2021, 06:54:02 PM
Blades cut. Keep body part out of the path of the blade. This my leg seconds ago. Use a bench hook if you need to hold the piece on your leg.
Lou


Lou
Title: Re: P-40 Cook-up 2021
Post by: lastvautour on January 16, 2021, 07:04:02 PM
Post by: lastvautour on January 16, 2021, 07:04:02 PM
Rock the blade vertically to cut out the stab knotch. Once again a bit at a time. When a sharp angle is required, the tip of the blade is more useful. Your fuselage should look something like the last photo.
Lou


Lou
Title: Re: P-40 Cook-up 2021
Post by: lastvautour on January 16, 2021, 07:34:24 PM
Post by: lastvautour on January 16, 2021, 07:34:24 PM
Let's remove the remaining excess wood with a blade. Care must be taken not to take too much. The green lines indicate the running of the grain. The center arrow is the highest point on the grain. Always cut down through the garin as indicated. The last photo shows a cross cut. Extra care to ensure the blade does not take too much wood.
Lou


Lou
Title: Re: P-40 Cook-up 2021
Post by: lastvautour on January 16, 2021, 07:39:55 PM
Post by: lastvautour on January 16, 2021, 07:39:55 PM
Let's start the final cutting using coarse sandpaper. Left to right, 120, 220, 320, 400 grit. Block are need to ensure sanding does not create high/low spots.
Lou


Lou
Title: Re: P-40 Cook-up 2021
Post by: lastvautour on January 16, 2021, 07:52:52 PM
Post by: lastvautour on January 16, 2021, 07:52:52 PM
Next is marking the vertical cut lines on the fuselage. Not that if you lay the template directly on a curve surface it will come up short. Align the aft template with the block. Trace the rear half of the fuselage. Looking straight down from the top, draw the forward fuselage shape. It is tricky as you can not put the template directly on the wood. Note the second photos shows I failed to properly align the template. The last photo show the correction. I must have moved my template after drawing the right fuselage half.
Lou


Lou
Title: Re: P-40 Cook-up 2021
Post by: lastvautour on January 16, 2021, 08:06:24 PM
Post by: lastvautour on January 16, 2021, 08:06:24 PM
Using your blade of preference, remove the excess wood from the sides of the fuselage. I frequently use a paring knife. That was my only tool in the early days. I also use a planner on occasion. Place the wood slightly higher that the lip of the bench hook when using the planner.
A friendly reminder, clean up frequently. Brush yourself of before leaving the work area including your footwear. This will keep the sawdust/wood chips in the work area and keep you in good graces with the misses/spouse/friend etc....
Lou


A friendly reminder, clean up frequently. Brush yourself of before leaving the work area including your footwear. This will keep the sawdust/wood chips in the work area and keep you in good graces with the misses/spouse/friend etc....
Lou
Title: Re: P-40 Cook-up 2021
Post by: lastvautour on January 16, 2021, 08:11:36 PM
Post by: lastvautour on January 16, 2021, 08:11:36 PM
This is what things should look like at this point. Once both sides were carved I sanded all sides with 120 grit paper just to clean things up. A P-40 is starting to come out of the wood. This is it for the fuselage so far. We will move on to other parts and bring them to the block shape the same as the fuselage.


Title: Re: P-40 Cook-up 2021
Post by: lastvautour on January 16, 2021, 08:18:37 PM
Post by: lastvautour on January 16, 2021, 08:18:37 PM
The last thing today is starting the tail feathers. I glued template to the stab and tail fin and did a template approach as well as I am doing a P-40B on the side. It is easier to cut vertically on the tips. Again, small steps. The last thing today is marking the thickness of the parts. I use the finger method of holding the pencil over the part with the finger as a guide, run the point of the pencil around the part. in this case 2.5mm is in order. Also make reference lines for the center point of the front and rear stab. SWe will remove excess wood tomorro.
Lou


Lou
Title: Re: P-40 Cook-up 2021
Post by: lastvautour on January 20, 2021, 09:40:18 PM
Post by: lastvautour on January 20, 2021, 09:40:18 PM
Carrying on with the tail feathers. Once the part is cut out, thinning it down to 2.5mm requires care as the cuts are shallow and taking too much away is ever present. Check the grain and always cut down through the grain. There are many ways to remove the excess wood as seen in the second photo group. The last photo in this group shows taking away approx. 5mm strips at a time if a wide chisel is not available. Photo group three shows the direction I should have taken (green) and the direction I took (red) resulting in a gouged out part. I used wood filler to fill the hole and sanded it smooth. I use masking tape as a handle for smaller parts.
Lou


Lou
Title: Re: P-40 Cook-up 2021
Post by: lastvautour on January 20, 2021, 10:54:27 PM
Post by: lastvautour on January 20, 2021, 10:54:27 PM
The vertical fin gets the same treatment as the stab. I ran the grain fore/aft direction which make the bottom part weaker than the top. If you run the grain vertically the weak part would be the forward part of the fin. Care is to taken when slimming down the part as the photo shows. Lots of glue fixes the broken part

Title: Re: P-40 Cook-up 2021
Post by: lastvautour on January 20, 2021, 11:09:49 PM
Post by: lastvautour on January 20, 2021, 11:09:49 PM
Next a bit of work on the main plane. My blank dimensions are 6.5mm X 24mm x 19mm. Cut out the top of the wing template.
For version one - do not flatten out the dihedral for this version.Version one has been moved to my P-40B build on my board
For version two - start by marking the shape of the wing on the blank followed by pasting the front shape to the edge. Note the dihedral has been cut in the center and the top of the image lined up with the top edge of the blank. Ensure the drawn template image lines up with the front image. This is the easiest of the two.
The difference is the first version is built flat, cut in the center and the dihedral will be set once the wing is shaped. The second version has the dihedral built in. Both are viable and each has its own problems. More on that latter.
Lou
Title: Re: P-40 Cook-up 2021
Post by: lastvautour on January 20, 2021, 11:56:25 PM
Post by: lastvautour on January 20, 2021, 11:56:25 PM
Wing version two: The second version can start being the thickness of the wing shown in the drawing. Once rough shaped the flat side of the wing will now be the bottom of the wing. Finish shaping the outline of the wing. Remember the flat side is now the bottom of the wing.
Lou


Lou
Title: Re: P-40 Cook-up 2021
Post by: lastvautour on January 21, 2021, 12:18:13 AM
Post by: lastvautour on January 21, 2021, 12:18:13 AM
Fine shaping the wing can be done with whatever blade you prefer. I use a chisel. On occasion, I use clamps to hold the piece. Note that you must remove the excess wood slowly of gouging like the one in my stab will occur. Use a large or small blade. When removing narrow strips take greater care as resistance is lower and the tendency to remove too much is ever present. Use a ruler or other straight edge to check your progress. Contouring the airfoil shape will be done later.
Lou


Lou
Title: Re: P-40 Cook-up 2021
Post by: lastvautour on January 21, 2021, 10:51:32 PM
Post by: lastvautour on January 21, 2021, 10:51:32 PM
Contour shaping of the wings will be done next. First mark the location of the guns by overlaying the wing over the drawings. Trace a line approx. 1.5mm along the bottom of the wing. Intersect those with vertical lines. I use a push pin to mark the locations and then use a 1/16" drill bit. These are available at any hardware store and is usually the smallest bit you can get before going to a specialty shop; This is also the nominal diameter of round toothpicks. I use a nail clipper to rough cut the guns. Do not glue them yet.
Note that last photo show damage between the starboard guns. That will be fixed with putty once the airfoil is contoured.


Note that last photo show damage between the starboard guns. That will be fixed with putty once the airfoil is contoured.
Title: Re: P-40 Cook-up 2021
Post by: lastvautour on January 21, 2021, 10:56:05 PM
Post by: lastvautour on January 21, 2021, 10:56:05 PM
This may be good time to get some sanding sticks. I use paint stirring sticks available for free at my local hardware store. Glue two different grit sandpaper at one end and another two at the other end if you so wish.
Lou

Lou
Title: Re: P-40 Cook-up 2021
Post by: lastvautour on January 21, 2021, 11:07:25 PM
Post by: lastvautour on January 21, 2021, 11:07:25 PM
Creating the airfoil shape take time and several steps. First is marking the leading edge of the wing at the 9MM-18mm at the center point and 7mm and 3.5mm at the tips. Run a line on the face of the wing 2mm from the bottom. I forgot to take a photo of this process, however you can still see the lines in the shaping photo.
Starting at the center point, remove the wood between the first line and the line on the face.
Next draw a line spitting the surface you have just revealed and remove the wood between it and the second line.
Sand that to a smooth curve.
The tip is is flattened slightly as shown in the drawings. You can carefully cur it/sand it to shape.
Lou
Title: Re: P-40 Cook-up 2021
Post by: lastvautour on January 21, 2021, 11:14:14 PM
Post by: lastvautour on January 21, 2021, 11:14:14 PM
Once the leading edge is sanded smooth use a straight edge and mark vertical parallel lines. Tilting the wing gives a view of the contour.
Lou

Lou
Title: Re: P-40 Cook-up 2021
Post by: lastvautour on January 21, 2021, 11:26:43 PM
Post by: lastvautour on January 21, 2021, 11:26:43 PM
Trace lines at the 10mm and 5mm point as shown. Trace a line on the face of the trailing edge approx. 1mm from the bottom of the wing. Carefully do the same as the leading edge of the wing slowly carving the airfoil shape.
Lou


Lou
Title: Re: P-40 Cook-up 2021
Post by: lastvautour on January 22, 2021, 01:20:36 AM
Post by: lastvautour on January 22, 2021, 01:20:36 AM
Using the template for the wing airfoil shape. This one is pretty close on the first try. Final shaping was done with the coarse sanding stick. Next is marking the bottom area and shaping using a sanding stick as the amount to remove is small.
Lou


Lou
Title: Re: P-40 Cook-up 2021
Post by: lastvautour on January 22, 2021, 01:25:06 AM
Post by: lastvautour on January 22, 2021, 01:25:06 AM
Draw vertical lines on the wing and tilt to see the shape of the wing. Note I neglected to take a picture of this so they were added after the picture was taken. The first attempt with the airfoil template was pretty close so a bit more sanding made it even better.
Lou


Lou
Title: Re: P-40 Cook-up 2021
Post by: lastvautour on January 22, 2021, 01:28:05 AM
Post by: lastvautour on January 22, 2021, 01:28:05 AM
CAUTION
Do not try to catch a knife in mid air.
OUCH
Lou

Do not try to catch a knife in mid air.
OUCH
Lou
Title: Re: P-40 Cook-up 2021
Post by: Gearup on January 22, 2021, 07:20:19 AM
Post by: Gearup on January 22, 2021, 07:20:19 AM
I was wondering what the random red lines were for....uh never mind 😯
I like the idea of using the fingernail clippers for close cuts such as you did with the gun barrels so close together.
Fraser
I like the idea of using the fingernail clippers for close cuts such as you did with the gun barrels so close together.
Fraser
Title: Re: P-40 Cook-up 2021
Post by: lastvautour on January 23, 2021, 07:48:04 PM
Post by: lastvautour on January 23, 2021, 07:48:04 PM
Once satisfied with the shape of the wing will set the dihedral by cutting the wing in half. The cut must be perpendicular to the wings span. To do so otherwise with skew the shape pf the wing. It can be cut with a hundred strokes of a shape blade or, in my case an Exacto saw. The object being that it needs to be a narrow cut.
Lou


Lou
Title: Re: P-40 Cook-up 2021
Post by: lastvautour on January 23, 2021, 08:35:30 PM
Post by: lastvautour on January 23, 2021, 08:35:30 PM
Note the inverted V. Ensure the wing held is parallel to the sandpaper. Sand down until the joint is flush when using the dihedral gauge. I doubled the height of the gauge to enable one wing to lay flat. I used super gel glue and let that set. Once dry I ran liquid super glue along the joint.
Lou


Lou
Title: Re: P-40 Cook-up 2021
Post by: lastvautour on January 24, 2021, 12:06:39 AM
Post by: lastvautour on January 24, 2021, 12:06:39 AM
Using the airfoil template, line up the front of the template to the bottom of the fuselage and not the cooler. Once traced, repeat on the other side. I used my bandsaw to do cut short of the template line. Using a paring knife, I twist the small pieces out.
Lou


Lou
Title: Re: P-40 Cook-up 2021
Post by: lastvautour on January 24, 2021, 12:09:54 AM
Post by: lastvautour on January 24, 2021, 12:09:54 AM
Remove the excess wood cutting from the outside in to the deepest part.
Lou


Lou
Title: Re: P-40 Cook-up 2021
Post by: lastvautour on January 24, 2021, 12:44:46 AM
Post by: lastvautour on January 24, 2021, 12:44:46 AM
Next as a break from the large carvings, we will do the smaller pieces.
First is upper fuselage air scoop. Cut out the shape from 2mm thick stock and shape the vertical face. Contour will consist of reducing the rear to 1mmthickness. Carving the bottom to make it fit to the fuselage will be done later.
Next is the belly pan is from 5mm stock. Note that I took the shape from the bottom image and not the SMM template. Contour shaping will also be done later.
Lou
Title: Re: P-40 Cook-up 2021
Post by: lastvautour on January 24, 2021, 03:27:28 AM
Post by: lastvautour on January 24, 2021, 03:27:28 AM
Trace the knee joint on 5'' stock. More on them later.
Next thin a piece to 1mm thick and 2mm wide. You will need two pieces 25mm long. Make three for good measure. these will be used to mount the exhaust stubs. Using a flat piece of wood scrap wood and mark a 45 degree angle. Cut a shallow grove parallel to the bottom line. Next place two vertical lines centered on the angled line 5mm apart. Run you blade several times over the lines to act as a guide. Line up a round toothpick with the vertical lines and cut off the end square on the right side followed by the angle line and then the left end. This will give you two exhaust stubs. Those are glued with super or wood glue two at a time. Once thoroughly dry, I used a spacer made from three thickness of cereal box cardboard to space out the grouping of two stubs. The exhaust two X two X two belong to the P-40E were the other is for my P-40B.


Next thin a piece to 1mm thick and 2mm wide. You will need two pieces 25mm long. Make three for good measure. these will be used to mount the exhaust stubs. Using a flat piece of wood scrap wood and mark a 45 degree angle. Cut a shallow grove parallel to the bottom line. Next place two vertical lines centered on the angled line 5mm apart. Run you blade several times over the lines to act as a guide. Line up a round toothpick with the vertical lines and cut off the end square on the right side followed by the angle line and then the left end. This will give you two exhaust stubs. Those are glued with super or wood glue two at a time. Once thoroughly dry, I used a spacer made from three thickness of cereal box cardboard to space out the grouping of two stubs. The exhaust two X two X two belong to the P-40E were the other is for my P-40B.
Title: Re: P-40 Cook-up 2021
Post by: lastvautour on January 24, 2021, 03:36:19 AM
Post by: lastvautour on January 24, 2021, 03:36:19 AM
Tail feathers and main wing filet guide are thinned to 2mm. The filet guide can be put aside for now. Make the center of the stab/vertical fin. The flat faces are marked 6mm from the edge. I use a pencil but a red felt tip is only used for your benefit. Remove with a blade and/or sand to a symmetrical airfoil shape. These parts usually have the thickest part at approx. 1/3 distance from the leading edge.
Lou


Lou
Title: Re: P-40 Tutorial/Cook-up 2021
Post by: Gearup on January 24, 2021, 07:25:52 AM
Post by: Gearup on January 24, 2021, 07:25:52 AM
Excellent exhaust stacks. Was the different pairing of the stubs related to engine type? Also thanks for showing the different wing constructions for the same model. Very informative. Thanks
Fraser
Fraser
Title: Re: P-40 Tutorial/Cook-up 2021
Post by: lastvautour on January 24, 2021, 06:24:35 PM
Post by: lastvautour on January 24, 2021, 06:24:35 PM
Yes, different engines. Early versions did not have superchargers. Personally I prefer one piece wing with the dihedral built in.
Lou
Lou
Title: Re: P-40 Tutorial/Cook-up 2021
Post by: lastvautour on January 25, 2021, 11:13:30 PM
Post by: lastvautour on January 25, 2021, 11:13:30 PM
The rear fuselage will now be contoured. Trace a thrust line from the center of the spinner to 10mm below the notch for the stab. Trace a line 1mm from the top edge and 2mm above the trust line we installed. Remove the wood between the lines. repeat for the other side. It is better oif you do both sides at once.


Title: Re: P-40 Tutorial/Cook-up 2021
Post by: Boomerang on January 25, 2021, 11:21:04 PM
Post by: Boomerang on January 25, 2021, 11:21:04 PM
Looking good Lou.
Enjoying the tutorial.
Cheers
Gordon
Title: Re: P-40 Tutorial/Cook-up 2021
Post by: lastvautour on January 25, 2021, 11:21:28 PM
Post by: lastvautour on January 25, 2021, 11:21:28 PM
Mark an additional line 1mm on top and 2mm on the side and remove the wood between those lines. Work slow as to not take too much away. The side of the fuselage should look something like the last photo.
Lou


Lou
Title: Re: P-40 Tutorial/Cook-up 2021
Post by: lastvautour on January 25, 2021, 11:22:23 PM
Post by: lastvautour on January 25, 2021, 11:22:23 PM
Thank you Gordon.
Lou
Lou
Title: Re: P-40 Tutorial/Cook-up 2021
Post by: lastvautour on January 25, 2021, 11:26:20 PM
Post by: lastvautour on January 25, 2021, 11:26:20 PM
Place the template and mark the bottom of the canopy, front and rear. Flip the template and repeat for the other side. I marked the locations with red ink.
Lou


Lou
Title: Re: P-40 Tutorial/Cook-up 2021
Post by: lastvautour on January 25, 2021, 11:29:11 PM
Post by: lastvautour on January 25, 2021, 11:29:11 PM
Mark the forward fuselage 5mm from the center line and 5mm above the thrust line.
Lou


Lou
Title: Re: P-40 Tutorial/Cook-up 2021
Post by: lastvautour on January 25, 2021, 11:34:41 PM
Post by: lastvautour on January 25, 2021, 11:34:41 PM
Using the vertical template, draw the outline of the windscreen. Cut vertically the remove the wood down to the windscreen side image. The finished product looks like the last picture.
Lou


Lou
Title: Re: P-40 Tutorial/Cook-up 2021
Post by: lastvautour on January 25, 2021, 11:38:45 PM
Post by: lastvautour on January 25, 2021, 11:38:45 PM
Mark the rear fuselage as shown. Remove the wood between the top and side lines.
Lou


Lou
Title: Re: P-40 Tutorial/Cook-up 2021
Post by: lastvautour on January 25, 2021, 11:43:01 PM
Post by: lastvautour on January 25, 2021, 11:43:01 PM
Using either a sanding block or stick round off the upper fuselage. This is the time to try out the cross section gauge if you are so inclined. I wait until the lower fuselage is done.
Lou


Lou
Title: Re: P-40 Tutorial/Cook-up 2021
Post by: lastvautour on January 25, 2021, 11:47:57 PM
Post by: lastvautour on January 25, 2021, 11:47:57 PM
Cut out the cockpit glass from the side template and trace the outline using the top of the fuselage with the top of the canopy as a guide. Mark the remain lines using your Mk I eyeball.
Lou


Lou
Title: Re: P-40 Tutorial/Cook-up 2021
Post by: lastvautour on January 26, 2021, 12:01:14 AM
Post by: lastvautour on January 26, 2021, 12:01:14 AM
Moving on the the upper forward fuselage. Draw a line 5mm from the center line and 5mm form the outer edge when you get to where the fuselage narrows.
Lou


Lou
Title: Re: P-40 Tutorial/Cook-up 2021
Post by: lastvautour on January 26, 2021, 12:03:50 AM
Post by: lastvautour on January 26, 2021, 12:03:50 AM
Remove the wood from the two lines. Flip the fuselage over and cut vertically around the spinner and carefully remove the excess wood. The spinner show be eight sided by now.
Lou


Lou
Title: Re: P-40 Tutorial/Cook-up 2021
Post by: lastvautour on January 26, 2021, 12:08:10 AM
Post by: lastvautour on January 26, 2021, 12:08:10 AM
The green lines are half way between the high points. Roughly round out the fuselage using a blade followed by the sanding stick. My spinner turn out to be deeper than wide. Using the template showed me how much to remove to get it circular. Cut and sand slowly to ensure you do not remove too much.
Lou


Lou
Title: Re: P-40 Tutorial/Cook-up 2021
Post by: lastvautour on January 26, 2021, 12:10:30 AM
Post by: lastvautour on January 26, 2021, 12:10:30 AM
Your fuselage should look something like this in comparison to the block shape. And a little loo at what the future holds.
Lou


Lou
Title: Re: P-40 Tutorial/Cook-up 2021
Post by: lastvautour on January 27, 2021, 06:59:26 PM
Post by: lastvautour on January 27, 2021, 06:59:26 PM
Trace a line 5mm from the edge for the rear bottom and side fuselage. Remove the wood between the lines. Trace a line in the center of the newly exposed wood and 2.5mm up the side. Remove the high points and sand smooth.
Lou


Lou
Title: Re: P-40 Tutorial/Cook-up 2021
Post by: lastvautour on January 27, 2021, 07:00:43 PM
Post by: lastvautour on January 27, 2021, 07:00:43 PM
Draw some vertical parallel lines. Tilt the fuselage to see the profile you have created. Use he template guide to further check your progress. Sand any high spots.
Lou


Lou
Title: Re: P-40 Tutorial/Cook-up 2021
Post by: lastvautour on January 27, 2021, 07:11:28 PM
Post by: lastvautour on January 27, 2021, 07:11:28 PM
Trace lines 5mm from the edge for the top side and bottom of the forward fuselage. remove the excess wood between the lines. Trace a line on the face of the cooler 1.5mm from the edge as in the 2nd and 3rd photo. Trace a line 10mm from the bottom edge on the side of the cooler. Draw another line vertically 10mm from the face of the cooler.
Lou


Lou
Title: Re: P-40 Tutorial/Cook-up 2021
Post by: lastvautour on January 27, 2021, 07:19:49 PM
Post by: lastvautour on January 27, 2021, 07:19:49 PM
Take your sanding stick to bevel the boxed in area. Flip the stick on its side to do the vertical face fairing into the spinner. Shave the green areas and smooth the bottom of the cooler with your sanding stick or block. The fuselage should look something like this. P-40E on the left, P-40B on the right.
Lou


Lou
Title: Re: P-40 Tutorial/Cook-up 2021
Post by: lastvautour on January 27, 2021, 07:27:28 PM
Post by: lastvautour on January 27, 2021, 07:27:28 PM
Check the fit of the wing to the fuselage. Place the belly pan and see if there is a gap between it and the fuselage. If so, remove wood from the fuselage cutout. Work slow. I needed approx. 1mm to be removed. Once done, thin the belly pan to 2.5mm tapering the forward 10mm to 1.5mm and the rear halt down to 1mm. Round off the belly pan and set aside.
Lou


Lou
Title: Re: P-40 Tutorial/Cook-up 2021
Post by: lastvautour on January 27, 2021, 07:35:10 PM
Post by: lastvautour on January 27, 2021, 07:35:10 PM
Trace a line 10mm at the leading edge and 1mm at the rear of the wing filet blank. Sand the inner piece to fit snuggly against the fuselage. The filet is horizontal and lined up with the trailing edge of the wing. Put the fairing aside until the wing is glued. Things should look like the last photo.
Lou


Lou
Title: Re: P-40 Tutorial/Cook-up 2021
Post by: lastvautour on January 27, 2021, 07:43:00 PM
Post by: lastvautour on January 27, 2021, 07:43:00 PM
Take the blank undercarriage and throw them away. Use the drawing to locate the undercarriage fairing. Cut out new fairing 6mm X 6MM X 23mm. Line up a blank with the image drawn on the wing and mark to top front part where it needs to be cut. Mine were 3.5mm from the forward end. The cut out is 3mm deep. Round the leg cover as shown.
Lou


Lou
Title: Re: P-40 Tutorial/Cook-up 2021
Post by: lastvautour on January 27, 2021, 07:44:19 PM
Post by: lastvautour on January 27, 2021, 07:44:19 PM
Glue the undercarriage fairing to the wing. Ensure they are parallel to the center line.
Lou

Lou
Title: Re: P-40 Tutorial/Cook-up 2021
Post by: lastvautour on January 27, 2021, 07:49:42 PM
Post by: lastvautour on January 27, 2021, 07:49:42 PM
Do not spare the glue at this point as the grain are 90 degree to each other therefore shrinkage and expansion makes this a weak joint.
Line up the wing carefully. Note the P-40E has a center line and that makes it easier to align. Regardless, use a clamp or weights to secure the two parts together. Leave that to sit for a couple of days to ensure the glue is cured.
Lou


Line up the wing carefully. Note the P-40E has a center line and that makes it easier to align. Regardless, use a clamp or weights to secure the two parts together. Leave that to sit for a couple of days to ensure the glue is cured.
Lou
Title: Re: P-40 Tutorial/Cook-up 2021
Post by: lastvautour on January 28, 2021, 11:08:46 PM
Post by: lastvautour on January 28, 2021, 11:08:46 PM
Moving along to the tail feathers, Test fit the stab and tail fin to the fuselage. Since I did not allow for the thickness of the stab, so the fin will sit high. I removes approx. .75mm from the top of the fuselage notch and the bottom of the forward fin. These are marked in red. Take a bit at a time until the base of the fin is level with the lower fuselage. I glued the stab in place. Check to see that the stab is parallel to the main wing. Once set, I will glue the vertical fin.
Next we will attach the filets and upper forward fuselage scoop and fair them into the fuselage. Final sanding will follow with attachment of the guns and exhaust last.
Lou


Next we will attach the filets and upper forward fuselage scoop and fair them into the fuselage. Final sanding will follow with attachment of the guns and exhaust last.
Lou
Title: Re: P-40 Tutorial/Cook-up 2021
Post by: lastvautour on January 29, 2021, 09:47:57 PM
Post by: lastvautour on January 29, 2021, 09:47:57 PM
Glue the vertical fin and check carefully that it is actually vertical. If using white glue either tape in place or place blocks on either side as the glue has a tendency to pull the part one way or the other as it dries. Experience from my stick and tissue flying model days. I let mine dry overnight.
Lou


Lou
Title: Re: P-40 Tutorial/Cook-up 2021
Post by: lastvautour on January 29, 2021, 09:55:26 PM
Post by: lastvautour on January 29, 2021, 09:55:26 PM
Thin the filets to 1mm and check the fit before attaching with white glue. I sanded mine a bit on the inside to get a tight fit. Note the location on the fuselage. Looking at it from the rear, the filet should be parallel to the wing. A side view should see it having a slight upsweep at the rear. Tomorrow we use putty to fair things out and seal gaps.
Lou


Lou
Title: Re: P-40 Tutorial/Cook-up 2021
Post by: lastvautour on January 30, 2021, 08:14:35 PM
Post by: lastvautour on January 30, 2021, 08:14:35 PM
Belly pan glued. Next, putty.
Lou


Lou
Title: Re: P-40 Tutorial/Cook-up 2021
Post by: lastvautour on January 31, 2021, 10:10:22 PM
Post by: lastvautour on January 31, 2021, 10:10:22 PM
Tight corners can be filled using a rounded bamboo skewer or dowel. For larger area I marked off the area where putty/filler was to be applied. I applied it straight from the tube and faired it in with my finger. DO just one pass and let it dry thoroughly before sanding or adding filler.
Lou


Lou
Title: Re: P-40 Tutorial/Cook-up 2021
Post by: lastvautour on January 31, 2021, 10:11:59 PM
Post by: lastvautour on January 31, 2021, 10:11:59 PM
Additional filet/filler photos.
Lou


Lou
Title: Re: P-40 Tutorial/Cook-up 2021
Post by: lastvautour on January 31, 2021, 10:18:54 PM
Post by: lastvautour on January 31, 2021, 10:18:54 PM
As long as the putty/filler is dry to the touch we van add the carburetor scoop. I shaved a bit at a time from the bottom to match the shape of the upper fuselage.
Lou


Lou
Title: Re: P-40 Tutorial/Cook-up 2021
Post by: lastvautour on February 01, 2021, 08:19:51 PM
Post by: lastvautour on February 01, 2021, 08:19:51 PM
My filler was too thick and it shrunk while drying leaving a big crack in the filet. I applied another thin coat and will wait for the results. This occurred with all four filets. I thinned the filer a few days ago and I guess I used too much water. A word to the wise! I also made stands using scrap fiber board and 1/4" dowels.
Lou


Lou
Title: Re: P-40 Tutorial/Cook-up 2021
Post by: buccfan on February 01, 2021, 10:30:07 PM
Post by: buccfan on February 01, 2021, 10:30:07 PM
Excellent tutorial as usual Lou, regards Paul J. Great progress.
Title: Re: P-40 Tutorial/Cook-up 2021
Post by: lastvautour on February 02, 2021, 01:31:01 AM
Post by: lastvautour on February 02, 2021, 01:31:01 AM
Thank you Paul.
Lou
Lou
Title: Re: P-40 Tutorial/Cook-up 2021
Post by: Michaelpierce123 on February 02, 2021, 04:03:35 AM
Post by: Michaelpierce123 on February 02, 2021, 04:03:35 AM
Hi Lou,
Thanks again for doing this. Tonight I got my fuselage blank cut out. I laminated 2 pine blocks... but the 2 halves didn't glue together exactly evenly, and when I cut it to length one half was too short. I also did one from a solid piece of poplar I found at a big box store, so I continued with that.
Like you, I found it tough to line up the top and bottom tracing (do you trace both, or just the top)?
Finally, I found that my band saw marks were pretty visible on the sides. Is that an issue, as I think I'll be carving off much of this.
A personal struggle is hating to make mistakes, not know how to do something perfectly, and not being good at something. So this is an exercise in learning by making mistakes. :)
Attempting to post pictures here.
Title: Re: P-40 Tutorial/Cook-up 2021
Post by: lastvautour on February 02, 2021, 01:53:38 PM
Post by: lastvautour on February 02, 2021, 01:53:38 PM
Excellent achievement Michael. It has the making of a great P-40. I always leave a bit between the lines and the blade to allow for the roughness of the cut. Looking forward to more progress shots.
Remember, there are no stupid questions.
Lou
Remember, there are no stupid questions.
Lou
Title: Re: P-40 Tutorial/Cook-up 2021
Post by: Michaelpierce123 on February 02, 2021, 02:40:28 PM
Post by: Michaelpierce123 on February 02, 2021, 02:40:28 PM
Hi Lou,
Quick question: for the beginner do you suggest the flat wing + cut for dihedral, or the one piece with dihedral built in?
I saw your P-40B with one piece with the dihedral cut in... but not instructions on how to do that.
Quick question: for the beginner do you suggest the flat wing + cut for dihedral, or the one piece with dihedral built in?
I saw your P-40B with one piece with the dihedral cut in... but not instructions on how to do that.
Title: Re: P-40 Tutorial/Cook-up 2021
Post by: lastvautour on February 02, 2021, 07:27:11 PM
Post by: lastvautour on February 02, 2021, 07:27:11 PM
The flat build is easier to do. The built in dihedral version has some tricky cuts to get around the flow of the grain. I would recommend the flat version for your first. I will have to do a tutorial on "built-in" dihedral wings on a later project.
Lou
Lou
Title: Re: P-40 Tutorial/Cook-up 2021
Post by: lastvautour on February 03, 2021, 09:44:42 PM
Post by: lastvautour on February 03, 2021, 09:44:42 PM
With the filler having dried, we move on to sanding. I use various rounded object for the filet areas. I used large diameter dowel to do the filet shape. Work slowly and keep the sweep constant. Note the rear end of the filet is sanded to meet the fuselage smoothly. Various areas will need different size dowels. The trick is to avoid sanding too much filler. Areas like the stab and around the undercarriage blisters can be done with a flat piece of sandpaper doubled over. I used a sanding stick to fair the carb scoop into the fuselage.
My Kittyhawk is currently in the paint both with its first coat of grey primer. Photos to follow.
Lou


My Kittyhawk is currently in the paint both with its first coat of grey primer. Photos to follow.
Lou
Title: Re: P-40 Tutorial/Cook-up 2021
Post by: buccfan on February 03, 2021, 10:20:23 PM
Post by: buccfan on February 03, 2021, 10:20:23 PM
Looking good Lou, regards Paul J.
Title: Re: P-40 Tutorial/Cook-up 2021
Post by: lastvautour on February 03, 2021, 10:44:04 PM
Post by: lastvautour on February 03, 2021, 10:44:04 PM
Thank you Paul.
Lou
Lou
Title: Re: P-40 Tutorial/Cook-up 2021
Post by: Boomerang on February 04, 2021, 04:04:41 AM
Post by: Boomerang on February 04, 2021, 04:04:41 AM
Excellent work Lou.
Looking good so far Michael.
Cheers
Gordon
Title: Re: P-40 Tutorial/Cook-up 2021
Post by: lastvautour on February 04, 2021, 08:11:53 PM
Post by: lastvautour on February 04, 2021, 08:11:53 PM
First coat of primer applied. Next flip her over and do the bottom. It appears that no major surgery will be needed and sanding with 220 grit can begin followed by another coat of primer. Should things look good at this point a final sanding with 320 grit. A paint scheme has been chosen. Hopefully it will be completed this month.
Lou

Lou
Title: Re: P-40 Tutorial/Cook-up 2021
Post by: Boomerang on February 05, 2021, 10:39:55 PM
Post by: Boomerang on February 05, 2021, 10:39:55 PM
Looking Good Lou
Gordon
Title: Re: P-40 Tutorial/Cook-up 2021
Post by: lastvautour on February 06, 2021, 09:33:57 PM
Post by: lastvautour on February 06, 2021, 09:33:57 PM
Sanded with 220 grit with just a bit of filler needed at the forward base of the vertical fin.
Lou

Lou
Title: Re: P-40 Tutorial/Cook-up 2021
Post by: lastvautour on February 07, 2021, 08:05:39 PM
Post by: lastvautour on February 07, 2021, 08:05:39 PM
wet primer and dry primer. Things are looking good so far. I may not need another sanding. Next print the decals before painting.
Lou


Lou
Title: Re: P-40 Tutorial/Cook-up 2021
Post by: Gearup on February 08, 2021, 12:37:04 AM
Post by: Gearup on February 08, 2021, 12:37:04 AM
Looking good!
Fraser
Fraser
Title: Re: P-40 Tutorial/Cook-up 2021
Post by: lastvautour on February 08, 2021, 08:38:25 AM
Post by: lastvautour on February 08, 2021, 08:38:25 AM
Thank you Fraser.
Lou
Lou
Title: Re: P-40 Tutorial/Cook-up 2021
Post by: lastvautour on February 08, 2021, 06:55:58 PM
Post by: lastvautour on February 08, 2021, 06:55:58 PM
Decals printed. Code letter will be painted the appropriate colour before application.
Lou

Lou
Title: Re: P-40 Tutorial/Cook-up 2021
Post by: lastvautour on February 08, 2021, 07:00:34 PM
Post by: lastvautour on February 08, 2021, 07:00:34 PM
Painting started. The Tomahawk will be dark sea grey/dark green over light sea grey and the Kittyhawk dark earth/dark green over light grey. All will be brushed on.
Lou

Lou
Title: Re: P-40 Tutorial/Cook-up 2021
Post by: Boomerang on February 08, 2021, 10:54:44 PM
Post by: Boomerang on February 08, 2021, 10:54:44 PM
A question Lou.
When you paint the code letters do you seal them before application ?
Cheers
Gordon
Title: Re: P-40 Tutorial/Cook-up 2021
Post by: lastvautour on February 09, 2021, 12:07:10 AM
Post by: lastvautour on February 09, 2021, 12:07:10 AM
I always put a light coat of clear before painting.
Lou
Lou
Title: Re: P-40 Tutorial/Cook-up 2021
Post by: lastvautour on February 10, 2021, 08:01:38 PM
Post by: lastvautour on February 10, 2021, 08:01:38 PM
I traced the camouflage pattern and labels each colour. Model Master dark earth is being applied.
Lou


Lou
Title: Re: P-40 Tutorial/Cook-up 2021
Post by: Boomerang on February 10, 2021, 10:31:53 PM
Post by: Boomerang on February 10, 2021, 10:31:53 PM
Coming along nicely Lou
Gordon
Title: Re: P-40 Tutorial/Cook-up 2021
Post by: lastvautour on February 10, 2021, 11:00:27 PM
Post by: lastvautour on February 10, 2021, 11:00:27 PM
Thank you Gordon. I hope to be finished by month's end.
Lou
Lou
Title: Re: P-40 Tutorial/Cook-up 2021
Post by: lastvautour on February 11, 2021, 08:12:31 PM
Post by: lastvautour on February 11, 2021, 08:12:31 PM
Camouflage hand brushed on the Kittyhawk. I use masking tape to separate the upper and lower colours. All else is freehanded. I have also marked the location of the exhaust that can be attached at anytime. My exhausts are currently in the paint shop.
Lou


Lou
Title: Re: P-40 Tutorial/Cook-up 2021
Post by: Gearup on February 11, 2021, 09:12:49 PM
Post by: Gearup on February 11, 2021, 09:12:49 PM
What paint do you favor for hand brushing?
Thanks
Fraser
Thanks
Fraser
Title: Re: P-40 Tutorial/Cook-up 2021
Post by: buccfan on February 11, 2021, 09:33:48 PM
Post by: buccfan on February 11, 2021, 09:33:48 PM
Nice job on the camo Lou, I've got 2 X 3 colour ones to do, regards Paul J.
Title: Re: P-40 Tutorial/Cook-up 2021
Post by: lastvautour on February 12, 2021, 01:41:50 AM
Post by: lastvautour on February 12, 2021, 01:41:50 AM
Thank you Paul.
Lou
Lou
Title: Re: P-40 Tutorial/Cook-up 2021
Post by: lastvautour on February 12, 2021, 07:28:18 PM
Post by: lastvautour on February 12, 2021, 07:28:18 PM
I lost my template so I had to print another. Regardless, tape the cockpit glass template to the fuselage and apply thin tape to outline the rear glass. Once satisfied both sides are even, proceed to doing the main cockpit area. I have 1mm tape, however for years I cut my own from wider tape. I use to place a lined paper under picture glass and used a straight edge to get consistent width tape. Once all tape is laid go over it again with the handle of a brush or your nail to make sure it lays down properly in all areas. I use flat black paint sparingly to cover the area. Once dry and not before, I use the tip of my hobby knife to hook the tape and remove it. Sometimes touch ups are required so wait for the existing paint to cure before proceeding.
Lou
PS Note the exhausts have been attached.


Lou
PS Note the exhausts have been attached.
Title: Re: P-40 Tutorial/Cook-up 2021
Post by: lastvautour on February 13, 2021, 09:40:00 PM
Post by: lastvautour on February 13, 2021, 09:40:00 PM
Curtiss Kittyhawk completed 13 Feb 2021. Marking are home made but could be substituted from the spares box of plastic kit model decals. Details on decal construction is available in out Technique section. As our cook-ups never close, clarification on anything present here is available for the asking.
Lou


Lou
Title: Re: P-40 Tutorial/Cook-up 2021
Post by: Boomerang on February 14, 2021, 12:33:42 AM
Post by: Boomerang on February 14, 2021, 12:33:42 AM
Looks great Lou! Well Done!
Gordon
Title: Re: P-40 Tutorial/Cook-up 2021
Post by: lastvautour on February 14, 2021, 12:10:48 PM
Post by: lastvautour on February 14, 2021, 12:10:48 PM
Thank you Gordon.
Lou
Lou
Title: Re: P-40 Tutorial/Cook-up 2021
Post by: buccfan on February 14, 2021, 10:44:46 PM
Post by: buccfan on February 14, 2021, 10:44:46 PM
Nice Job Lou, well done with the markings, regards Paul J.
Title: Re: P-40 Tutorial/Cook-up 2021
Post by: lastvautour on February 14, 2021, 11:51:25 PM
Post by: lastvautour on February 14, 2021, 11:51:25 PM
Thank you Paul.
Lou
Lou
Title: Re: P-40 Tutorial/Cook-up 2021
Post by: Gearup on February 15, 2021, 12:56:30 AM
Post by: Gearup on February 15, 2021, 12:56:30 AM
Looks great Lou! I like the aircraft in the British camouflage. Well done.
Regards
Fraser
Regards
Fraser
Title: Re: P-40 Tutorial/Cook-up 2021
Post by: lastvautour on February 15, 2021, 01:07:37 AM
Post by: lastvautour on February 15, 2021, 01:07:37 AM
Markings are RCAF 118 Sqn based in Canada during WWII.
Lou
Lou
Title: Re: P-40 Tutorial/Cook-up 2021
Post by: Gearup on February 18, 2021, 06:33:36 AM
Post by: Gearup on February 18, 2021, 06:33:36 AM
Thanks for the clarification on the markings.
Regards
Fraser
Regards
Fraser
Title: Re: P-40 Tutorial/Cook-up 2021
Post by: lastvautour on February 19, 2021, 05:34:55 PM
Post by: lastvautour on February 19, 2021, 05:34:55 PM
RCAF 400 Sqn Tomahawk and RCAF 118 Sqn Kittyhawk are complete.
Lou

Lou