Title: WWII ID + Models Vol II
Post by: lastvautour on April 20, 2011, 07:59:37 PM
Post by: lastvautour on April 20, 2011, 07:59:37 PM
Feb 24, 2008 I asked Garet to send me the B-25 drawings from the gallery. Not wanting to hurry into a project, it only took three years to start on the B-25C. As per the Beaufort, drawings come from the ID Recognition Models in the gallery and other I found here and there. She will be a B-25C in 1/72 scale. I have compared the drawings to a couple of plastics I have and the drawings come out pretty good. I have done the block cutting and will start the contours shortly. The Mitchell is very big in comparison to the P-51 and other single engine models in the collection.
Lou


Lou
Title: Re: WWII ID + Models Vol II
Post by: lastvautour on April 22, 2011, 06:28:47 PM
Post by: lastvautour on April 22, 2011, 06:28:47 PM
The one piece wing is cut and shaping the airfoil contour will follow shortly.
Lou

Lou
Title: Re: WWII ID + Models Vol II
Post by: lastvautour on May 01, 2011, 01:03:38 PM
Post by: lastvautour on May 01, 2011, 01:03:38 PM
The Mitchell is at the top of the priority list. The wings are contoured and await some final sanding. The green tape is just masking tape as Frog tape(also green) is way to expensive for general use.


Title: Re: WWII ID + Models Vol II
Post by: dave_t on May 01, 2011, 02:10:29 PM
Post by: dave_t on May 01, 2011, 02:10:29 PM
I like the assembly photo, complete with rubber bands, string and pins.
Title: Re: WWII ID + Models Vol II
Post by: lastvautour on May 01, 2011, 02:39:21 PM
Post by: lastvautour on May 01, 2011, 02:39:21 PM
Thanks Dave, whatever works!!!
Lou
Lou
Title: Re: WWII ID + Models Vol II
Post by: lastvautour on May 14, 2011, 12:40:50 AM
Post by: lastvautour on May 14, 2011, 12:40:50 AM
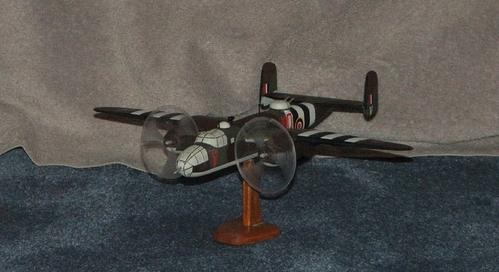
The B-25 is done. I used decals from a plastic kit rather than make my own. This will not happen very often, however the kit had two sets. Paint was Krylon rattle can except for the glass which was Model Master Ghost Grey.
http://smm.solidmodelmemories.net/Gallery/displayimage.php?pid=5745
Construction was at a fairly rapid pace as little else was a priority at this time.
Lou


http://smm.solidmodelmemories.net/Gallery/displayimage.php?pid=5745
Construction was at a fairly rapid pace as little else was a priority at this time.
Lou
Title: Re: WWII ID + Models Vol II
Post by: lastvautour on May 14, 2011, 12:48:26 AM
Post by: lastvautour on May 14, 2011, 12:48:26 AM
Almost forgot!! The paint edges were achieved using "Frog Tape". It worked very well when applied to smooth surfaces even if they are matte. The key is to ensure the edges are firmly pressed to the painted surface. Removing and replacing for alignment purposes did not affect its bonding quality. So for now, this product is recommended if you have problems with regular masking tape. If your tape work well, keep using it as "Frog Tape" is approx 2 & 1/2 times the cost of regular green or blue masking tape. I will keep a roll on hand for doing edges. The long term effect of storing the tape is unknown at this time but it does come in a air tight sealed container.
Lou
Lou
Title: Re: WWII ID + Models Vol II
Post by: Mark Braunlich on May 14, 2011, 01:26:20 AM
Post by: Mark Braunlich on May 14, 2011, 01:26:20 AM
Very nice Lou! I always think the Mitchell is the nicest looking of the American twins. Had the opportunity to work on a real one once or twice, long ago now. You've made a beautiful job of it.
Mark
Mark
Title: Re: WWII ID + Models Vol II
Post by: lastvautour on May 14, 2011, 01:01:36 PM
Post by: lastvautour on May 14, 2011, 01:01:36 PM
Thank you Mark. I recall seeing some being disassembled for scrap in 1958. Of course, taking a picture with my mom's Brownie was out of the question.
Lou
Lou
Title: Re: WWII ID + Models Vol II
Post by: Ken Pugh on May 14, 2011, 02:03:10 PM
Post by: Ken Pugh on May 14, 2011, 02:03:10 PM
She looks good, Lou, and a striking paint scheme. It was such an enjoyable model to build I am building two in a row!
Ken Pugh
Ken Pugh
Title: Re: WWII ID + Models Vol II
Post by: dave_t on May 14, 2011, 02:11:49 PM
Post by: dave_t on May 14, 2011, 02:11:49 PM
Lookin' good. Years ago, I built several of the Revell and Monogram 1/48 versions of the B-25. One of my favorites.
Title: Re: WWII ID + Models Vol II
Post by: lastvautour on May 14, 2011, 04:20:56 PM
Post by: lastvautour on May 14, 2011, 04:20:56 PM
Thank you Ken and Dave. The Mitchell is a nice aircraft to build and I have a thing for twin fins: Ercoupe, Nord 843, Expeditor & Skymaster. Now on to the next project???????????????
Lou
Lou
Title: Re: WWII ID + Models Vol II
Post by: Balsabasher on May 15, 2011, 12:09:29 PM
Post by: Balsabasher on May 15, 2011, 12:09:29 PM
Lou your B-25 Mitchell has turned out great,I also like the invasion striped paint scheme,well done.
Barry.
Barry.
Title: Re: WWII ID + Models Vol II
Post by: lastvautour on May 15, 2011, 12:33:11 PM
Post by: lastvautour on May 15, 2011, 12:33:11 PM
Thanks Barry. I like invasion stripe. They set things off in any aircraft and they don't even have to be sharply done as many were just hand painted at the last moment. Huuuummmmmmmmm how many days to 6 June??
D Day build. A quick one perhaps. I have a partially completed P-51! But that would be another topic.
Lou
D Day build. A quick one perhaps. I have a partially completed P-51! But that would be another topic.
Lou
Title: Re: WWII ID + Models Vol II
Post by: lastvautour on February 23, 2012, 08:54:27 PM
Post by: lastvautour on February 23, 2012, 08:54:27 PM
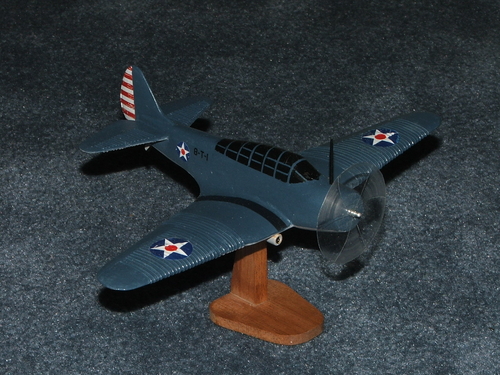
My latest WWII ID + model stands below ready to jump out of the wood. I may give this one Russian markings!!
Lou

Lou
Title: Re: WWII ID + Models Vol II
Post by: lastvautour on February 24, 2012, 02:15:23 PM
Post by: lastvautour on February 24, 2012, 02:15:23 PM
Top wing dihedral cut and very rough fuselage.
Lou

Lou
Title: Re: WWII ID + Models Vol II
Post by: lastvautour on March 05, 2012, 02:14:55 PM
Post by: lastvautour on March 05, 2012, 02:14:55 PM
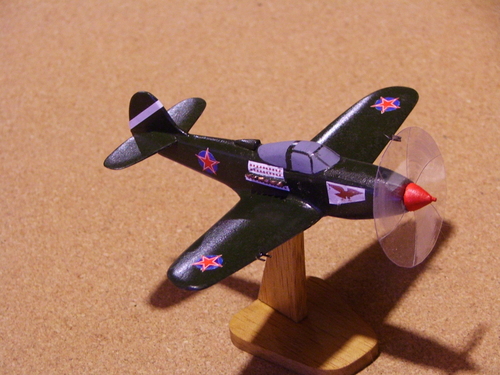
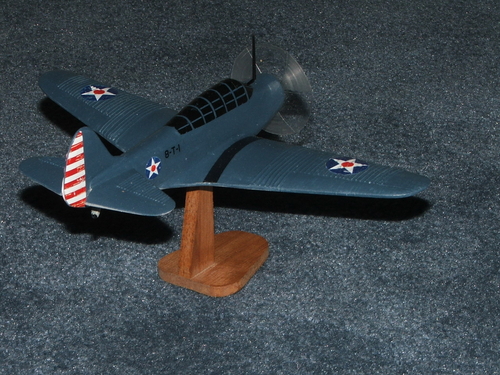
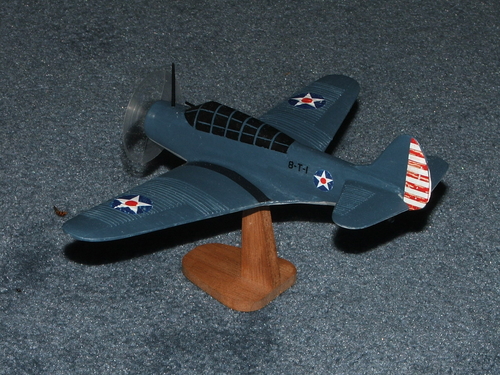
Time for primer to be applied.The P-39 lends itself to many paint schemes most of them olive drab plus identifying colours.
Lou

Lou
Title: Re: WWII ID + Models Vol II
Post by: Balsabasher on March 05, 2012, 11:03:58 PM
Post by: Balsabasher on March 05, 2012, 11:03:58 PM
Very nice project Lou.
Barry.
Barry.
Title: Re: WWII ID + Models Vol II
Post by: lastvautour on March 13, 2012, 11:59:23 PM
Post by: lastvautour on March 13, 2012, 11:59:23 PM
Thank you Barry. Production is rather slow this winter. Here is the latest addition to my WWII ID + fleet.
Lou
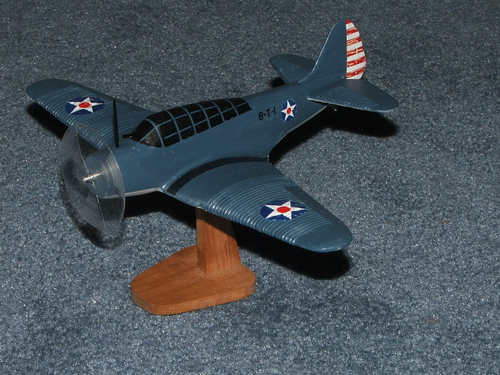
P.S. I am eyeing a Devastator for this series.!!!!!
The collection of ID + stands at 14 so far. Just another 76 to go.


Lou
P.S. I am eyeing a Devastator for this series.!!!!!
The collection of ID + stands at 14 so far. Just another 76 to go.
Title: Re: WWII ID + Models Vol II
Post by: lastvautour on March 14, 2012, 12:05:05 AM
Post by: lastvautour on March 14, 2012, 12:05:05 AM
Comparison with other WWII aircraft the P-39 appears to be smaller than most.
Lou


Lou
Title: Re: WWII ID + Models Vol II
Post by: lastvautour on March 14, 2012, 03:32:23 PM
Post by: lastvautour on March 14, 2012, 03:32:23 PM
Better pictures added to 2nd above post.
Lou
Lou
Title: Re: WWII ID + Models Vol II
Post by: cliff strachan on March 14, 2012, 08:40:09 PM
Post by: cliff strachan on March 14, 2012, 08:40:09 PM
Again a very nice model Lou. But I especially like the prop. Have you ever given any consideration to cutting away part of the plastic to make it possibly even more realistic? I had thought of this but that's as far as I got.
Cliff.
Cliff.
Title: Re: WWII ID + Models Vol II
Post by: lastvautour on March 15, 2012, 03:38:20 PM
Post by: lastvautour on March 15, 2012, 03:38:20 PM
I did think of it and will try it.
Lou
Lou
Title: Re: WWII ID + Models Vol II
Post by: lastvautour on March 17, 2012, 01:46:07 PM
Post by: lastvautour on March 17, 2012, 01:46:07 PM
Three more on the bench. A Devastator, Mosquito and a Wildcat all in WWII ID +. Drawings were taken from the WWII ID plan section on SMM. http://smm.solidmodelmemories.net/Gallery/index.php?cat=13 I did not realize that the Devastator wing was almost a big as the twin engine Mosquito. Regardless, templates have been printed and glued to cardboard. The Wildcat templates have been cut out and the basic blocks marked and cut out.
Lou
Lou
Title: Re: WWII ID + Models Vol II
Post by: Balsabasher on March 17, 2012, 02:51:20 PM
Post by: Balsabasher on March 17, 2012, 02:51:20 PM
Looks good in the Ruskie scheme.
Barry.
Barry.
Title: Re: WWII ID + Models Vol II
Post by: lastvautour on March 23, 2012, 05:49:23 PM
Post by: lastvautour on March 23, 2012, 05:49:23 PM
Thank you Barry. Here are some progress shots.
Lou


Lou
Title: Re: WWII ID + Models Vol II
Post by: Peter on March 23, 2012, 06:34:41 PM
Post by: Peter on March 23, 2012, 06:34:41 PM
You know Lou, I really wish you would just write a how to book! It would make it easier for the rest of us.
Peter
Peter
Title: Re: WWII ID + Models Vol II
Post by: Balsabasher on March 25, 2012, 11:09:01 PM
Post by: Balsabasher on March 25, 2012, 11:09:01 PM
I just love the Mossie as you have portrayed it so far,a classic in the making.
Barry.
Barry.
Title: Re: WWII ID + Models Vol II
Post by: lastvautour on March 28, 2012, 02:35:27 AM
Post by: lastvautour on March 28, 2012, 02:35:27 AM
Moving a bit further along. Most parts are just sanded with 100 grit paper so far.
Lou


Lou
Title: Re: WWII ID + Models Vol II
Post by: Balsabasher on March 28, 2012, 08:35:29 AM
Post by: Balsabasher on March 28, 2012, 08:35:29 AM
Is that what we call minimum recognition features Lou !! looks like a dinosaur at the moment,you are a tease !
Barry.
Barry.
Title: Re: WWII ID + Models Vol II
Post by: lastvautour on April 01, 2012, 02:31:43 PM
Post by: lastvautour on April 01, 2012, 02:31:43 PM
The current shots do not show much more than before, however sealer has been applied and sanded and putty has been added to smooth out certain areas. Thread is being used to simulate the corrugated wings on the devastator.
Lou


Lou
Title: Re: WWII ID + Models Vol II
Post by: cliff strachan on April 02, 2012, 07:51:49 PM
Post by: cliff strachan on April 02, 2012, 07:51:49 PM
Hi Lou. Thread to simulate corrugated wings? Hmm. I wonder! Do you think your method could also be used on any 1/72 scale model? An idea I haven't thought of. Also in the long run do you think that the thread might be subject to deterioration due to it being under paint?
Cliff.
Cliff.
Title: Re: WWII ID + Models Vol II
Post by: Balsabasher on April 02, 2012, 08:14:47 PM
Post by: Balsabasher on April 02, 2012, 08:14:47 PM
Cliff speaking from personal experience the thread should be fine after a long period of time,I have used cotton thread with success and the models are still in god condition,modern synthetic threads should have even better longevity,the clear dope encapsulates the thread which seems to protect it much the same as tissue does over thread as well.
Another way of simulating corrugations which takes a bit of practise is to use a comb,for the carrier you use thixotropic acrylic medium,you need to prepare the surface in the usual way then spread on the medium with a brush,the comb is drawn through the liquid and with care a good simulated finish can be achieved,you can even use rubber graining combs but these are difficult to get hold of these days,these were used to simulate wood grain effects onto various items including car dashboards.
The secret behind the thixotropic medium is to attack the corrugations at just the right time as the medium starts to cure,once mastered it will hold its edge nicely simulating the most difficult to achieve effect on our models.
Barry.
Title: Re: WWII ID + Models Vol II
Post by: cliff strachan on April 02, 2012, 11:20:02 PM
Post by: cliff strachan on April 02, 2012, 11:20:02 PM
Thanks Barry. Your method for corrugation is very similar to what I was planning - still in the back of my mind so to speak - in that while thinking of the single engined Junkers J54 CF ROM which was very famous in Western Canadian bush lore I thought if I incised the corrugations after a dope primer had been applied I might be able to establish their being or essential features sufficiently at 1/72 sale. As this aircraft has it's corrugations at various separations over the entire aircraft it is poised to be a significant problem.
At the moment or in the pre-planning stage I hoped to incise the corrugations - and their various numbers per given area - with the tools at hand and from photos.
Cliff.
At the moment or in the pre-planning stage I hoped to incise the corrugations - and their various numbers per given area - with the tools at hand and from photos.
Cliff.
Title: Re: WWII ID + Models Vol II
Post by: lastvautour on April 03, 2012, 11:25:02 AM
Post by: lastvautour on April 03, 2012, 11:25:02 AM
I have used thread in other application and other than it takes forever, I have had no problems. My Devastator is 1/72.
Lou
Lou
Title: Re: WWII ID + Models Vol II
Post by: Balsabasher on April 03, 2012, 12:05:00 PM
Post by: Balsabasher on April 03, 2012, 12:05:00 PM
A good tip when laying thread onto a wing is to make a pre-notched jig that the wing will slide into,by using the notches you can wind away with accuracy then fix the thread with clear dope,then run a blade to remove it from the jig and tuck in the surplus.
To do selected corrugations as on the Junkers W.34 etc with the liquid method you can mask off the non corrugated portions first before applying the build up thixotropic medium,once cured simply remove the tape to reveal clean breaks where the metal is flat.
Barry.
To do selected corrugations as on the Junkers W.34 etc with the liquid method you can mask off the non corrugated portions first before applying the build up thixotropic medium,once cured simply remove the tape to reveal clean breaks where the metal is flat.
Barry.
Title: Re: WWII ID + Models Vol II
Post by: lastvautour on April 06, 2012, 02:43:14 PM
Post by: lastvautour on April 06, 2012, 02:43:14 PM
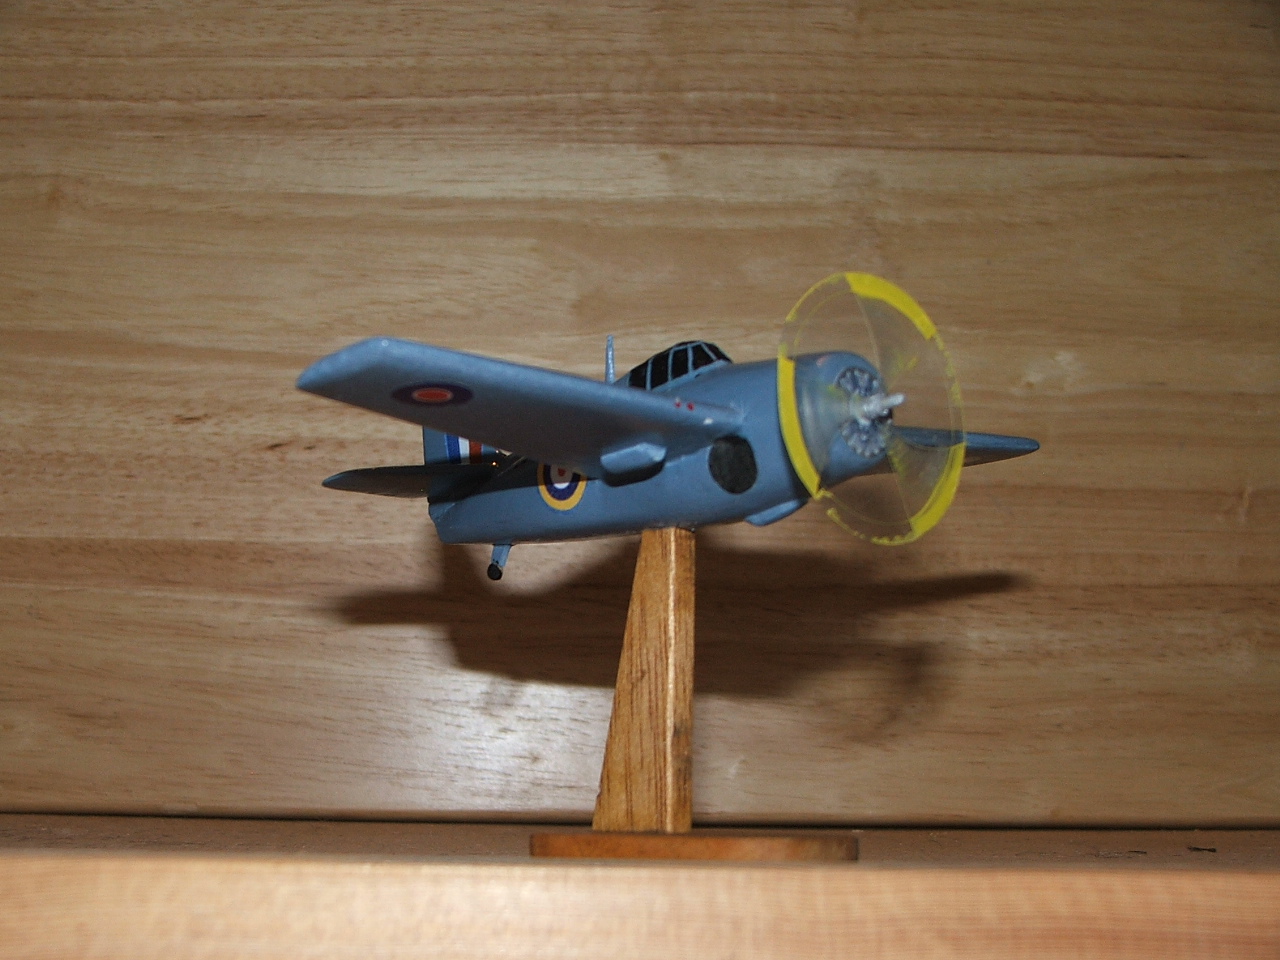
The first to make it to the paint shop is the Martlet in light azure blue. I quote Wings Palette http://wp.scn.ru/en/ww2/f/574/9/0
Unit: 805 NAS, FAA
Serial: F (AX730)
Sidi Haneish (LG102), Egypt, September 1941. Forming one flight of Royal Naval Fighter Squadron in Western Desert, No 805's Martlets finished light azure blue overall.
Lou

Unit: 805 NAS, FAA
Serial: F (AX730)
Sidi Haneish (LG102), Egypt, September 1941. Forming one flight of Royal Naval Fighter Squadron in Western Desert, No 805's Martlets finished light azure blue overall.
Lou
Title: Re: WWII ID + Models Vol II
Post by: Balsabasher on April 06, 2012, 08:52:02 PM
Post by: Balsabasher on April 06, 2012, 08:52:02 PM
Interesting colour choice Lou,did you use ready mixed paint ? if so is it cellulose type or enamel,this is a very difficult blue to pre-mix a bit like PRU blue used for photographic recce aircraft,I think the Azure shade is what is termed non specular.
Barry.
Barry.
Title: Re: WWII ID + Models Vol II
Post by: lastvautour on April 06, 2012, 09:51:34 PM
Post by: lastvautour on April 06, 2012, 09:51:34 PM
I have/had a tin of Humbrol azure blue but it was dried out after so many years sitting on the shelf. I used DecoArt acrylic with a bit of mixing to get what I thought was the correct shade.
Lou
Lou
Title: Re: WWII ID + Models Vol II
Post by: cliff strachan on April 07, 2012, 04:11:43 PM
Post by: cliff strachan on April 07, 2012, 04:11:43 PM
A difficult colour to mix. But you've done a very good job, Lou. When searching for a similar colour for one of my F6Fs I was amazed to discouver that, according to Model Master's colour chart for enamels, the colour I was looking for was listed under the "blues" but called "grey" with a grey SF number? Something for modelers to watch out for.
Cliff.
Cliff.
Title: Re: WWII ID + Models Vol II
Post by: lastvautour on April 07, 2012, 06:15:17 PM
Post by: lastvautour on April 07, 2012, 06:15:17 PM
I found that blue and grey cross each other's line quite often.
Lou
Lou
Title: Re: WWII ID + Models Vol II
Post by: lastvautour on April 08, 2012, 10:07:39 PM
Post by: lastvautour on April 08, 2012, 10:07:39 PM
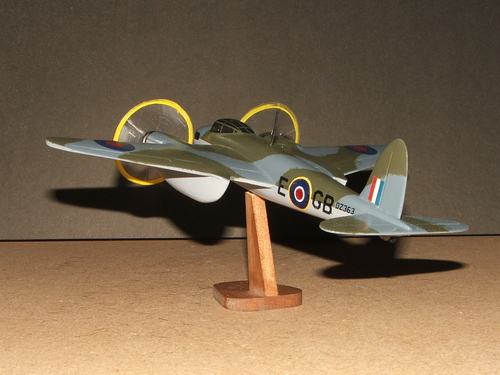
The Martlet is finished and gives time for the Mosquito which is next in line.
http://smm.solidmodelmemories.net/Gallery/displayimage.php?pid=6781
Lou
http://smm.solidmodelmemories.net/Gallery/displayimage.php?pid=6781
Lou
Title: Re: WWII ID + Models Vol II
Post by: Balsabasher on April 09, 2012, 10:11:05 AM
Post by: Balsabasher on April 09, 2012, 10:11:05 AM
Props spinning away,very effective.
Barry.
Barry.
Title: Re: WWII ID + Models Vol II
Post by: lastvautour on April 19, 2012, 11:53:39 AM
Post by: lastvautour on April 19, 2012, 11:53:39 AM
The Devastator and Mosquito are still rumaging in the background with the TBD wing almost finished corrugation and will be mated to the fuselage later this week followed by the large fillet. The Mosquito wing is glues and only await a bit of sanding before attachment of the wings.
Lou

Lou
Title: Re: WWII ID + Models Vol II
Post by: lastvautour on April 24, 2012, 03:36:31 PM
Post by: lastvautour on April 24, 2012, 03:36:31 PM
The corrugation is completed on the main wing of the Devastator. The glistening on the blue side is due to the paint still being wet. The Mosquito is ready for painting after several trips to the primer shop for make overs.
Lou


Lou
Title: Re: WWII ID + Models Vol II
Post by: Balsabasher on April 24, 2012, 10:01:31 PM
Post by: Balsabasher on April 24, 2012, 10:01:31 PM
Lou as I was building today I was thinking about our two busy workbences some thousands of miles apart,your Mossie looks really good,one of my al time favourite aerpanes.
Barry.
Barry.
Title: Re: WWII ID + Models Vol II
Post by: lastvautour on April 24, 2012, 10:52:02 PM
Post by: lastvautour on April 24, 2012, 10:52:02 PM
The Mosquito has a special place for many. The movie 633 Squadron was my first movie while at basic training in 1966. I just watched it again about a month ago. To bad they destroyed so many Mossies during the making of the film.
Lou
Lou
Title: Re: WWII ID + Models Vol II
Post by: Balsabasher on April 25, 2012, 10:25:09 AM
Post by: Balsabasher on April 25, 2012, 10:25:09 AM
In actual fact Lou that is not entirely true,the press have expanded on this over the years,this is what happened-
A scene was needed where a Mosquito was required to tax into a fuel bowser and explode,a wooden mock up was used at first but the film director was not happy with the effect,as it happened Group Captain Mahaddie who was responsible for the location of surviving Mosquitoe's which were the last ones in service with the RAF arranged the loan for filming,one single aircraft in poor condition was also purchased by the film company for making props and plaster casts from,it was decided to drag this along the ground on a stout cable into a burning bowser,if you look carefully at the film you can see this sequence,the Mosquito was wrecked,but this was the only aircraft damaged,as it happened a few months later one of the aircraft suffered an engine failure and made a forced landing,this is now in the Imperial War museum collection at Duxford having been rebuilt to static codition.
I hope that you do not mind me pointing this out Lou in the interests of historical accuracy.
Barry.
Title: Re: WWII ID + Models Vol II
Post by: lastvautour on May 02, 2012, 06:54:57 PM
Post by: lastvautour on May 02, 2012, 06:54:57 PM
Busy busy with building gates for the deck and still getting things done down here.
Lou

Lou
Title: Re: WWII ID + Models Vol II
Post by: Balsabasher on May 02, 2012, 11:22:24 PM
Post by: Balsabasher on May 02, 2012, 11:22:24 PM
Thats what I like to see plenty going on.
Barry.
Barry.
Title: Re: WWII ID + Models Vol II
Post by: lastvautour on May 03, 2012, 07:24:27 PM
Post by: lastvautour on May 03, 2012, 07:24:27 PM
First gate done on front porch. One more to go. I may have a few hours of peace doing what I love best later tonight.
Lou
Lou
Title: Re: WWII ID + Models Vol II
Post by: lastvautour on May 06, 2012, 04:15:55 PM
Post by: lastvautour on May 06, 2012, 04:15:55 PM
The Mosquito paint has been applied and now masking for the glass parts is next. I misplaced a spinner somehow and will have to do a thorough search to find it or make another.

Title: Re: WWII ID + Models Vol II
Post by: Balsabasher on May 06, 2012, 07:36:39 PM
Post by: Balsabasher on May 06, 2012, 07:36:39 PM
I really like this Mossie,it is really coming to life now with the camouflage.
A Mosquito is on my to-do list for the future.
Barry.
A Mosquito is on my to-do list for the future.
Barry.
Title: Re: WWII ID + Models Vol II
Post by: lastvautour on May 16, 2012, 07:40:42 PM
Post by: lastvautour on May 16, 2012, 07:40:42 PM
Progress report on Mossie and Devastator as per May Ping comments.
Lou


Lou
Title: Re: WWII ID + Models Vol II
Post by: lastvautour on May 21, 2012, 04:40:30 PM
Post by: lastvautour on May 21, 2012, 04:40:30 PM
The Devastator was rolled out this morning with the following results. I was afraid the decals would not sit onto the corrugation but my fears were for not. This is the fourth 1/72 naval subject from the WWII ID plans on site.
Lou
More photos in the next post.
Lou
More photos in the next post.
Title: Re: WWII ID + Models Vol II
Post by: lastvautour on May 21, 2012, 04:43:02 PM
Post by: lastvautour on May 21, 2012, 04:43:02 PM
Additional photos not loaded to the gallery. The last photo shows her new home.
Lou


Lou
Title: Re: WWII ID + Models Vol II
Post by: lastvautour on May 21, 2012, 04:44:49 PM
Post by: lastvautour on May 21, 2012, 04:44:49 PM
The 1/72 naval fleet is growing.
Lou


Lou
Title: Re: WWII ID + Models Vol II
Post by: Balsabasher on May 21, 2012, 07:19:29 PM
Post by: Balsabasher on May 21, 2012, 07:19:29 PM
Ther wing corrugations on the Devastator have turned out really well Lou,quite a fleet of miniature Naval aircraft you have there.
Barry.
Barry.
Title: Re: WWII ID + Models Vol II
Post by: lastvautour on May 21, 2012, 07:59:24 PM
Post by: lastvautour on May 21, 2012, 07:59:24 PM
Thank you Barry.
The DH.98 Mosquito is hot on the Devastator's tail and rolled out this afternoon.

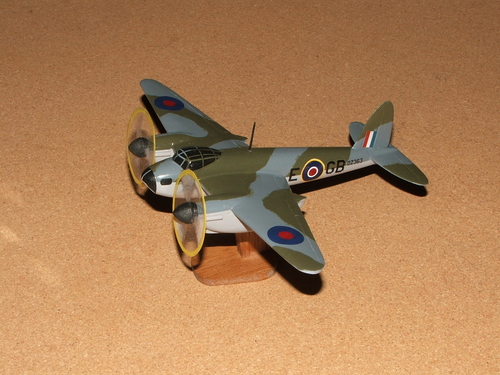
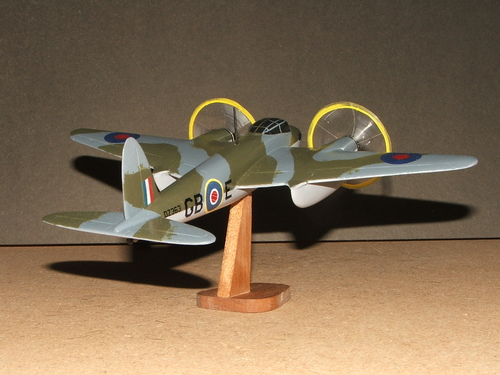
Some things are beyond my skills and beyond my budget to purchase. In this case the Code letters should be "Sky" rather than black. I may try to paint over them as some point, but for now my apologies to 105 Squadron.
Lou
The DH.98 Mosquito is hot on the Devastator's tail and rolled out this afternoon.
Some things are beyond my skills and beyond my budget to purchase. In this case the Code letters should be "Sky" rather than black. I may try to paint over them as some point, but for now my apologies to 105 Squadron.
Lou
Title: Re: WWII ID + Models Vol II
Post by: lastvautour on May 21, 2012, 08:01:40 PM
Post by: lastvautour on May 21, 2012, 08:01:40 PM
The twin engine group is up to 4.
Lou


Lou
Title: Re: WWII ID + Models Vol II
Post by: Balsabasher on May 21, 2012, 10:36:17 PM
Post by: Balsabasher on May 21, 2012, 10:36:17 PM
Superb display Lou,represents many hours of joy and passion carving,sanding and painting.
Barry.
Barry.
Title: Re: WWII ID + Models Vol II
Post by: lastvautour on May 21, 2012, 11:02:55 PM
Post by: lastvautour on May 21, 2012, 11:02:55 PM
Definitely a passion for both of us.
Lou
Lou
Title: Re: WWII ID + Models Vol II
Post by: cliff strachan on May 22, 2012, 03:16:20 PM
Post by: cliff strachan on May 22, 2012, 03:16:20 PM
A really neat Mosquito, Lou. A wonderful group.
Cliff.
Cliff.
Title: Re: WWII ID + Models Vol II
Post by: lastvautour on May 22, 2012, 04:45:46 PM
Post by: lastvautour on May 22, 2012, 04:45:46 PM
Thank you Cliff.
Lou
Lou
Title: Re: WWII ID + Models Vol II
Post by: buccfan on May 23, 2012, 08:39:37 PM
Post by: buccfan on May 23, 2012, 08:39:37 PM
Two great additions to your airforce Lou, excellent work. What programme do you use to make your decals? Regards Paul J.
Title: Re: WWII ID + Models Vol II
Post by: lastvautour on May 24, 2012, 01:11:41 AM
Post by: lastvautour on May 24, 2012, 01:11:41 AM
Thanks Paul. I just use MS Word to make my decals and images downloaded from the web.
Lou
Lou
Title: Re: WWII ID + Models Vol II
Post by: lastvautour on August 06, 2012, 10:42:43 PM
Post by: lastvautour on August 06, 2012, 10:42:43 PM
Two new subjects: A Hellcat and a shelved Mustang. The Hellcat was started from scratch but the Mustang was carved to block shape before I put it away last year.
Lou


Lou
Title: Re: WWII ID + Models Vol II
Post by: lastvautour on August 07, 2012, 10:10:00 PM
Post by: lastvautour on August 07, 2012, 10:10:00 PM
All major carving has been done with sealing and sanding coming later tonight. The first Mustang IV was done some time ago. I have started the exhaust pipes by slant cut to a 1mm bamboo stick from my place mat. Super glue ties it together and then sanding will bring it down to the size needed.
Lou


Lou
Title: Re: WWII ID + Models Vol II
Post by: lastvautour on August 08, 2012, 06:40:46 PM
Post by: lastvautour on August 08, 2012, 06:40:46 PM
An accident on the assembly line lead to a cracked P-51 tail assembly. The operator forgot that the tail was only tacked in place and added putty before finishing the glue job. That allowed the Hellcat to take the lead and move to the spray booth first.
Lou


Lou
Title: Re: WWII ID + Models Vol II
Post by: lastvautour on August 09, 2012, 02:31:39 PM
Post by: lastvautour on August 09, 2012, 02:31:39 PM
Primer applied and leaving for holidays tomorrow. Not much more to report until my return next week.
Lou

Lou
Title: Re: WWII ID + Models Vol II
Post by: lastvautour on August 19, 2012, 01:38:01 AM
Post by: lastvautour on August 19, 2012, 01:38:01 AM
The Hellcat and Mustang were completed within minutes so I will present them both. The Mustang is a P-51D from the Tuskegee Squadron Duchess Arlene and the Hellcat an F6F from the Royal Navy Fleet Air Arm Pacific Theatre.
Lou


Lou
Title: Re: WWII ID + Models Vol II
Post by: lastvautour on August 19, 2012, 01:41:36 AM
Post by: lastvautour on August 19, 2012, 01:41:36 AM
With the addition of the Hellcat and new Mustang, this brings my WWII ID + Squadron numbers up to 19. Some are not true WWII ID planes, but they were built in the same fashion and level of detail.
Lou

Lou
Title: Re: WWII ID + Models Vol II
Post by: buccfan on August 19, 2012, 09:07:32 AM
Post by: buccfan on August 19, 2012, 09:07:32 AM
Excellent pair Lou, I like the colour schemes and your decals with the nose art. The exhaust look very effective, there are so many tips and methods used on this site to pick up.Regards Paul J.
Title: Re: WWII ID + Models Vol II
Post by: lastvautour on August 19, 2012, 12:01:47 PM
Post by: lastvautour on August 19, 2012, 12:01:47 PM
Thank you Paul. This is the BEST site for solids.
Lou
Lou
Title: Re: WWII ID + Models Vol II
Post by: lastvautour on June 11, 2014, 09:58:19 PM
Post by: lastvautour on June 11, 2014, 09:58:19 PM
Starting another WWII ID + Model namely the Lancaster. She is big in comparison to single engine fighters. At 17 inches of wing span and just over 11 inches long, she will barely fit in the new display case. Next to it will be a Halifax Mk III. Lanc drawings are printed but the start date is not yet set. I am using the ID plans from the site.
Lou
Lou
Title: Re: WWII ID + Models Vol II
Post by: lastvautour on July 27, 2014, 10:53:59 PM
Post by: lastvautour on July 27, 2014, 10:53:59 PM
She will take up quite a bit of space, however the stand is high enough to allow the smaller single engine models to fit under her wing.
Lou

Lou
Title: Re: WWII ID + Models Vol II
Post by: lastvautour on August 26, 2014, 07:28:33 PM
Post by: lastvautour on August 26, 2014, 07:28:33 PM
The Mustang Squadron now has a P-51 Mk I, a P-51 Mk IV, a P-51 Mk.23 and a P-51D.
Lou

Lou
Title: Re: WWII ID + Models Vol II
Post by: lastvautour on October 07, 2014, 01:35:26 PM
Post by: lastvautour on October 07, 2014, 01:35:26 PM
The Mustang squadron has an another addition within a short period of time and one more Mustang is on the bench. Although a bit hard to see from this picture, the RAAF Mustang roundels have been replaced with properly oriented Kangaroos.
Lou

Lou
Title: Re: WWII ID + Models Vol II
Post by: lastvautour on October 31, 2014, 03:49:10 PM
Post by: lastvautour on October 31, 2014, 03:49:10 PM
The 6th Mustang joins the Squadron.
Lou

Lou
Title: Re: WWII ID + Models Vol II
Post by: Biggles on November 01, 2014, 12:42:53 AM
Post by: Biggles on November 01, 2014, 12:42:53 AM
Good work Lou, Looking great!
Title: Re: WWII ID + Models Vol II
Post by: lastvautour on November 01, 2014, 11:08:24 AM
Post by: lastvautour on November 01, 2014, 11:08:24 AM
Thank you Biggles.
Lou
Lou
Title: Re: WWII ID + Models Vol II
Post by: lastvautour on December 23, 2014, 03:58:50 PM
Post by: lastvautour on December 23, 2014, 03:58:50 PM
Royal Canadian Air Force 410 Squadron Defiant was built for the 2014 year end quickie build.
Lou


Lou
Title: Re: WWII ID + Models Vol II
Post by: lastvautour on December 24, 2014, 06:04:04 PM
Post by: lastvautour on December 24, 2014, 06:04:04 PM
Royal Air Force No 2 Squadron Defiant was built for the 2014 year end build.
Lou


Lou
Title: Re: WWII ID + Models Vol II
Post by: lastvautour on January 16, 2015, 01:57:30 PM
Post by: lastvautour on January 16, 2015, 01:57:30 PM
ROKAF P-51D makes the 7th Mustang to date. The sole Mk I is absent.
Lou

Lou
Title: Re: WWII ID + Models Vol II
Post by: lastvautour on February 21, 2017, 10:03:34 PM
Post by: lastvautour on February 21, 2017, 10:03:34 PM
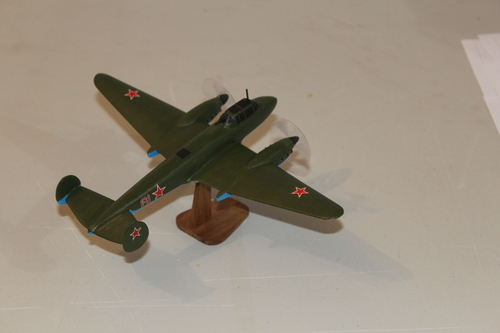
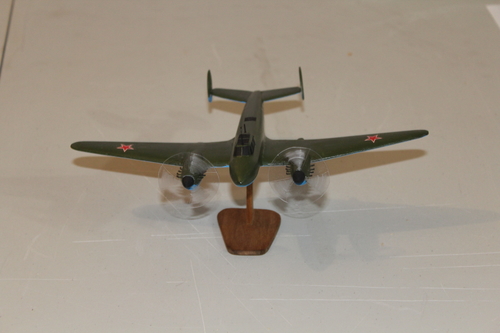
My production of ID + models has been still far too long. I hope to make more after this Petlyakov Pe-2.
Lou
Lou
Title: Re: WWII ID + Models Vol II
Post by: Biggles on February 24, 2017, 08:14:38 AM
Post by: Biggles on February 24, 2017, 08:14:38 AM
Loovly! my great grand dad built one of these at about 6cm WS whilst on anti aircraft duty in the northern territory AU. one of about 30 models of that size.
Title: Re: WWII ID + Models Vol II
Post by: lastvautour on May 02, 2017, 11:28:02 PM
Post by: lastvautour on May 02, 2017, 11:28:02 PM
Biggles, are any of those still around?
Lou
Lou
Title: Re: WWII ID + Models Vol II
Post by: lastvautour on May 02, 2017, 11:29:15 PM
Post by: lastvautour on May 02, 2017, 11:29:15 PM
Just over a month for the Yak 4.
Lou

Lou
Title: Re: WWII ID + Models Vol II
Post by: Peter on May 04, 2017, 02:43:17 AM
Post by: Peter on May 04, 2017, 02:43:17 AM
Well done Lou!
Peter
Peter
Title: Re: WWII ID + Models Vol II
Post by: lastvautour on May 04, 2017, 11:17:15 AM
Post by: lastvautour on May 04, 2017, 11:17:15 AM
Thank you Peter.
Lou
Lou
Title: Re: WWII ID + Models Vol II
Post by: Biggles on June 26, 2017, 08:02:06 AM
Post by: Biggles on June 26, 2017, 08:02:06 AM
Yes they are, I have got photos somewhere on mums phone, I will have to dig them out for you!
Title: Re: WWII ID + Models Vol II
Post by: lastvautour on November 19, 2017, 01:21:32 AM
Post by: lastvautour on November 19, 2017, 01:21:32 AM
Just discovered a terrible error in my first Vought Corsair. I glued the vertical fin on backwards. Will have to sort that out. I found out by comparing old 2011 photos to the current Corsair I am building with Rick.
http://smm.solidmodelmemories.net/SMF/index.php?topic=599.msg5309#msg5309
Lou
http://smm.solidmodelmemories.net/SMF/index.php?topic=599.msg5309#msg5309
Lou
Title: Re: WWII ID + Models Vol II
Post by: lastvautour on November 23, 2017, 03:01:59 PM
Post by: lastvautour on November 23, 2017, 03:01:59 PM
F4U Corsair built as a tutorial for a new member. Details at http://smm.solidmodelmemories.net/SMF/index.php?topic=1581.0
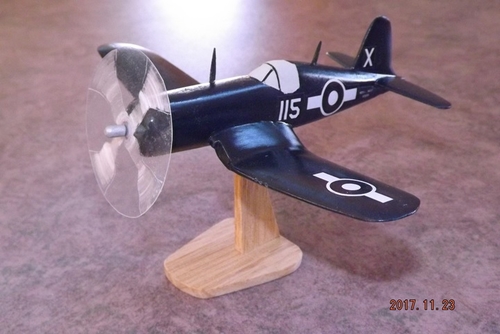
Robert Hampton "Hammy" Gray, VC, DSC (November 2, 1917 – August 9, 1945) was a Canadian naval officer, pilot, and recipient of the Victoria Cross (VC) during World War II, while flying with the Royal Navy's Fleet Air Arm HMS Formidable.
Lou
Robert Hampton "Hammy" Gray, VC, DSC (November 2, 1917 – August 9, 1945) was a Canadian naval officer, pilot, and recipient of the Victoria Cross (VC) during World War II, while flying with the Royal Navy's Fleet Air Arm HMS Formidable.
Lou
Title: Re: WWII ID + Models Vol II
Post by: lastvautour on March 05, 2018, 10:09:50 PM
Post by: lastvautour on March 05, 2018, 10:09:50 PM
Just about to start an ID+ Hawker Hurricane in 1/72 scale. I fear any bigger scale would be problematic for me to simulate the fabric covered rear fuselage. The RCAF No 1 Squadron took part in the Battle of Britain and that will be my colour scheme.
Lou
Lou
Title: Re: WWII ID + Models Vol II
Post by: lastvautour on March 09, 2018, 05:15:10 PM
Post by: lastvautour on March 09, 2018, 05:15:10 PM
Hurricane major components in block shape.
Lou

Lou
Title: Re: WWII ID + Models Vol II
Post by: lastvautour on April 14, 2018, 07:19:33 PM
Post by: lastvautour on April 14, 2018, 07:19:33 PM
Wings and fuselage are glued and rough sanded. Filets have been added and puttied.
Lou

Lou
Title: Re: WWII ID + Models Vol II
Post by: buccfan on April 15, 2018, 09:30:23 AM
Post by: buccfan on April 15, 2018, 09:30:23 AM
Looking good Lou, regards Paul J.
Title: Re: WWII ID + Models Vol II
Post by: lastvautour on April 15, 2018, 12:02:20 PM
Post by: lastvautour on April 15, 2018, 12:02:20 PM
This is my first Hurricane. I have always been afraid of making one because of the fabric rear fuselage ribbing. I decided to ignore that feature and leave the area smooth. U am using the SMM USN ID drawing & plan.
Lou
Lou
Title: Re: WWII ID + Models Vol II
Post by: Boomerang on April 18, 2018, 06:22:13 AM
Post by: Boomerang on April 18, 2018, 06:22:13 AM
Looks great so far!
Gordon
Title: Re: WWII ID + Models Vol II
Post by: lastvautour on April 18, 2018, 10:59:21 AM
Post by: lastvautour on April 18, 2018, 10:59:21 AM
Thank you Gordon.
Lou
Lou
Title: Re: WWII ID + Models Vol II
Post by: lastvautour on April 30, 2018, 10:11:02 PM
Post by: lastvautour on April 30, 2018, 10:11:02 PM
All components attached requiring just some fine sanding.
Lou


Lou
Title: Re: WWII ID + Models Vol II
Post by: Boomerang on May 01, 2018, 07:08:20 AM
Post by: Boomerang on May 01, 2018, 07:08:20 AM
Nice Job!
Gordon
Title: Re: WWII ID + Models Vol II
Post by: lastvautour on May 01, 2018, 11:29:51 AM
Post by: lastvautour on May 01, 2018, 11:29:51 AM
Thank you Gordon.
Lou
Lou
Title: Re: WWII ID + Models Vol II
Post by: lastvautour on May 08, 2018, 07:00:17 PM
Post by: lastvautour on May 08, 2018, 07:00:17 PM
Moving along. I had a slightly different cam pattern until I realized that I had two aircraft profiles. I painted while looking at one and somewhere I switch over to the other. It made for a weird cam pattern. All fixed now.
Lou

Lou
Title: Re: WWII ID + Models Vol II
Post by: Boomerang on May 13, 2018, 06:48:58 AM
Post by: Boomerang on May 13, 2018, 06:48:58 AM
Good job on the brown and green
Gordon
Title: Re: WWII ID + Models Vol II
Post by: lastvautour on May 13, 2018, 03:37:38 PM
Post by: lastvautour on May 13, 2018, 03:37:38 PM
Thank you. I had to revisit the scheme again and I am now ready for the gloss coat prior to placing the decals. They have been printed and coated.
Lou
Lou
Title: Re: WWII ID + Models Vol II
Post by: lastvautour on May 17, 2018, 10:13:35 PM
Post by: lastvautour on May 17, 2018, 10:13:35 PM
Roll out 17 May 2018. Which incidentally is my 51th anniversary of joining the Royal Canadian Air Force. The colour variance brings out the canopy lines that a normal picture cannot.
Lou


Lou
Title: Re: WWII ID + Models Vol II
Post by: lastvautour on November 16, 2018, 10:11:10 PM
Post by: lastvautour on November 16, 2018, 10:11:10 PM
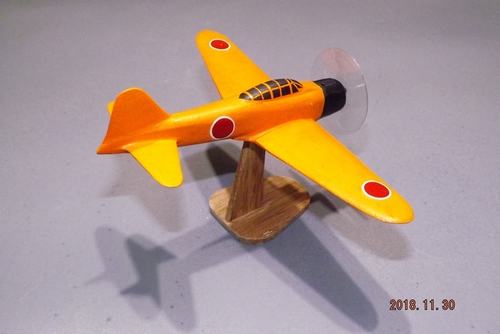
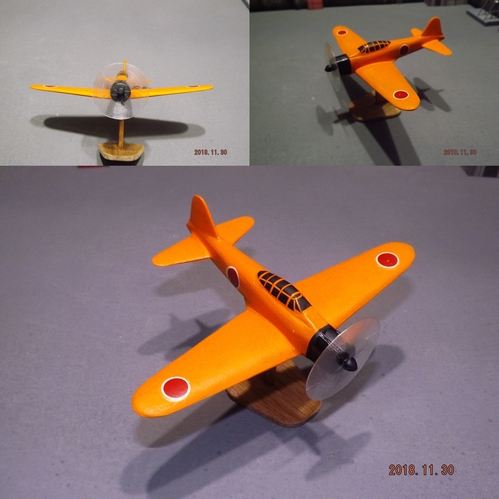
Started a Mitsubishi Type 00 with the intent of finishing it for the 2018 poster. More commonly known as the Zeke or Zero, my version will be the same as the WWII ID plans in the gallery that appears to be a model 21. The colour scheme has been selected as a trainer type with features a black engine cowling and an orange fuselage and wings.
Lou

Lou
Title: Re: WWII ID + Models Vol II
Post by: Boomerang on November 18, 2018, 10:21:57 PM
Post by: Boomerang on November 18, 2018, 10:21:57 PM
Look forward to the finished model.
Cheers
Gordon
Title: Re: WWII ID + Models Vol II
Post by: buccfan on November 19, 2018, 10:16:46 AM
Post by: buccfan on November 19, 2018, 10:16:46 AM
Glad to see your spark has reignited. Regards Paul J.
Title: Re: WWII ID + Models Vol II
Post by: lastvautour on November 19, 2018, 12:17:04 PM
Post by: lastvautour on November 19, 2018, 12:17:04 PM
I would call it an ember for now.
Lou
Lou
Title: Re: WWII ID + Models Vol II
Post by: Boomerang on November 19, 2018, 11:03:48 PM
Post by: Boomerang on November 19, 2018, 11:03:48 PM
Maybe an ember. You have tweaked my interest. I'm looking around for a plan I know I have of the Type 96 Claude.
In the event of an unsuccessful search I'll go with the ID plan.
Cheers
Gordon
Title: Re: WWII ID + Models Vol II
Post by: lastvautour on November 20, 2018, 01:46:02 AM
Post by: lastvautour on November 20, 2018, 01:46:02 AM
Wings 2 has this http://richard.ferriere.free.fr/3vues/mitsubishi_a5m2_3v.jpg
Lou
Lou
Title: Re: WWII ID + Models Vol II
Post by: lastvautour on November 20, 2018, 01:48:25 AM
Post by: lastvautour on November 20, 2018, 01:48:25 AM
VARS has this http://www.airwar.ru/other/draw/a5m2.html
Lou
Lou
Title: Re: WWII ID + Models Vol II
Post by: Boomerang on November 20, 2018, 10:24:53 PM
Post by: Boomerang on November 20, 2018, 10:24:53 PM
Thanks Lou,
I didn't think of the richard ferriere site. I've downloaded them.
See how I go for time.
Cheers
Gordon
Title: Re: WWII ID + Models Vol II
Post by: lastvautour on November 24, 2018, 05:42:26 PM
Post by: lastvautour on November 24, 2018, 05:42:26 PM
Waiting for primer coats to proceed wit sanding. I added main wing filets which are not listed in SSM gallery plans.
Lou


Lou
Title: Re: WWII ID + Models Vol II
Post by: Boomerang on November 24, 2018, 09:10:25 PM
Post by: Boomerang on November 24, 2018, 09:10:25 PM
Looks great. Good progress.
Cheers
Gordon
Title: Re: WWII ID + Models Vol II
Post by: buccfan on November 25, 2018, 09:48:05 AM
Post by: buccfan on November 25, 2018, 09:48:05 AM
Looking good Lou, regards Paul J.
Title: Re: WWII ID + Models Vol II
Post by: lastvautour on November 25, 2018, 03:04:28 PM
Post by: lastvautour on November 25, 2018, 03:04:28 PM
That you Gordon and Paul.
Lou
Lou
Title: Re: WWII ID + Models Vol II
Post by: lastvautour on November 30, 2018, 09:19:44 PM
Post by: lastvautour on November 30, 2018, 09:19:44 PM
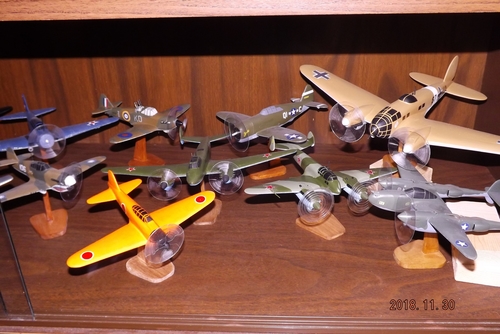
Dressed up in prototype colours as displayed in Wings Palette. With exception of the one piece wing, the models is as per the Gallery WWII ID model. Decals are spares box, paints are Model Master black and DecoArt pumpkin.
Lou
Lou
Title: Re: WWII ID + Models Vol II
Post by: buccfan on November 30, 2018, 10:14:45 PM
Post by: buccfan on November 30, 2018, 10:14:45 PM
That looks great Lou, you certainly made short work of it. Regards Paul J.
Title: Re: WWII ID + Models Vol II
Post by: lastvautour on November 30, 2018, 10:19:25 PM
Post by: lastvautour on November 30, 2018, 10:19:25 PM
Thank you Paul. Now I am trolling the WWII ID drawings for another year end project.
Lou
Lou
Title: Re: WWII ID + Models Vol II
Post by: Model Maker on December 03, 2018, 01:12:39 AM
Post by: Model Maker on December 03, 2018, 01:12:39 AM
An inspired model. - Looks great - ken
Title: Re: WWII ID + Models Vol II
Post by: Boomerang on December 03, 2018, 02:03:55 AM
Post by: Boomerang on December 03, 2018, 02:03:55 AM
Well done Lou!
I like the look of the decoArt pumpkin.
Cheers
Gordon
Title: Re: WWII ID + Models Vol II
Post by: lastvautour on December 03, 2018, 09:01:01 PM
Post by: lastvautour on December 03, 2018, 09:01:01 PM
There are a few orange Zekes but they have a second cockpit for training and the associated longer canopy.
Lou
Lou
Title: Re: WWII ID + Models Vol II
Post by: lastvautour on December 15, 2018, 10:10:53 PM
Post by: lastvautour on December 15, 2018, 10:10:53 PM
Just finished reading a story about a Canadian airman hoping to become a fighter pilot. After having done all his training he was posted to SEAC assigned to the A-31 Vultee Vengeance for dive bombing duty with RAF Sqn 110. Drawings have been printed from the WWII ID section and glued to the wooden block that will form my latest WWII ID+ model.
Although other drawings are available, most are not suitable for my needs.
Lou
Although other drawings are available, most are not suitable for my needs.
Lou
Title: Re: WWII ID + Models Vol II
Post by: lastvautour on December 15, 2018, 11:12:51 PM
Post by: lastvautour on December 15, 2018, 11:12:51 PM
A new beginning. Hope to have done by end Jan 2019 and it being the first off many models next year.
Lou

Lou
Title: Re: WWII ID + Models Vol II
Post by: Boomerang on December 16, 2018, 08:33:30 PM
Post by: Boomerang on December 16, 2018, 08:33:30 PM
Will watch with interest. RAAF had a couple of squadrons of these for a short time.
I might copy cat ( if thats Ok)in the New Year.
Cheers
Gordon
Title: Re: WWII ID + Models Vol II
Post by: Boomerang on December 16, 2018, 09:13:42 PM
Post by: Boomerang on December 16, 2018, 09:13:42 PM
This might be of interest.
http://aussiemodeller.com.au/Images/History/Lang_Vengeance/1.-EZ-999_V.jpg.
They used to push this out the back and start her up occasionally.
Cheers
Gordon
Title: Re: WWII ID + Models Vol II
Post by: lastvautour on December 19, 2018, 08:19:02 PM
Post by: lastvautour on December 19, 2018, 08:19:02 PM
Thank you Gordon.
The chips are flying.
Lou

The chips are flying.
Lou
Title: Re: WWII ID + Models Vol II
Post by: Boomerang on December 21, 2018, 04:26:58 AM
Post by: Boomerang on December 21, 2018, 04:26:58 AM
When I copy cat I might do 1/48th
Cheers
Gordon
Title: Re: WWII ID + Models Vol II
Post by: lastvautour on December 21, 2018, 09:30:10 PM
Post by: lastvautour on December 21, 2018, 09:30:10 PM
Major components to the Vengeance. Might finish before by year's end???
Photo 1 Parts
Photo 2 Rough sanded and puttied
Photo 3/4 Rough sanded ready for primer and some fine sanding.
Lou


Photo 1 Parts
Photo 2 Rough sanded and puttied
Photo 3/4 Rough sanded ready for primer and some fine sanding.
Lou
Title: Re: WWII ID + Models Vol II
Post by: lastvautour on December 27, 2018, 09:50:14 PM
Post by: lastvautour on December 27, 2018, 09:50:14 PM
RCAF Flying Officer Sebisty's log book lists his having flown EZ-860 "V" several times while assigned to RAF 110 Sqn operating in India and Burma.
Lou


Lou
Title: Re: WWII ID + Models Vol II
Post by: buccfan on December 28, 2018, 10:21:12 AM
Post by: buccfan on December 28, 2018, 10:21:12 AM
Great job Lou, Regards Paul J.
Title: Re: WWII ID + Models Vol II
Post by: lastvautour on December 28, 2018, 01:58:36 PM
Post by: lastvautour on December 28, 2018, 01:58:36 PM
Thank you Paul.
Lou
Lou
Title: Re: WWII ID + Models Vol II
Post by: Boomerang on January 02, 2019, 12:31:27 AM
Post by: Boomerang on January 02, 2019, 12:31:27 AM
Another great model Lou.
Gordon
Title: Re: WWII ID + Models Vol II
Post by: lastvautour on January 02, 2019, 01:31:59 PM
Post by: lastvautour on January 02, 2019, 01:31:59 PM
Thank you Gordon.
Lou
Lou
Title: Re: WWII ID + Models Vol II
Post by: lastvautour on November 09, 2019, 08:25:53 PM
Post by: lastvautour on November 09, 2019, 08:25:53 PM
The Blenheim is taking shape. The wing is the second since my over eager chisel took to much off. I will be careful with this one.
Lou

Lou
Title: Re: WWII ID + Models Vol II
Post by: Boomerang on November 11, 2019, 10:22:20 PM
Post by: Boomerang on November 11, 2019, 10:22:20 PM
Good to see Lou.
What plan are you using?
Title: Re: WWII ID + Models Vol II
Post by: lastvautour on November 11, 2019, 10:47:15 PM
Post by: lastvautour on November 11, 2019, 10:47:15 PM
I get a lot of drawing from http://www.airwar.ru/other/drawe.html The Blenhein is here at http://www.airwar.ru/other/draw/blenh1.html
You must download and then convert must files to jpeg. Converting software is free on line.
Lou
You must download and then convert must files to jpeg. Converting software is free on line.
Lou
Title: Re: WWII ID + Models Vol II
Post by: Boomerang on November 12, 2019, 11:08:34 PM
Post by: Boomerang on November 12, 2019, 11:08:34 PM
Thanks Lou I'll check it out.
Gordon
Title: Re: WWII ID + Models Vol II
Post by: lastvautour on November 28, 2019, 07:21:02 PM
Post by: lastvautour on November 28, 2019, 07:21:02 PM
Moving along with roughly sanded fuselage and wing center section.
Louis

Louis
Title: Re: WWII ID + Models Vol II
Post by: Boomerang on December 04, 2019, 01:56:33 AM
Post by: Boomerang on December 04, 2019, 01:56:33 AM
Coming along nicely.
Gordon
Title: Re: WWII ID + Models Vol II
Post by: lastvautour on December 16, 2019, 09:14:54 PM
Post by: lastvautour on December 16, 2019, 09:14:54 PM
Wing and fuselage notched for assembly. The Blenheim is currently third on the priority list.
Louis


Louis
Title: Re: WWII ID + Models Vol II
Post by: Gearup on December 17, 2019, 03:12:19 AM
Post by: Gearup on December 17, 2019, 03:12:19 AM
Thanks for sharing the build pictures. It's always interesting to see your intermediate steps of the construction.
Frase
Frase
Title: Re: WWII ID + Models Vol II
Post by: Boomerang on December 25, 2019, 09:31:21 PM
Post by: Boomerang on December 25, 2019, 09:31:21 PM
Looking good. The geometry of panels for the cockpit is wee bit of a challenge.
Gordon
Title: Re: WWII ID + Models Vol II
Post by: lastvautour on December 25, 2019, 10:21:54 PM
Post by: lastvautour on December 25, 2019, 10:21:54 PM
Indeed. However there are many close up photos on line. I just discovered that the forward port area is panels and not glass.
Louis
Louis
Title: Re: WWII ID + Models Vol II
Post by: lastvautour on December 27, 2019, 03:55:06 PM
Post by: lastvautour on December 27, 2019, 03:55:06 PM
A bit more done. All major parts are rough cut/sanded and test fitted.
Louis


Louis
Title: Re: WWII ID + Models Vol II
Post by: Boomerang on December 28, 2019, 06:26:59 AM
Post by: Boomerang on December 28, 2019, 06:26:59 AM
Further advanced than mine. Work halted till the New Year
Gordon
Title: Re: WWII ID + Models Vol II
Post by: lastvautour on December 28, 2019, 04:43:44 PM
Post by: lastvautour on December 28, 2019, 04:43:44 PM
Mine will not be done this year either. Although the Blenheim is first priority, I have a few other projects on the go.
Louis
Louis
Title: Re: WWII ID + Models Vol II
Post by: lastvautour on January 05, 2020, 07:42:14 PM
Post by: lastvautour on January 05, 2020, 07:42:14 PM
Nacelles and tail plane glued and rough sanded. Need a bit more putty and final sanding.
Lou


Lou
Title: Re: WWII ID + Models Vol II
Post by: lastvautour on January 17, 2020, 02:41:05 AM
Post by: lastvautour on January 17, 2020, 02:41:05 AM
A reasonable effort using carpenter's white glue. I should have built it up slowly. Some of the blisters caved in. I hope a slight application of more glue will hide my error.
Lou

Lou
Title: Re: WWII ID + Models Vol II
Post by: lastvautour on January 20, 2020, 09:32:04 PM
Post by: lastvautour on January 20, 2020, 09:32:04 PM
Main wing filet glued as well as all other major components. Photos to follow.
Lou
Lou
Title: Re: WWII ID + Models Vol II
Post by: lastvautour on January 21, 2020, 10:58:59 PM
Post by: lastvautour on January 21, 2020, 10:58:59 PM
Putty almost ready for sanding. I anticipate completion of my Blenheim by mid Feb.
Lou

Lou
Title: Re: WWII ID + Models Vol II
Post by: Boomerang on January 24, 2020, 08:41:22 AM
Post by: Boomerang on January 24, 2020, 08:41:22 AM
Coming along nicely.
Gordon
Title: Re: WWII ID + Models Vol II
Post by: lastvautour on January 24, 2020, 09:35:16 PM
Post by: lastvautour on January 24, 2020, 09:35:16 PM
Looking at your Blenheim I see that the shape of my nacelles is incorrect. I will have to fiddle with them to bring them closer to the shape you have done. The filet first attempt needs a bit of sanding.
Lou


Lou
Title: Re: WWII ID + Models Vol II
Post by: lastvautour on January 30, 2020, 09:36:23 PM
Post by: lastvautour on January 30, 2020, 09:36:23 PM
The nacelles have been reshaped to conform with the actual shape. Primer has been applied. Now sanding and the final finish will follow. The only RCAF paint scheme found is for the totally black night fighter. I am not completely sure if I will do it that way.
Lou
Lou
Title: Re: WWII ID + Models Vol II
Post by: Boomerang on February 02, 2020, 07:38:48 AM
Post by: Boomerang on February 02, 2020, 07:38:48 AM
Lou ,
I've done some searching and have come up with Pilot officer Joseph Carriere who was on 219 squadron RAF flying MK1F's Squadron code was FK .The is info of him having an accident in L8724 . There is a picture in an Osprey publication Blenheim aces which is L8726 coded "M" of 219 squadron.
Cheers
Gordon
Title: Re: WWII ID + Models Vol II
Post by: lastvautour on February 03, 2020, 09:58:54 PM
Post by: lastvautour on February 03, 2020, 09:58:54 PM
I looked up PO Jean Carriere from 219 Sqn. I see he is Canadian and was awarded a DFC. Thanks for the tip.
Lou
Lou
Title: Re: WWII ID + Models Vol II
Post by: lastvautour on February 08, 2020, 08:03:57 PM
Post by: lastvautour on February 08, 2020, 08:03:57 PM
Painted in Fleet Air Arm colours of extra dark sea gray and dark slate. The slate is eyeball mix as I am out of the slate and cannot find any reasonably priced on line. The port wing has a coat of clear gloss.
Lou
The image below is a link from Wings Palette. The colours are poorly shown.


Lou
The image below is a link from Wings Palette. The colours are poorly shown.
Title: Re: WWII ID + Models Vol II
Post by: lastvautour on February 08, 2020, 08:08:17 PM
Post by: lastvautour on February 08, 2020, 08:08:17 PM
A bit of research revealed that the Blenheim Mk I was replaced in 1943, so this model will not be featured in the 1945 75th anniversary group build.
Louis
Louis
Title: Re: WWII ID + Models Vol II
Post by: lastvautour on February 13, 2020, 07:39:33 PM
Post by: lastvautour on February 13, 2020, 07:39:33 PM
Number eleven in my twin engine ID + collection. Colours are Fleet Air Arm circa 1943.
Lou


Lou
Title: Re: WWII ID + Models Vol II
Post by: Boomerang on February 14, 2020, 12:41:48 AM
Post by: Boomerang on February 14, 2020, 12:41:48 AM
Excellent work Lou.
Cheers
Gordon
Title: Re: WWII ID + Models Vol II
Post by: lastvautour on February 14, 2020, 01:47:07 AM
Post by: lastvautour on February 14, 2020, 01:47:07 AM
Thank you Gordon. I need to tweak the front glass area but otherwise I am satisfied.
Lou
Lou
Title: Re: WWII ID + Models Vol II
Post by: Gearup on February 14, 2020, 05:34:14 AM
Post by: Gearup on February 14, 2020, 05:34:14 AM
Nicely done model, Lou. It must have been a vulnerable feeling sitting inside all that glass during a mission. Thanks!
Fraser
Fraser
Title: Re: WWII ID + Models Vol II
Post by: lastvautour on February 14, 2020, 11:17:27 AM
Post by: lastvautour on February 14, 2020, 11:17:27 AM
Thank you Fraser. I suppose the HE 111 crew felt the same. I always thought the very short nose would be quite the experience landing at night.
Lou
Lou
Title: Re: WWII ID + Models Vol II IJN Betty
Post by: lastvautour on February 16, 2020, 08:52:53 PM
Post by: lastvautour on February 16, 2020, 08:52:53 PM
The Betty Bomber has drawings printed, measured, adjusted and printed again to attain correctly sized 1/72 drawings. Japanese Aircraft of WWII provided the profile below.
Lou

Lou
Title: Re: WWII ID + Models Vol II
Post by: lastvautour on February 17, 2020, 08:39:18 PM
Post by: lastvautour on February 17, 2020, 08:39:18 PM
The Betty bomber will be my largest ID+ model. Here are the drawings I will use. The drawings in the gallery are not suitable for the particular nark I wish to make. The process and parts breakdown will be similar.
Lou

Lou
Title: Re: WWII ID + Models Vol II IJN Betty
Post by: lastvautour on February 23, 2020, 09:40:53 PM
Post by: lastvautour on February 23, 2020, 09:40:53 PM
Blocks and templates have been cut. Nacelles are still in the wood pile.
Lou

Lou
Title: Re: WWII ID + Models Vol II
Post by: Boomerang on February 24, 2020, 10:25:07 PM
Post by: Boomerang on February 24, 2020, 10:25:07 PM
Coming along nicely Lou.
Cheers
Gordon
Cheers
Gordon
Title: Re: WWII ID + Models Vol II
Post by: lastvautour on March 12, 2020, 07:04:13 PM
Post by: lastvautour on March 12, 2020, 07:04:13 PM
Blocked parts.
Lou

Lou
Title: Re: WWII ID + Models Vol II
Post by: lastvautour on November 21, 2020, 09:24:52 PM
Post by: lastvautour on November 21, 2020, 09:24:52 PM
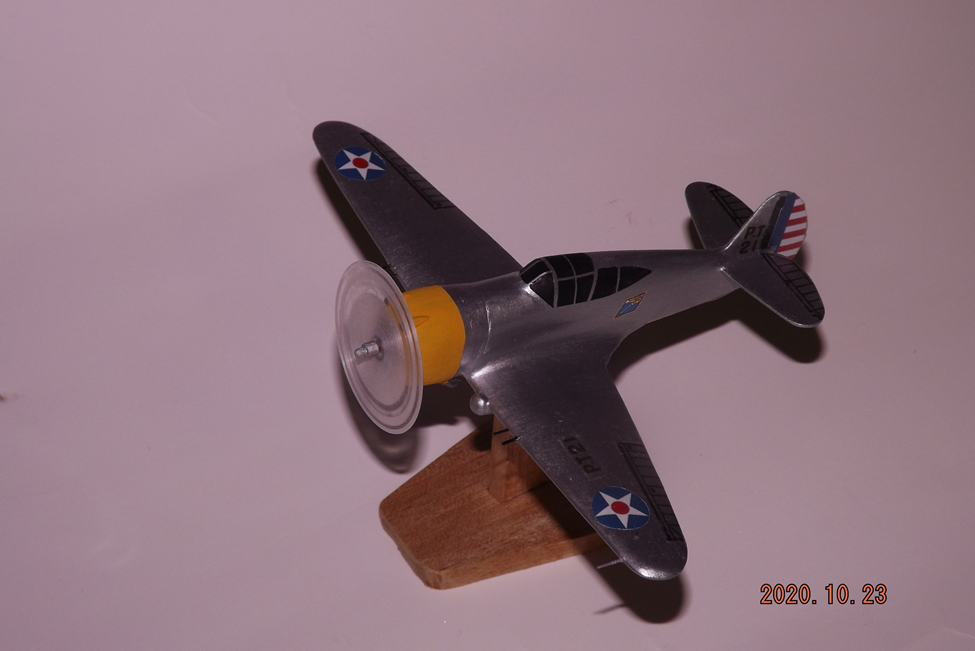
The Betty has been permanently shelved. Additional WWII ID + models include a Curtis P-36 and a Messerschimtt BF-109.
Lou

Lou
Title: Re: WWII ID + Models Vol II
Post by: lastvautour on November 21, 2020, 09:27:13 PM
Post by: lastvautour on November 21, 2020, 09:27:13 PM
A couple of WWII + from the 2020 build season, namely a Beaufighter and a Blenheim.
Lou


Lou