Title: SMM 14th Anniversary X-Plane Cook-Up
Post by: lastvautour on April 11, 2015, 10:23:57 AM
Post by: lastvautour on April 11, 2015, 10:23:57 AM
At Ray's suggestion, an X-Plane Cook-Up is called. I have selected the X-15 and Paul chose the X-3. So bring on those pioneering planes and let the chips fly.
Lou
Lou
Title: Re: SMM 14th Anniversary X-Plane Cook-Up
Post by: Will on April 11, 2015, 06:37:37 PM
Post by: Will on April 11, 2015, 06:37:37 PM
Apart from the Bell X-1 to Grumman X-29, what else counts as X-planes? Other countries experimental types? Prototypes like XP-40 or other or just purely experimental? Types never actually built? I'd like to join in but wondering about choices...
Will
Will
Title: Re: SMM 14th Anniversary X-Plane Cook-Up
Post by: lastvautour on April 11, 2015, 06:54:46 PM
Post by: lastvautour on April 11, 2015, 06:54:46 PM
I think just types that had no intentions of being an operational aircraft but purely for research purposes (my opinion only). I will leave to Ray to decide what belongs and if other countries may be included. Here are link to American X-Planes as other countries do not use the X-designation.
Lou
Military Factory http://www.militaryfactory.com/aircraft/us-xplane-aircraft.asp
Wikipedia USA http://en.wikipedia.org/wiki/List_of_X-planes
Wikipedia Other http://en.wikipedia.org/wiki/List_of_experimental_aircraft
Lou
Lou
Military Factory http://www.militaryfactory.com/aircraft/us-xplane-aircraft.asp
Wikipedia USA http://en.wikipedia.org/wiki/List_of_X-planes
Wikipedia Other http://en.wikipedia.org/wiki/List_of_experimental_aircraft
Lou
Title: Re: SMM 14th Anniversary X-Plane Cook-Up
Post by: lastvautour on April 11, 2015, 07:15:36 PM
Post by: lastvautour on April 11, 2015, 07:15:36 PM
Pete already has three X-Planes to his credit.
X-3
X-5
X-29
X-3
X-5
X-29
Title: Re: SMM 14th Anniversary X-Plane Cook-Up
Post by: lastvautour on April 15, 2015, 11:26:24 AM
Post by: lastvautour on April 15, 2015, 11:26:24 AM
X-15 three views have been scale and printed. A close look at photos show on tricky blending of the three fuselage section. The center section is mostly circular with additional triangular sides. The joint between parts is not a smooth as I had envisaged it to be.
North American X-15 3-view" by NASA - U. S. Air Force official web site. Licensed under Public Domain.

North American X-15 3-view" by NASA - U. S. Air Force official web site. Licensed under Public Domain.
Title: Re: SMM 14th Anniversary X-Plane Cook-Up
Post by: R.F.Bennett on April 15, 2015, 02:15:31 PM
Post by: R.F.Bennett on April 15, 2015, 02:15:31 PM
Any country, any time, has to have flown more than once, built just for research, not production. Prototypes for production planes would be a build of it's own.
Title: Re: SMM 14th Anniversary X-Plane Cook-Up
Post by: lastvautour on April 15, 2015, 08:51:18 PM
Post by: lastvautour on April 15, 2015, 08:51:18 PM
Thank you Ray for the clarification. So come on guys, please commit to the group build. Some of those research designs have pretty simple lines in smaller scales.
1/48 scale drawings for the X-15 have been redone in 1/72 scale and glued to cardboard for use as templates. The 1/48 scale version requires laminating my existing stock of wood, so 1/72 it is.
Lou
1/48 scale drawings for the X-15 have been redone in 1/72 scale and glued to cardboard for use as templates. The 1/48 scale version requires laminating my existing stock of wood, so 1/72 it is.
Lou
Title: Re: SMM 14th Anniversary X-Plane Cook-Up
Post by: Boomerang on April 15, 2015, 10:25:29 PM
Post by: Boomerang on April 15, 2015, 10:25:29 PM
I put my hand up for the X-3 . Had a close look at the third link above and have several plans.
Decisions, decisions decisions .
Cheers
Gordon
Title: Re: SMM 14th Anniversary X-Plane Cook-Up
Post by: lastvautour on April 16, 2015, 12:14:04 AM
Post by: lastvautour on April 16, 2015, 12:14:04 AM
Welcome Gordon. Make two!!
Lou
Lou
Title: Re: SMM 14th Anniversary X-Plane Cook-Up
Post by: lastvautour on April 16, 2015, 08:54:09 PM
Post by: lastvautour on April 16, 2015, 08:54:09 PM
X-15 has a few cuts here and there.
Lou

Lou
Title: Re: SMM 14th Anniversary X-Plane Cook-Up
Post by: lastvautour on April 22, 2015, 05:14:47 PM
Post by: lastvautour on April 22, 2015, 05:14:47 PM
Some progress has been made on the X-15. There are some weird angular shapes to be cut so taking my time is of the essence.
Lou

Lou
Title: Re: SMM 14th Anniversary X-Plane Cook-Up
Post by: lastvautour on April 24, 2015, 07:46:16 PM
Post by: lastvautour on April 24, 2015, 07:46:16 PM
Wings and fuselage are rough sanded. Preparing to cut the fuselage to fit the wings. Canopy has been glued but is a bit oversize, so some delicate sanding will have to be done to bring it in line with 1/72 scale.
Lou


Lou
Title: Re: SMM 14th Anniversary X-Plane Cook-Up
Post by: lastvautour on April 28, 2015, 10:20:35 PM
Post by: lastvautour on April 28, 2015, 10:20:35 PM
Puttied, sanded and first visit to the paint shop.
Lou

Lou
Title: Re: SMM 14th Anniversary X-Plane Cook-Up
Post by: lastvautour on May 06, 2015, 03:48:26 PM
Post by: lastvautour on May 06, 2015, 03:48:26 PM
My X-15 is ready for launch. Decals are a mixture of home made and aftermarket.
Lou

Lou
Title: Re: SMM 14th Anniversary X-Plane Cook-Up
Post by: Boomerang on June 01, 2015, 12:35:41 AM
Post by: Boomerang on June 01, 2015, 12:35:41 AM
Lou,
Great work as usual.
I have cut some wood for but I'll post something when it gets a bit more advanced.
Also pondering something "small" which sholudn't take long to put together.
cheers
Gordon
Title: Re: SMM 14th Anniversary X-Plane Cook-Up
Post by: lastvautour on June 01, 2015, 09:29:46 AM
Post by: lastvautour on June 01, 2015, 09:29:46 AM
Looking forward to your project.
Lou
Lou
Title: Re: SMM 14th Anniversary X-Plane Cook-Up
Post by: Boomerang on June 08, 2015, 12:13:15 AM
Post by: Boomerang on June 08, 2015, 12:13:15 AM
Wood has been cut for a 1/64 Chance Vought V-173 "Flying Pancake".
Plan and wood ( from the bits box) for a 1/72 X-28 "Osprey" a one off looking into the feasibility of a small single place
seaplane for civil police patrol in SE Asia. "The Air Skimmer Program".
Cheers
Gordon
Title: Re: SMM 14th Anniversary X-Plane Cook-Up
Post by: lastvautour on June 08, 2015, 08:20:07 PM
Post by: lastvautour on June 08, 2015, 08:20:07 PM
Sweet. I always thought they should carried on the project despite the advent of jet engines.
Lou
Lou
Title: Re: SMM 14th Anniversary X-Plane Cook-Up
Post by: Boomerang on July 30, 2015, 06:18:43 AM
Post by: Boomerang on July 30, 2015, 06:18:43 AM
Some progress on the V-173
Cheers
Gordon
Title: Re: SMM 14th Anniversary X-Plane Cook-Up
Post by: lastvautour on July 30, 2015, 10:35:58 AM
Post by: lastvautour on July 30, 2015, 10:35:58 AM
Very nice Pancake Gordon. The next version always fascinated me. I failed in an tempted to find drawings of the Osprey II and abandoned the project. Would you mind uploading your plans or tell me where you found them.
Lou
Lou
Title: Re: SMM 14th Anniversary X-Plane Cook-Up
Post by: Will on July 30, 2015, 01:42:09 PM
Post by: Will on July 30, 2015, 01:42:09 PM
Quote from: lastvautour on July 30, 2015, 10:35:58 AM
Very nice Pancake Gordon. The next version always fascinated me. I failed in an tempted to find drawings of the Osprey II and abandoned the project. Would you mind uploading your plans or tell me where you found them.
Lou
Lou, I just resent by PM the Osprey 2 drawing I PMed you a couple of years ago, if you still plan to build one. It's from a recent book so not appropriate to upload on SMM. It's quite an attractive little plane.
Regards
Will
Title: Re: SMM 14th Anniversary X-Plane Cook-Up
Post by: Boomerang on July 30, 2015, 09:37:09 PM
Post by: Boomerang on July 30, 2015, 09:37:09 PM
The drawing I was using is from an Aerophiles? magazine that ran a series on all the X craft with three views. Found the
magazine in my youngest brothers ar chives. I'll see if i can scan it and will send it.
My X-28 is on the back burner for the moment. I have the drawings for the XF5U - the follow on from the V-173.
Cheers
Gordon
Title: Re: SMM 14th Anniversary X-Plane Cook-Up
Post by: Boomerang on August 14, 2015, 03:23:13 AM
Post by: Boomerang on August 14, 2015, 03:23:13 AM
Progress so far
General cleaning up and shaping. Undercarriage underway
Gordon

General cleaning up and shaping. Undercarriage underway
Gordon
Title: Re: SMM 14th Anniversary X-Plane Cook-Up
Post by: lastvautour on August 14, 2015, 05:32:21 PM
Post by: lastvautour on August 14, 2015, 05:32:21 PM
Love seeing your progress. I have drawings of the XF5U from an old Flying Progress mag but they are also on line at various sites.
Lou
Lou
Title: Re: SMM 14th Anniversary X-Plane Cook-Up
Post by: Boomerang on August 15, 2015, 02:34:09 AM
Post by: Boomerang on August 15, 2015, 02:34:09 AM
I picked up the Ginter book Naval Fighters number 21. Drawings for both of them.
Might tackle the XF5U - 1 at a later date.
Cheers
Gordon
Title: Re: SMM 14th Anniversary X-Plane Cook-Up
Post by: Boomerang on August 30, 2015, 05:07:33 AM
Post by: Boomerang on August 30, 2015, 05:07:33 AM
Some progress.
Fabric covered rudders have been simulated with doped on thread and grey primer.
Undercarriage struts from trimmed down wooden coffee stirrer stick. Unfortunately where I picked up half a dozen has now switched to plastic spoons. Inner strut yet to be made. Air inlets I'll leave till I get home next so I can use the rotary tool.
The faint lines on the top are the location of the ribs. The doped on thread and primer method will be used for this . Top and bottom.
Propeller blades have been roughed out and spinners have yet to be attempted.
Cheers
Gordon
Title: Re: SMM 14th Anniversary X-Plane Cook-Up
Post by: lastvautour on August 30, 2015, 06:42:43 PM
Post by: lastvautour on August 30, 2015, 06:42:43 PM
Beautiful. She looks great Gordon.
Lou
My first attempt was a single engine control line model. It flew very well but upon being posted to Ottawa I found there were no playmates for me so interest was lost.

Lou
My first attempt was a single engine control line model. It flew very well but upon being posted to Ottawa I found there were no playmates for me so interest was lost.
Title: Re: SMM 14th Anniversary X-Plane Cook-Up
Post by: Boomerang on August 31, 2015, 03:30:50 AM
Post by: Boomerang on August 31, 2015, 03:30:50 AM
Thanks Lou,
Looks like yours is still serviceable.
My control line experience was as a kid under supervision of my older brother.
I had a P26, 109 and a Corsair. The 109 and Corsair still exist.
Cheers
Gordon
Looks like yours is still serviceable.
My control line experience was as a kid under supervision of my older brother.
I had a P26, 109 and a Corsair. The 109 and Corsair still exist.
Cheers
Gordon
Title: Re: SMM 14th Anniversary X-Plane Cook-Up
Post by: lastvautour on August 31, 2015, 03:20:56 PM
Post by: lastvautour on August 31, 2015, 03:20:56 PM
I tries to turn the engine over. It is pretty stiff as it has not been used in approximately 30 years. I gave away all my motors this pass June hopeful someone could use them. As for me my powered flights are over.
Lou
Lou
Title: Re: SMM 14th Anniversary X-Plane Cook-Up
Post by: Boomerang on September 04, 2015, 11:43:02 PM
Post by: Boomerang on September 04, 2015, 11:43:02 PM
Some progress .
The picture of the upper surface has a couple of coats of primer . Not yet sanded back
"decal" is from paper for sizing purposes. Looks about right when compared to photos.
The lower surface picture is "Half n Half". Half has two coats of primer not sanded back.
The other half with the small white access panel has not been primed and is to show the cotton thread in place before moving on to finishing.
One trick with this method is to ensure the thread is pulled tight over the surface .
cheers
Gordon
Title: Re: SMM 14th Anniversary X-Plane Cook-Up
Post by: lastvautour on September 05, 2015, 11:39:23 AM
Post by: lastvautour on September 05, 2015, 11:39:23 AM
Great work to date Gordon. Looking forward to more.
Lou
Lou
Title: Re: SMM 14th Anniversary X-Plane Cook-Up
Post by: buccfan on September 08, 2015, 09:23:39 AM
Post by: buccfan on September 08, 2015, 09:23:39 AM
Coming on nicely Gordon, do you fix one end of the thread and let it dry, then pull the thread tight and glue the rest?. Regards Paul J.
Title: Re: SMM 14th Anniversary X-Plane Cook-Up
Post by: Boomerang on September 14, 2015, 07:05:01 AM
Post by: Boomerang on September 14, 2015, 07:05:01 AM
Paul,
I used a dab of dope on both ends of the run and held it in tension whilst it dried.
Took a while (was a bit cold here when I did it). Then I ran thinned dope along
the lines when all was dry. worked for me. Doing one end probably would have been a bit easier.
Amazing what you can do with all ten fingers at once.
Cheers
Gordon
Title: Re: SMM 14th Anniversary X-Plane Cook-Up
Post by: Oceaneer99 on September 16, 2015, 05:45:29 AM
Post by: Oceaneer99 on September 16, 2015, 05:45:29 AM
Gordon, thank you for sharing the tips on using doped thread.
Garet
Garet
Title: Re: SMM 14th Anniversary X-Plane Cook-Up
Post by: buccfan on September 17, 2015, 09:39:19 AM
Post by: buccfan on September 17, 2015, 09:39:19 AM
Yes, thanks for the info on you technique Gordon, regards Paul J.
Title: Re: SMM 14th Anniversary X-Plane Cook-Up
Post by: cliff strachan on September 17, 2015, 09:30:05 PM
Post by: cliff strachan on September 17, 2015, 09:30:05 PM
Gordon, you've very nicely described your procedure for, what amounts to - at least for me - the making of some type of corrugated surface for modelers of
older aircraft. In particular I'm thinking of say, the China Clipper or perhaps even the Junkers Ju52/1M. The latter aircraft, ARM which they have a replica of one
in our very own "Royal Aviation Museum of Western Canada" (formally known as the Western Canada Aviation Museum or WCAM).
This aircraft, ARM, was flown by Canadian Airways from 1931 until 1942. It had a length of 60ft.
I have thought of strips of masking tape and even other devices that may have served the purpose. But have generally come up lacking. Perhaps other
members of SMM can add to the discussion - or even people who have "almost joined." Of course there will likely be some sort of commitment to join SMM
on the part of the "almost joined."
Cliff.
Title: Re: SMM 14th Anniversary X-Plane Cook-Up
Post by: Boomerang on September 24, 2015, 09:45:33 PM
Post by: Boomerang on September 24, 2015, 09:45:33 PM
Cliff,
Lou did a "Devastator" some time ago and I think he described how he did the outer wing corrugations.
V- 173 has had some progress . Several coats of primer with cutback when I felt like it. Looks Ok.
Air inlets done . Just needs some final tweaking. Have made the spinners ( appropriate sized dowel spun up in an electric
drill) , prop tubes added. work commenced on prop blades.
Started on making the tail wheel.
Picture to follow.
Cheers
Gordon
Title: Re: SMM 14th Anniversary X-Plane Cook-Up
Post by: Boomerang on September 25, 2015, 09:59:11 AM
Post by: Boomerang on September 25, 2015, 09:59:11 AM
Progress pictures.
Title: Re: SMM 14th Anniversary X-Plane Cook-Up
Post by: lastvautour on September 25, 2015, 09:41:56 PM
Post by: lastvautour on September 25, 2015, 09:41:56 PM
A beauty so far. I have not been able to do a spinner in a drill. I always mess it up and never turns out the way I envisaged it. I need more practice I guess. Looking forward to some more progress shots.
Lou
Lou
Title: Re: SMM 14th Anniversary X-Plane Cook-Up
Post by: Boomerang on September 26, 2015, 01:20:44 AM
Post by: Boomerang on September 26, 2015, 01:20:44 AM
Working on the propeller blades.
Cheers
Gordon
Title: Re: SMM 14th Anniversary X-Plane Cook-Up
Post by: buccfan on September 26, 2015, 09:55:55 AM
Post by: buccfan on September 26, 2015, 09:55:55 AM
Great progress Gordon, the ribbing looks effective. Regards Paul J.
Title: Re: SMM 14th Anniversary X-Plane Cook-Up
Post by: Boomerang on September 26, 2015, 08:24:55 PM
Post by: Boomerang on September 26, 2015, 08:24:55 PM
Thank you Paul
Title: Re: SMM 14th Anniversary X-Plane Cook-Up
Post by: Boomerang on October 04, 2015, 02:43:49 AM
Post by: Boomerang on October 04, 2015, 02:43:49 AM
A bit of progress on V-173
Cheers
Gordon
Title: Re: SMM 14th Anniversary X-Plane Cook-Up
Post by: Boomerang on October 04, 2015, 02:46:12 AM
Post by: Boomerang on October 04, 2015, 02:46:12 AM
Found a few idle moments and the X-28 Sea Skimmer materialized.
Has received a coat of white primer. Engine pod and floats yet to be done.
Cheers
Gordon
Title: Re: SMM 14th Anniversary X-Plane Cook-Up
Post by: lastvautour on October 04, 2015, 11:49:49 AM
Post by: lastvautour on October 04, 2015, 11:49:49 AM
First let me address the V-173 - Outstanding
Second the X-28 look great from these photos. If memory serves me correctly, Popular Mechanic or similar magazine featured it on their cover.
I await pictures of both your wonderful creations
Lou.
Second the X-28 look great from these photos. If memory serves me correctly, Popular Mechanic or similar magazine featured it on their cover.
I await pictures of both your wonderful creations
Lou.
Title: Re: SMM 14th Anniversary X-Plane Cook-Up
Post by: Boomerang on October 04, 2015, 08:07:27 PM
Post by: Boomerang on October 04, 2015, 08:07:27 PM
Thanks Lou,
Gordon
Title: Re: SMM 14th Anniversary X-Plane Cook-Up
Post by: buccfan on October 07, 2015, 10:33:01 PM
Post by: buccfan on October 07, 2015, 10:33:01 PM
Excellent work on the V-173, colour scheme looks great, looking forward to progress on the X-28. Regards Paul J.
Title: Re: SMM 14th Anniversary X-Plane Cook-Up
Post by: Boomerang on October 08, 2015, 08:07:35 AM
Post by: Boomerang on October 08, 2015, 08:07:35 AM
Thank you Paul.
Gordon.
Title: Re: SMM 14th Anniversary X-Plane Cook-Up
Post by: Boomerang on October 16, 2015, 10:58:18 PM
Post by: Boomerang on October 16, 2015, 10:58:18 PM
Progress so far.
V-173 - Main undercarriage attached. Need to sill add one strut after doing the small fairings at the top.
Balance weights on elevators made. Brass rod with a small blob of 5 min epoxy.
X-28 - Cockpit done with rotary tool. Working on engine and wing floats.
Cheers
Gordon
Title: Re: SMM 14th Anniversary X-Plane Cook-Up
Post by: Boomerang on October 23, 2015, 05:28:10 AM
Post by: Boomerang on October 23, 2015, 05:28:10 AM
Progress on V-173
Cheers
Gordon
Title: Re: SMM 14th Anniversary X-Plane Cook-Up
Post by: lastvautour on October 23, 2015, 01:31:16 PM
Post by: lastvautour on October 23, 2015, 01:31:16 PM
Your photo shows the ribbing very well. I look forward to the next photos.
Lou
Lou
Title: Re: SMM 14th Anniversary X-Plane Cook-Up
Post by: Boomerang on November 01, 2015, 05:13:01 AM
Post by: Boomerang on November 01, 2015, 05:13:01 AM
Status of the X-28 and V-173
Working on pylon , engine and propeller for X-28.
Cockpit and lower window glazing done.
Still working on propellers.
Not far off doing the decals.
Cheers
Gordon
Title: Re: SMM 14th Anniversary X-Plane Cook-Up
Post by: lastvautour on November 01, 2015, 12:53:40 PM
Post by: lastvautour on November 01, 2015, 12:53:40 PM
Excellent progress.
Lou
Lou
Title: Re: SMM 14th Anniversary X-Plane Cook-Up
Post by: Boomerang on November 09, 2015, 04:46:43 AM
Post by: Boomerang on November 09, 2015, 04:46:43 AM
A bit of progress. Decals added. Tail wheel fitted.
Spinners and propeller blades need a bit more work and are dry fitted.
The other picture is the tail wheel. Thick gauge copper wire around a bamboo skewer. Brass rod and tube with copper wire.
using the skewer made it easier to handle
Title: Re: SMM 14th Anniversary X-Plane Cook-Up
Post by: lastvautour on November 09, 2015, 12:49:24 PM
Post by: lastvautour on November 09, 2015, 12:49:24 PM
Outstanding Model Gordon. Very realistic finish.
Lou
Lou
Title: Re: SMM 14th Anniversary X-Plane Cook-Up
Post by: buccfan on November 10, 2015, 09:48:25 PM
Post by: buccfan on November 10, 2015, 09:48:25 PM
Very nice indeed Gordon, looking good. Regards Paul J.
Title: Re: SMM 14th Anniversary X-Plane Cook-Up
Post by: Biggles on November 11, 2015, 06:22:23 AM
Post by: Biggles on November 11, 2015, 06:22:23 AM
It looks just like the real thing! (Although I am sure most pilots did not have the assurance of landing on carpet....!)
Title: Re: SMM 14th Anniversary X-Plane Cook-Up
Post by: Boomerang on November 11, 2015, 07:39:33 PM
Post by: Boomerang on November 11, 2015, 07:39:33 PM
Thanks Lou, Paul and Biggles.
Nearly finished.
Cheers
Gordon
Title: Re: SMM 14th Anniversary X-Plane Cook-Up
Post by: lastvautour on November 25, 2015, 10:42:19 AM
Post by: lastvautour on November 25, 2015, 10:42:19 AM
Have made your finishing touches yet?
Lou
Lou
Title: Re: SMM 14th Anniversary X-Plane Cook-Up
Post by: Boomerang on November 26, 2015, 01:28:24 AM
Post by: Boomerang on November 26, 2015, 01:28:24 AM
Just have to finish of the propeller blades and attach then to the spinners.
Gordon
Title: Re: SMM 14th Anniversary X-Plane Cook-Up
Post by: lastvautour on November 26, 2015, 10:51:06 PM
Post by: lastvautour on November 26, 2015, 10:51:06 PM
Thanks.
Lou
Lou
Title: Re: SMM 14th Anniversary X-Plane Cook-Up
Post by: Boomerang on December 03, 2015, 08:00:44 AM
Post by: Boomerang on December 03, 2015, 08:00:44 AM
Small set back with the propellers . Did the red/white /blue tips thought that was pretty good .
Got the Port propeller together and again thought that was pretty good . But alas on closer inspection of the drawings I have
in fact reversed the order so remedial action is currently taking place to reverse this.
Cheers
Gordon
Title: Re: SMM 14th Anniversary X-Plane Cook-Up
Post by: Boomerang on December 05, 2015, 10:07:25 PM
Post by: Boomerang on December 05, 2015, 10:07:25 PM
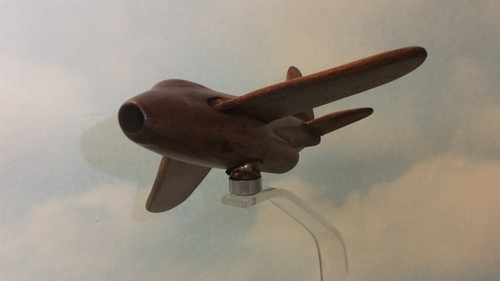
The V-173 is now complete.
Cheers
Gordon
Title: Re: SMM 14th Anniversary X-Plane Cook-Up
Post by: lastvautour on December 05, 2015, 10:50:03 PM
Post by: lastvautour on December 05, 2015, 10:50:03 PM
That is beautiful. This one was worth the wait. Thanks for sharing it with us.
Lou
Lou
Title: Re: SMM 14th Anniversary X-Plane Cook-Up
Post by: Boomerang on December 05, 2015, 11:00:56 PM
Post by: Boomerang on December 05, 2015, 11:00:56 PM
Thanks Lou,
On with the X-28
Cheers
Gordon
Title: Re: SMM 14th Anniversary X-Plane Cook-Up
Post by: Boomerang on June 04, 2016, 10:20:57 PM
Post by: Boomerang on June 04, 2016, 10:20:57 PM
Some progress finally on X-28.
Engine pylon and pod have been done . Just needs some fine tuning.
Propeller from a bamboo chopstick .
The " Airfix"1/72 Australian Vietnam "digger" will be modified to fill the cockpit.
Cheers
Gordon
Title: Re: SMM 14th Anniversary X-Plane Cook-Up
Post by: lastvautour on June 05, 2016, 09:20:22 PM
Post by: lastvautour on June 05, 2016, 09:20:22 PM
Looking great. Thanks for the update.
Lou
Lou
Title: Re: SMM 14th Anniversary X-Plane Cook-Up
Post by: buccfan on June 05, 2016, 09:46:00 PM
Post by: buccfan on June 05, 2016, 09:46:00 PM
Looking good Gordon. Regards Paul J.
Title: Re: SMM 14th Anniversary X-Plane Cook-Up
Post by: Biggles on June 21, 2016, 01:30:55 AM
Post by: Biggles on June 21, 2016, 01:30:55 AM
Great. hope that diggers got a head for hight's?..
Title: Re: SMM 14th Anniversary X-Plane Cook-Up
Post by: Boomerang on June 21, 2016, 09:20:14 PM
Post by: Boomerang on June 21, 2016, 09:20:14 PM
The Aussie Digger has always been adaptable.
Cheers
Gordon
Title: Re: SMM 14th Anniversary X-Plane Cook-Up
Post by: Biggles on June 22, 2016, 12:41:57 AM
Post by: Biggles on June 22, 2016, 12:41:57 AM
Ha ha yes, us aussies can do anything when were not feeling lazy...
Title: Re: SMM 14th Anniversary X-Plane Cook-Up
Post by: Boomerang on August 07, 2016, 02:41:39 AM
Post by: Boomerang on August 07, 2016, 02:41:39 AM
Engine pod added. some cleaning up to do.
Erstwhile pilot yet to be modified.
Cheers
Gordon
Title: Re: SMM 14th Anniversary X-Plane Cook-Up
Post by: lastvautour on August 08, 2016, 10:29:33 AM
Post by: lastvautour on August 08, 2016, 10:29:33 AM
Great to see your progress shots.
lou
lou
Title: Re: SMM 14th Anniversary X-Plane Cook-Up
Post by: Boomerang on August 25, 2016, 01:21:35 AM
Post by: Boomerang on August 25, 2016, 01:21:35 AM
Finally getting some colour onto it.
The Humbrol can is to lend some scale to the model. It is small.
Have to redo the decals . The originals I did look a bit small . Working on it.
Gordon
Title: Re: SMM 14th Anniversary X-Plane Cook-Up
Post by: lastvautour on August 25, 2016, 09:46:17 PM
Post by: lastvautour on August 25, 2016, 09:46:17 PM
Wonderful miniature. You do it justice.
Lou
Lou
Title: Re: SMM 14th Anniversary X-Plane Cook-Up
Post by: Boomerang on August 25, 2016, 10:29:14 PM
Post by: Boomerang on August 25, 2016, 10:29:14 PM
Thanks Lou.
It's taken a long time to get to this stage.
Gordon
Title: Re: SMM 14th Anniversary X-Plane Cook-Up
Post by: Boomerang on September 22, 2016, 06:04:20 AM
Post by: Boomerang on September 22, 2016, 06:04:20 AM
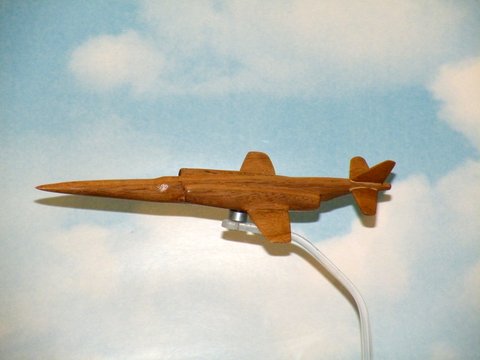
Finished....
Cheers
Gordon
Title: Re: SMM 14th Anniversary X-Plane Cook-Up
Post by: lastvautour on September 22, 2016, 11:14:31 AM
Post by: lastvautour on September 22, 2016, 11:14:31 AM
Magnificent modelling Gordon. Such a small craft yet captured faithfully. Congratulations.
Lou
Lou
Title: Re: SMM 14th Anniversary X-Plane Cook-Up
Post by: Model Maker on September 22, 2016, 02:09:30 PM
Post by: Model Maker on September 22, 2016, 02:09:30 PM
Gordon - I'm always amazed at the size of some of the models. The details and finished model are excellent!! Congratulations. It was worth the wait for the unveiling - ken
Title: Re: SMM 14th Anniversary X-Plane Cook-Up
Post by: Boomerang on September 22, 2016, 09:32:09 PM
Post by: Boomerang on September 22, 2016, 09:32:09 PM
Thank you Lou and Ken.
Took a while. I thought being small it would be a bit quicker.
I've had an X - 3 cut out for some time so I'll start that when the current projects are a bit further down the production line.
With the X-3 I'm going to "experiment" with Aluminum ( note the spelling) foil on the wings.
Cheers
Gordon
Title: Re: SMM 14th Anniversary X-Plane Cook-Up
Post by: Biggles on October 19, 2016, 02:22:50 AM
Post by: Biggles on October 19, 2016, 02:22:50 AM
Exquisite.
Title: Re: SMM 14th Anniversary X-Plane Cook-Up
Post by: Boomerang on April 25, 2018, 07:15:01 AM
Post by: Boomerang on April 25, 2018, 07:15:01 AM
Ok its taken a while and cook ups never close.
I said at the start of this one that I had cut some wood for an X-3.
I pulled what I had out on 2nd of April and started anew.
This one also is an experiment in using household aluminium foil for natural metal finish.
There is info on the internet.
I've used brushed PVA and put the dull side down.
I smoothed out both sides ( gloss and dull) to get rid of the stuff that the manufacturers put on.
If you have a go at this take your time when smoothing as you can "scrunch" it up very easily.
I applied the bottom surface first and left to totally dry. Then the top surface. New sharp blade to trim and soft tissue to polish.
Seemed to work OK. So on to cleaning up the rough fuselage.
Decals have been done but not printed.
Cheers
Gordon
Title: Re: SMM 14th Anniversary X-Plane Cook-Up
Post by: lastvautour on April 25, 2018, 02:03:27 PM
Post by: lastvautour on April 25, 2018, 02:03:27 PM
Wonderful results on the metal foil wings Gordon. I have tried it but without success.
Lou
Lou
Title: Re: SMM 14th Anniversary X-Plane Cook-Up
Post by: Model Maker on April 27, 2018, 02:17:58 AM
Post by: Model Maker on April 27, 2018, 02:17:58 AM
Very impressive Gordon!! I have read some articles on this method on the web as you indicated. Not sure I have the patience to apply, but may try on some scrap down the road. But the finish looks spectacular.
-ken
-ken
Title: Re: SMM 14th Anniversary X-Plane Cook-Up
Post by: Boomerang on April 30, 2018, 01:44:15 AM
Post by: Boomerang on April 30, 2018, 01:44:15 AM
Ken,
Did try it on some scrap first. Worked OK . Just nice to know that its a method that can be used.
It can be a bit fiddly when finishing off the edges.
Cheers
Gordon
Title: Re: SMM 14th Anniversary X-Plane Cook-Up
Post by: Oceaneer99 on April 30, 2018, 07:28:28 PM
Post by: Oceaneer99 on April 30, 2018, 07:28:28 PM
It is looking very good, Gordon!
Garet
Garet
Title: Re: SMM 14th Anniversary X-Plane Cook-Up
Post by: Boomerang on May 01, 2018, 06:57:01 AM
Post by: Boomerang on May 01, 2018, 06:57:01 AM
Thank You Garet .
More work required on Fuselage.
Gordon
More work required on Fuselage.
Gordon
Title: Re: SMM 14th Anniversary X-Plane Cook-Up
Post by: lastvautour on May 01, 2018, 11:43:39 AM
Post by: lastvautour on May 01, 2018, 11:43:39 AM
Just happen to be surfing one of my model sites.
https://www.facebook.com/photo.php?fbid=2115538048730128&set=pcb.1891999584157456&type=3&ifg=1
Lou
https://www.facebook.com/photo.php?fbid=2115538048730128&set=pcb.1891999584157456&type=3&ifg=1
Lou
Title: Re: SMM 14th Anniversary X-Plane Cook-Up
Post by: Boomerang on May 13, 2018, 07:01:20 AM
Post by: Boomerang on May 13, 2018, 07:01:20 AM
I've done some work on fuselage . More required.
Going away for a week . Will get back into it when I'm back.
Gordon
Title: Re: SMM 14th Anniversary X-Plane Cook-Up
Post by: Boomerang on January 06, 2019, 08:27:12 PM
Post by: Boomerang on January 06, 2019, 08:27:12 PM
Pulled the X-3 out again .
I've had to do some major rework of fuselage . Letting things dry while I'm away.
Printed some decals. Should be OK . Done on White decal paper.
Update as things progress.
Cheers
Gordon
Title: Re: SMM 14th Anniversary X-Plane Cook-Up
Post by: Boomerang on January 28, 2019, 06:41:25 AM
Post by: Boomerang on January 28, 2019, 06:41:25 AM
Managed to get the rework done on the fuselage.
I'll add some primer and clean things up . Hopefully should be finishing it shortly.
Picture to follow.
Cheers
Gordon
Title: Re: SMM 14th Anniversary X-Plane Cook-Up
Post by: lastvautour on January 28, 2019, 08:14:11 PM
Post by: lastvautour on January 28, 2019, 08:14:11 PM
Nice to see you back at it.
Lou
Lou
Title: Re: SMM 14th Anniversary X-Plane Cook-Up
Post by: Boomerang on February 03, 2019, 11:12:04 PM
Post by: Boomerang on February 03, 2019, 11:12:04 PM
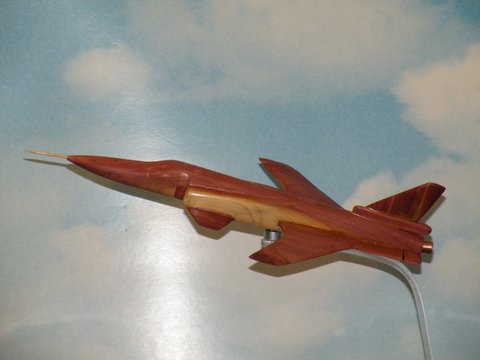
Finished..................
Title: Re: SMM 14th Anniversary X-Plane Cook-Up
Post by: lastvautour on February 04, 2019, 03:36:16 PM
Post by: lastvautour on February 04, 2019, 03:36:16 PM
Fantastic finish on the X-3. The metal wings are excellent.
Lou
Lou
Title: Re: SMM 14th Anniversary X-Plane Cook-Up
Post by: Boomerang on February 18, 2019, 04:33:55 AM
Post by: Boomerang on February 18, 2019, 04:33:55 AM
Thanks Lou. it was all a bit of an experiment
Gordon
Gordon
Title: Re: SMM 14th Anniversary X-Plane Cook-Up
Post by: lastvautour on February 18, 2019, 05:40:36 PM
Post by: lastvautour on February 18, 2019, 05:40:36 PM
The experiment had excellent results.
Lou
Lou